PSU-2448mk2 Power Supply Kit
PSU-2448mk2 Voltage Adjustment Guide
The voltages selected for this instruction assumes you’ll be using this PSU kit with the SC-1mk3 or X-12 preamp kit. If you’ll be
using this power supply with another project, adjust the output voltage accordingly to what you need.
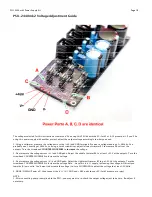
1. Using a voltmeter, measure the voltage across the (+48) and GND terminals. We want a voltage reading of +48Volts. You
probably won’t exactly get 48Volts, so using a small screwdriver, adjust leftmost trimmer R3 to measure 48 volts at the
outputs.
Turn the screwhead
COUNTERCLOCKWISE
to
increase
the voltage.
2. Next measure the voltage across (V+) and GND pads. Adjust the middle trimmer R6 to at least +20V at the outputs. Turn the
screwhead COUNTERCLOCKWISE to Increase the voltage
3. Next measure the voltage across (V-) and GND pads. Adjust the rightmost trimmer R7 to get –20V at the outputs. Turn the
screwhead COUNTERCLOCKWISE to Increase the voltage Note... since this is a (-) supply, increasing the voltage will direct you
towards (0) zero volts. You'd want to decrease the voltage (i.e. turn CLOCKWISE) to adjust the voltage to at least -20Volts.
4. DONE!
FINISH!
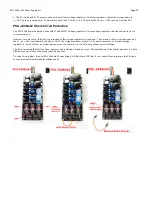
Power o
ff
, then connect the (V+), (V-), GND and +48V pads to your SC-1mk3 preamp or project.
NOTE:
1. After connecting your preamp/load to the PSU… you may want to re-check the output voltages just to be sure. Re-adjust if
necessary.
Page 18


