


OPERATING INSTRUCTIONS
The HEPA Air Cleaner is designed to run continuously
to provide clean, filtered air 24 hours a day. The fan on
the heating/cooling system, to which the HEPA Air
Cleaner is dependent on for circulated air, should be
on ‘continuous’.
Note:
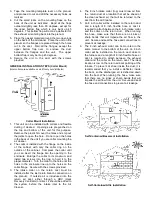
If the system fan setting is on ‘automatic’, it is
recommended the HEPA Air Cleaner be operated
through an air switch or relay to turn the Air Cleaner
off, when there is no system fan on.
The unit plugs into a regular 120 volt outlet and is
controlled by a switch located on the bottom of the unit,
near the cord.
Note:
Do not allow the cord to be placed where it may
be walked on or allow anything to roll over it.
The door must be secured for the Air Cleaner to
operate. All filters must be in place for the unit to
operate properly.
MAINTENANCE
For efficient operation, the filters must be changed on a
regular basis. If you notice a reduction in air flow from
the system, check the filters.
1. To access the filters, turn the Air Cleaner
OFF
at
the switch and remove the front door.
2. Carefully remove filters to avoid spilling of collected
contaminants. Dispose of filters in a plastic bag
and discard with regular household trash.
3. Remove plastic from new filters before installing.
Discard plastic safely. Take care not to damage
the filters. Hold by the frame only.
4. Date the replacement filter in the space provided.
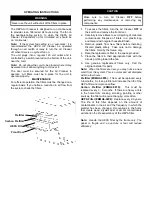
5. Place the filters in their appropriate track with the
arrows pointing toward the fan.
6. Use genuine replacement filters only. Call the
original installer for parts.
Note:
When the filters are new, you may notice a new
smell from the system. This is normal and will dissipate
within a few hours.
Prefilter (#DMH4-0855):
This must be replaced every
3-6 months. A clean prefilter will increase the life of the
HEPA filter and improve airflow.
Carbon Prefilter (#DMH4-0810):
This must be
replaced every 3 - 6 months. If there are heavy odors
in the home from cooking, smoking, painting or other
sources, the filter will require changing more often.
HEPA Filter (#DMH4-0400):
Replace every 2-3 years.
The life of this filter depends on the amount of
contaminants in the air and the frequency in which the
prefilter has been changed. Renovations in the home
that create wood, drywall dust or similar contaminants
will shorten the life expectancy of the HEPA filter.
Note:
Handle the HEPA filter by the frame only. The
paper is fragile and a puncture or tear will reduce
efficiency.
WARNING
Never use the unit without all of the filters in place.
CAUTION
Make sure to turn Air Cleaner
OFF
before
performing any maintenance or removing any
components.
Prefilter
Carbon Prefilter
HEPA Filter
Front Door