background image


Step 1 

 
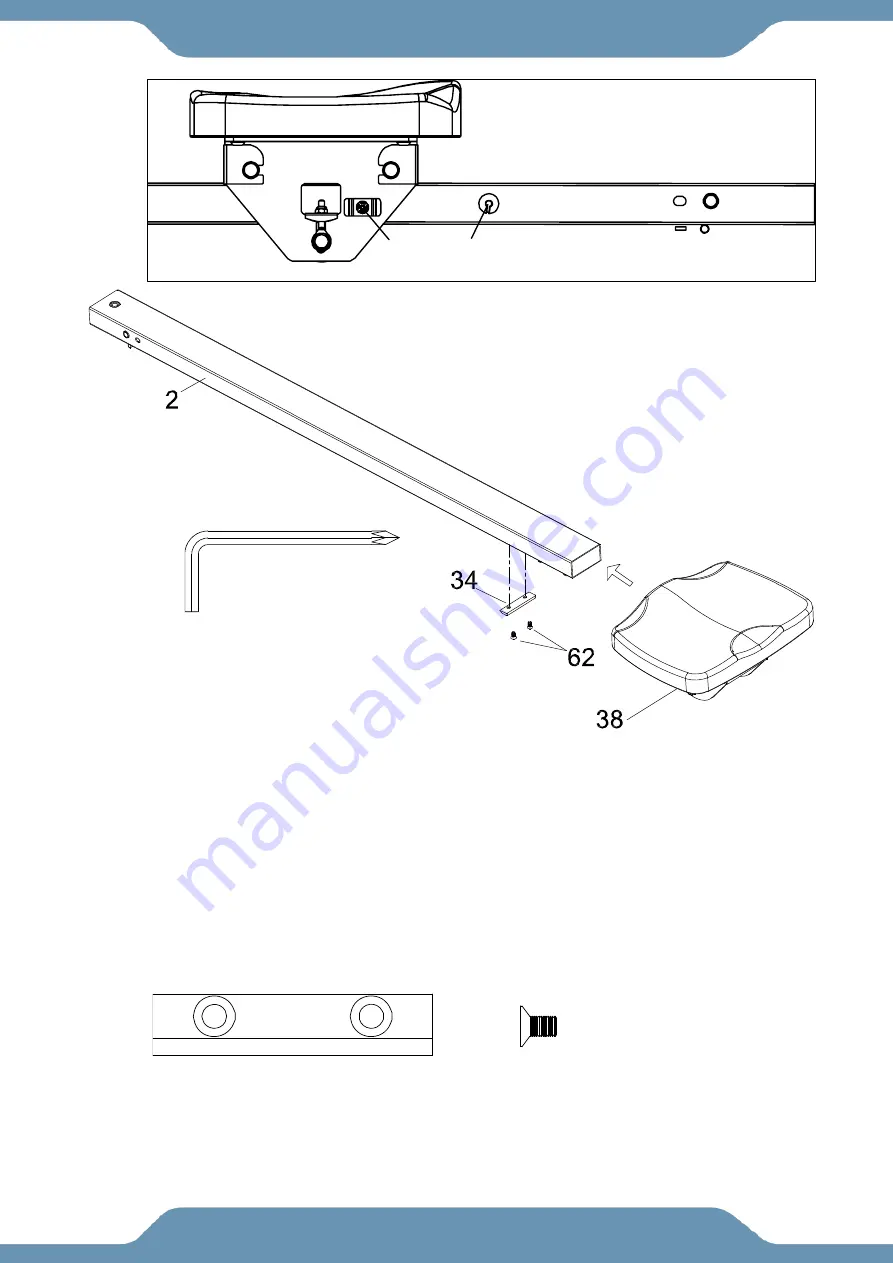
1A. Installing the Seat   

Slide the

 Seat (38) 

onto the 

Sliding Tube (2).

 Make sure 

Magnet (69)

 and 

Sensor (41)

 are on the 

same side when installing the 

Seat (38)

SEE Fig. A.


Attach the 

Rubber Pad (34)

 onto the underside of the 

Sliding Tube (2) 

with two 

Socket Phillips 

Screws (62). 

Tighten using the 

5mm Allen Wrench with Phillips Screwdriver 

provided. 


NOTE:

 The narrow edge of the 

Rubber Pad (34) 

should be pointing towards the 

Seat (38).


ASSEMBLY 


Hardware: 

(34) Rubber Pad   

1 PC 

(62) Socket Phillips 

Screw 

2 PCS 

5mm Allen Wrench with 

Phillips Screwdriver      1PC 

Tool: 

41

69

Fig. A 

IMPORTANT!!! 

Summary of Contents for 2636

Page 1: ...l instructions carefully before using this product Retain this owner s manual for future reference The specifications of this product may vary from this photo subject to change without notice 2636 7 060920 ROWER MACHINE ...

Page 2: ...PLEASE DO NOT RETURN THIS PRODUCT TO THE STORE STOP Contact customer service if you have any questions regarding assembly or proper operation of the machine Email us at Service paradigmhw com ...

Page 3: ...IMPORTANT SAFETY GUIDELINES 4 OVERVIEW DRAWING 5 PARTS LIST 6 HARDWARE PACK 8 ASSEMBLY 9 CONSOLE 15 WORKOUT 16 ADJUSTMENTS TRANSPORTING 17 STORAGE 18 TROUBLESHOOTING MAINTENANCE 29 WARRANTY 20 PARTS REQUEST FORM 21 TABLE OF CONTENT ...

Page 4: ...st method to receive a response during peak business hours Website www paradigmhw com Toll Free 1 844 641 7920 8 00 AM 5 00 PM Pacific Standard Time Monday thru Friday Response time may vary via calling Please have the following information ready when requesting for service Your name Phone number Model number Serial number Part number Proof of Purchase For damaged or defective product please conta...

Page 5: ...3 LABEL PLACEMENT ...

Page 6: ... Service Servicing should be performed by an authorized service representative Our contact number is on the service page 15 This product requires a minimum of 6 square feet of space for safe operation 16 ASSEMBLE ALL HARDWARE IN THE ORDER THAT IS SHOWN IN THE ILLUSTRATIONS Serious bodily injury can occur if this equipment is not assembled and used correctly 17 Warning Risk of Personal Injury Keep ...

Page 7: ...5 OVERVIEW DRAWING ...

Page 8: ... 1 15 Flat Washer OD12 ID6 5 1 5 2 45 Flat Washer OD25 ID12 5 2 0 1 16 U Bracket 4 46 Hex Bolt Ø10 95 M6 1 17 Belt6PJ250 1 47 Safety Pin Ф11 7 Ф8 106 1 18 Wire Plug 1 48 Bushing Ф10 Ф6 1 40 2 19 End Cap 2 49 Hex Bolt M6 55 2 20 Foot Pad 1 50 Hex Bolt M12 Ф12 5 160 4 21 Handlebar Bracket 1 51 Eye Bolt M6 40 4 22 Belt Pulley 1 52 Spring Washer ID8 5 1 5 4 23 Drawstring Pulley 1 53 Bolt M8 16 4 24 Sp...

Page 9: ...n BearingHR1712 1 66 Wheel Ф50 35 1 81 Round Head Hex BoltM8 20 4 67 Bearing 608ZZ 6 82 C Ring Ø10 5 68 BushingOD15 ID8 0 4 1 6 83 Wave WasherOD13 5 ID10 2 0 4 3 69 MagnetФ15 7 1 84 Bearing 16003 1 70 Hex Bolt M8 125 3 85 Console 1 71 Flat WasherOD12 ID5 5 1 5 1 86 Console Bracket 1 72 Rolling Wheel 3 87 5mm Allen Wrench 1 73 Self Tapping Phillips Screw ST4 0 12 2 88 6mm Allen Wrench 1 74 Phillips...

Page 10: ...8 HARDWARE TOOLS PACK ...

Page 11: ...ubber Pad 34 onto the underside of the Sliding Tube 2 with two Socket Phillips Screws 62 Tighten using the 5mm Allen Wrench with Phillips Screwdriver provided NOTE The narrow edge of the Rubber Pad 34 should be pointing towards the Seat 38 ASSEMBLY Hardware 34 Rubber Pad 1 PC 62 Socket Phillips Screw 2 PCS 5mm Allen Wrench with Phillips Screwdriver 1PC Tool 41 69 Fig A IMPORTANT ...

Page 12: ... the underside of the Sliding Tube 2 with four Flat Washers 55 four Spring Washers 52 and four Round Head Hex Bolts 81 Tighten using the 6mm Allen Wrench provided ASSEMBLY 6mm Allen Wrench 1PC Tool Hardware 55 Flat Washer 4 PCS 81 Round Head Hex Bolt 4 PCS 52 Spring Washer 4 PCS ...

Page 13: ...er 3 onto the Main Frame 1 with two Flat Washers 55 and two Round Head Hex Bolts 65 Tight using the 5 mm Allen Wrench with Phillips Screwdriver provided ASSEMBLY 5mm Allen Wrench with Phillips Screwdriver 1PC Tool 55 Flat Washer 2 PCS 65 Round Head Hex Bolt 2 PCS Hardware ...

Page 14: ...h the center of the Pedal 12 then slide a Bushing 64 onto the end of that Hex Bolt 50 Attach the group of parts to the TOP bolt hole on the left side of the Main Frame 1 Tighten using the Open Wrench provided Repeat for the left side NOTE The heel of the Pedals 12 will rest on the lower Hex Bolt 50 ASSEMBLY Hardware 50 Hex Bolt 4 PCS 64 Pedal Bushing 2 PCS LOW TOP Tool Open Wrench 1PC ...

Page 15: ...hrough the frame and attach one Round Head Hex Bolt 57 Tighten using the 5mm Allen Wrench with Phillips Screwdriver and 6mm Allen Wrench provided Insert the Safety Pin 47 to align and secure the Main Frame 1 and the Sliding Tube 2 Further secure the Main Frame 1 and Sliding Tube 2 with one Flat Washer 45 and one Round Knob 44 ASSEMBLY 5mm Allen Wrench with Phillips Screwdriver 1PC 6mm Allen Wrench...

Page 16: ...le out There are wires connecting the console to the internal speed sensor Open the Velcro straps and install the batteries The positive and negative poles are labeled in the image above After installing the batteries secure the batteries in place with the Velcro strap Make sure the consoles wires are securely clipped together and then reinsert the console Lorem ipsum ASSEMBLY Tool Open Wrench 1PC...

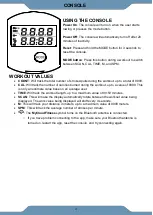
Page 17: ... burned during the workout up to a value of 9999 This is only an estimate value base on an average user TIME Will track the workout length up to a maximum value of 99 59 minutes SCAN This will make the display automatically rotate between the workout value being displayed The work value being displayed will shift every 4 seconds M This will track your distance in meters up to a maximum value of 99...

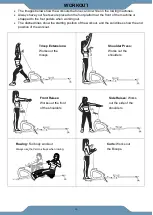
Page 18: ...working out The dashed lines show the starting position of the workout and the solid lines show the end position of the workout Front Raises Works out the front of the shoulders Side Raises Works out the side of the shoulders Shoulder Press Works out the shoulders Tricep Extensions Works out the triceps Rowing Full body workout Always use the Velcro straps when rowing Curls Works out the Biceps WO...

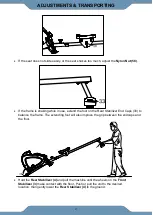
Page 19: ...s 33 to balance the frame The extending foot will also improve the grip between the endcaps and the floor Hold the Rear Stabilizer 4 and pull the machine until the wheels on the Front Stabilizer 3 make contact with the floor Push or pull the unit to the desired location then gently lower the Rear Stabilizer 4 to the ground ADJUSTMENTS TRANSPORTING Lorem ipsum Lorem ipsum ...

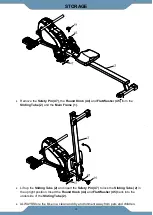
Page 20: ...the upright position Insert the Round Knob 44 and Flat Washer 45 back into the underside of the Sliding Tube 2 ALWAYS Store the bike in a clean and dry environment away from pets and children Remove the Safety Pin 47 the Round Knob 44 and Flat Washer 45 from the Sliding Tube 2 and the Main Frame 1 ...

Page 21: ... noise when in use o SOLUTION The bolts may be loose on the equipment Please inspect all of the nuts bolts screws and tighten any loose Hardware o SOLUTION The change the resistance levels to the lowest setting and see if the noise continues Contact Customer service for future assistance PROBLEM The console is on but it is not tracking my workout The strokes are not counting up o SOLUTION Make sur...

Page 22: ...ny act of Nature such as fire flooding snow ice hurricane earthquake lightning or other natural disaster environmental condition such as air pollution mold mildew etc or staining from foreign substances such as dirt grease oil etc 6 Normal weathering due to exposure to sunlight weather and atmosphere which can cause colored surfaces to among other things flake chalk accumulate dirt or stains 7 Imp...

Page 23: ..._____________________________________________________ Night ________________________________________________________ SERIAL ____________________________________________________________________ MODEL ____________________________________________________________________ PURCHASE DATE ____________________________________________________________ PLACE OF PURCHASE _______________________________________...

Reviews: