


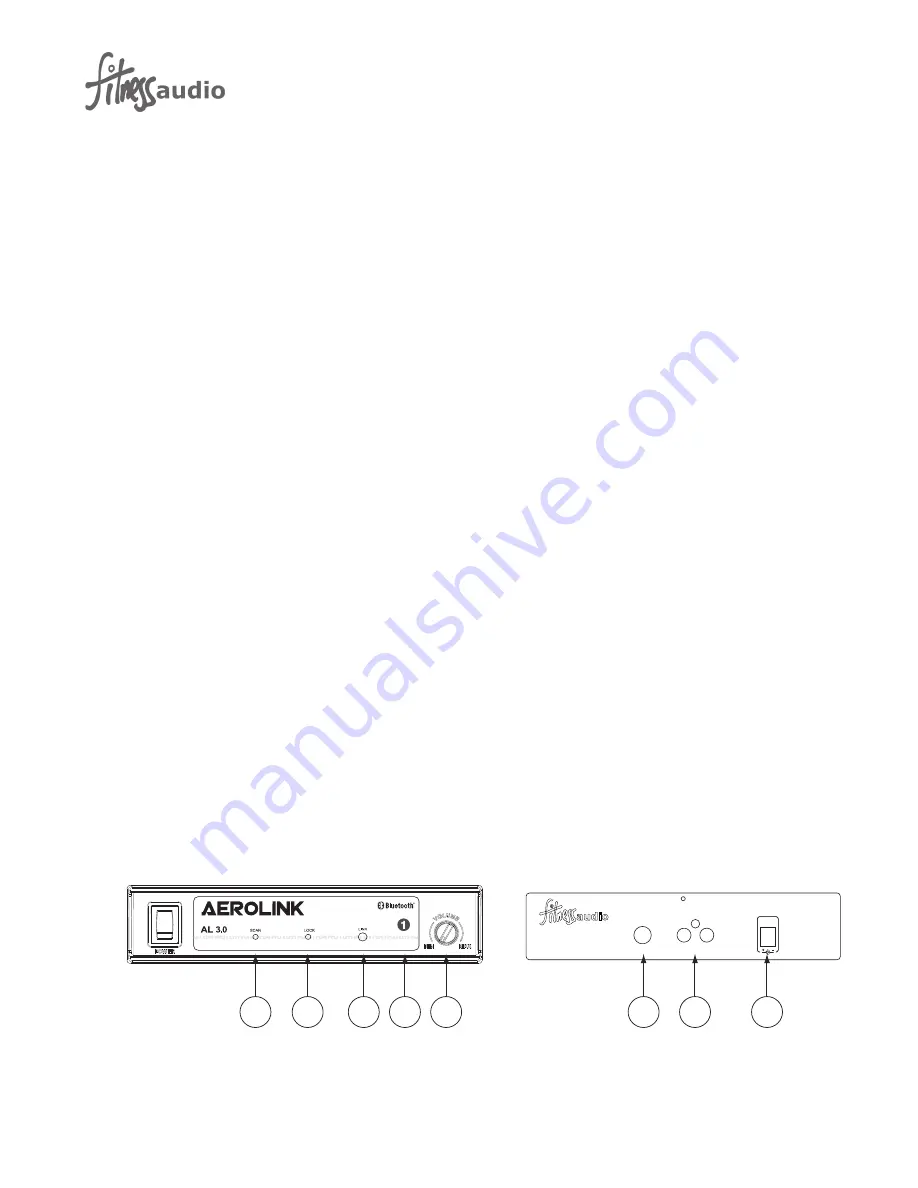
AUX OUT
DC IN
12V
LINE OUT
1
3
2
6
5
4
8
7
AL 3.0 Aerolink Bluetooth® Receiver
Thank you for purchasing the Aerolink by Fitness Audio. This product is easy to install by
anyone one who is familiar with setting up sound systems. It is now available in 1 of 4 sepa-
rate IDs: Aerolink1, Aerolink2, Aerolink3 and Aerolink4. They can be identified in 3 ways - 1) A
Blue Dot on the Silver Label on the side of the carton is the first indication of the id number;
2) you will see a black number in a white circle on the right hand side of the front panel
once you have unpacked the unit; and 3) the Bluetooth Device signature for the product
when you pair it with your smartphone, pc or tablet. The 4 separate id versions can all be
used under the same roof in adjacent rooms without any conflict in pairing - you will be
pairing with the one who’s number is shown on the front panel you are looking at.
1. Powering It Up.
The Aerolink can be powered from any 12V500mA already in use in the audio system like
those that power the Wireless Mic Receiver using the DC “Y” Cable supplied. Alternatively, if
you purchased the unit with an optional 12V DC Power Supply then please plug that into a
GPO and DC connector into the Power In socket (1).
2. Connecting to a Mixer.
Connect using either the Stereo (TRS) Line Out Jack (3) or the 2 RCA sockets(2) to your mix-
er’s matching Line Input sockets. A standard 2RCA to 2RCA Cable is provided.
3. Turn it on and linking up.
When you turn it on, the blue Power-on light in the switch illuminates and the 2 blue LEDs
will start flashing once you have pushed the Blue LINK button (6). The first, “SCAN” LED(4) is
searching for a smartphone or player to pair with, so, open your smartphone, go to Settings,
select Bluetooth, turn Bluetooth on and watch it search for devices. After a few seconds the
words Aerolink1 will appear and Not Connected will soon change to Connected and the
SCAN LED will stop flashing. The second, “LOCK LED”(5) will continue to flash confirming the
link is good. Go to your music file on the device and select the Playlist you want to use and
press Play. If the sound system is turned on and the Aerolink has been selected then you will
hear the music so set the volume and you are all done. Please note that the Volume Control
(7) on the front Panel of the Aerolink is a “Turn Down” Attenuator so should always be on
MAX unless a better cleaner sound with the Mixer or Amp input you are using is achieved
with it set at the 12 o’clock position.
4. Re-setting the Link
Once you take the linked device out of the range of the receiver (around 8 meters or 25 feet)
you will need to re-scan and connect again. Press the Blue Button to break a link and to start
a new linking process again.
Key To Illustration:
1. DC Input
2. RCA Outputs
3. ¼” Stereo Jack Output
4. SCAN LED
5. LOCK LED
6. LINK button
7. ID Number
8. Volume Control
Summary of Contents for Aerolink AL 3.0
Page 1: ...Operating Manual AL 3 0 ...


