background image

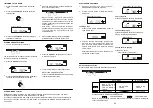
To repeat a track or disc

Random play function

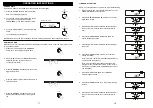
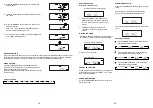
PROGRAMMED PLAYBACK

The CD player enables you to program up to 40 tracks in a sequence of your choice. First select CD stop
mode.

1.

Press the MEMORY button on remote control
one time.

3.

Press the MEMORY button again, then track 4
is stored.

2. Press the SKIP forward or backward buttons to

select the desired track to be programmed.

4.

Continue to program, repeat steps 2 and 3.

Press PLAY/PAUSE button to play the program
tracks.

5.

23

Press REPEAT button on remote control:

Press once for one track repeat

Press RANDOM button on remote control in stop
condition to start random play. Press once again to
cancel the function.

Note: Random play can not operate while playing
programmed tracks.

Random playing start

Intro play function

In stop condition, press the INTRO button on
remote control. After that the first 10 seconds of
each song will be played.
If the INTRO button is pressed again, the CD will
change to normal playing mode.

Intro playing

Program input mode

Choose track 4

Note: If the program function has stopped with
MEMORY indicator displayed, press the PLAY/
PAUSE button, the program play will start.

Clear the program

In stop mode, press the STOP button once, the
MEMORY indicator will go off and the preset
programs will be cancelled.

Press twice to repeat all tracks
in playing disc

Press three times to repeat tracks
in all discs

With one further press, the repeat
mode is cancelled.

24

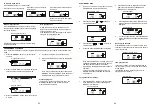
PLAYING MP3 DISC

Switch on the power and press the PLAY/
PAUSE button to select the CD mode.

After reading TOC

Press the FOLDER        or        buttons to
select desired album.

1.

2.

3.

4.

To repeat a track or Folder

Press the REPEAT Button on remote control
once, MP3 plays one track repeatedly and
“REPEAT” is displayed.

Press this button twice, MP3 plays all tracks
within the selected album repeatedly and
“REPEAT ALL” is displayed.

Press this button three times, MP3 plays all
tracks on the disc and REPEAT ALL DISC is
displayed.

To cancel repeat function, Press the REPEAT
button repeatedly until repeat function display
goes off.

1.

2.

3.

4.

Random play function

Press RANDOM button on remote control in stop
condition to start random play. Press once again to
cancel the function.

Random playing start

One track repeat

All track repeat

All disc repeat

Intro play function

In the stop condition, press the INTRO button on
remote control. The first 10 seconds of each song
will be played.
If the INTRO button is pressed again, normal
playing mode will resume.

Intro playing

Press the SKIP             or             buttons to
select desired track.

Press the PLAY/PAUSE button to play MP3.

Note: When an MP3 disc is playing, press and
hold the MP3 MODE button, and the track no.,
title and artist information will be shown
repeatedly in the display if disc information is
available.
To resume normal play display, press the
MP3 MODE button repeatedly until playing
time appears.

Summary of Contents for DS24425

Page 1: ...INSTRUCTION MANUAL SLIM3010 ...

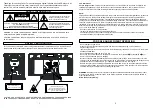
Page 2: ...imits for a Class B digital device pursuant to Part 15 of the FCC Rules These limits are designed to provide reasonable protection against harmful interference in a residential installation This equipment generates uses and can radiate radio frequency energy and if not installed and used in accordance with the instructions may cause harmful interference to radio communications However there is no ...

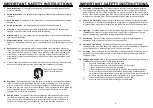
Page 3: ...nstructions 10 11 S3125A PORTABLE CART WARNING symbol provided by RETAC 4 Grounding or Polarization This product may be equipped with a polarized alternating current line plug a plug having one blade wider than the other This plug will fit into the power outlet only one way This is a safety feature If you are unable to insert the plug fully into the outlet try reversing the plug If the plug should...

Page 4: ... Wall or Ceiling Mounting The product should be mounted to a wall or ceiling only as recommended by the manufacturer Heat The product should be situated away from heat sources such as radiators heat registers stoves or other products including amplifiers that produce heat Nonuse Periods Unplug the product s power cord when you will not use it for an extended period 19 20 21 22 23 CONNECTIONS AUDIO...

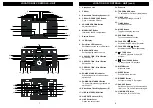
Page 5: ...hes off 10 11 12 TUNER BAND Button To select AM or FM tuner radio modes LINE Button Activates operating mode LINE MODE Button Toggles the display contents SUREWAKE Button Turns on surewake function FOLDER UP Button Activates the MP3 album Forward FOLDER DOWN Button Activates the MP3 album Backward STOP Button To stop CD playback or clear CD program PLAY PAUSE Button To play or pause CD playback 14...

Page 6: ...ation search Backward CD reverse title selection reverse search operation MP3 MODE Button Selects MP3 TITLE ARTIST or ALBUM AC Socket Main power connection NOTE If the system is connected to the power voltage part of the machine is in operation due to the stand by function In order to switch off the system completely pull out the power plug from the power socket 44 43 Wall Mounting Holder Center u...

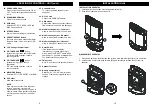
Page 7: ...want to hang the center unit Drill 2 holes slightly undersized for a firm fit Secure the bracket on the wall using 2 dowels and 2 screws supplied The mounting screws should be anchored into solid wall support such as wood frame or concrete wall Mount the center unit onto the wall bracket Make sure the mounting tab on the center unit fits securely into the mounting slot on the wall bracket Screws a...

Page 8: ...alls CD tracks 55 56 57 58 59 60 61 62 63 64 65 66 67 68 69 73 FOLDER Button Selects MP3 album reverse PLAY PAUSE Button To play CD start CD playback short interruption of CD playback MUTE Button Mutes the sound VOLUME Button Increases volume CD TUNER SKIP Button Manual tuning up to stations station search operation Forward CD forward title selection forward search operation 70 71 72 74 75 76 77 M...

Page 9: ...teries not supplied Observe and signs Remember to replace the battery compartment lid 3 AA size batteries CAUTION WHEN INSTALLING BATTERIES To prevent leakage from the batteries leakage is corrosive and can cause personal injury and damage to the unit observe the following precautions The batteries must be installed correctly Match the polarities and signs on the batteries to the polarities shown ...

Page 10: ...f the unit to standby mode before disconnecting main power supply from the unit MEMORY MEMORY MEMORY POWER STANDBY POWER STANDBY TIMER ON OFF SETTING 18 NOTE The clock should be set before the Timer On Off setting Press the SKIP forward or backward buttons to adjust the hour Be sure to set the hour correctly for AM or PM Press the SKIP forward or backward buttons to adjust the minute Press the MEM...

Page 11: ...control display Press VOLUME UP or DOWN button to adjust sound level the volume level MIN 01 59 MAX will be shown in the LCD display Holding down the button will result in continuous increase or decrease of the volume 1 2 MUTING FUNCTION If the MUTE button is pressed the audio output will be muted and MUTE indicator will be displayed Press once more to cancel Cancel Muting Switching the display Pr...

Page 12: ...ou wish to store 3 Press the PRESET REPEAT button repeatedly to set the desired preset station number 5 To store other stations repeat above steps RECALLING PRESET STATION Press the PRESET REPEAT button repeatedly to select the desired station 21 FM BAND PRESET REPEAT Switch on the power and press the PLAY PAUSE button to select the CD mode IN PLAY MODE PRESS ONCE PRESS TWICE IN STOP MODE PRESS ON...

Page 13: ...g disc Press three times to repeat tracks in all discs With one further press the repeat mode is cancelled 24 PLAYING MP3 DISC Switch on the power and press the PLAY PAUSE button to select the CD mode After reading TOC Press the FOLDER or buttons to select desired album 1 2 3 4 To repeat a track or Folder Press the REPEAT Button on remote control once MP3 plays one track repeatedly and REPEAT is d...

Page 14: ...lint free dry cloth Never use detergents or adhesive cleaners to clean the disc If necessary use a CD cleaning kit If disc skips or gets stuck on a section of the disc it is probably dirty or damaged scratched When cleaning the disc wipe in straight lines from the centre of the disc to the edge of the disc Never wipe in a circular motion To remove a disc from its storage case press down on the cen...

Page 15: ...ts this FISHER product against defects in materials and workmanship for the periods of LABOR and PARTS specified below SFC will repair or replace at its option the product and any of its parts which fail to conform to this warranty with new or reconditioned products or parts This warranty period commences on the date the product was first purchased at retail This warranty does not cover A the adju...

Reviews: