background image

8

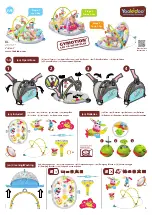
• Press the pad edges onto the fasteners on the seat.

• Presionar los bordes de la almohadilla en los sujetadores 

del asiento.

10

PRESS

PRESS

PRESIONAR

PRESIONAR

PRESS

PRESS

PRESIONAR

PRESIONAR

Assembly    Montaje   

Care    Mantenimiento

Unfasten

Desajustar

To remove the pad and infant support:

• Unbuckle the restraint system.
• Unfasten the pad button holes from the seat brackets.
• Unbuckle the straps on the pad.
• Pull the pad off the fasteners.
• Pull the restraint system down through the slots in the pad and 

infant support. Remove the pad from the seat.

• To replace the pad, follow the assembly instructions.

Para quitar la almohadilla y el cojín de soporte infantil:

• Desabrochar el sistema de sujeción.
• Desajustar los orificios de botón de la almohadilla de las 

abrazaderas del asiento.

• Desabrochar los cinturones de la almohadilla.
• Separar la almohadilla de los sujetadores.
• Jalar hacia abajo el sistema de sujeción por las ranuras de la 

almohadilla y el cojín de soporte infantil. Quitar la almohadilla del 
asiento.

• Para regresar la almohadilla a su lugar, seguir las instrucciones 

de montaje.

• The pad and toy are machine washable. Wash separately in cold 

water on the gentle cycle. Do not use bleach. Tumble dry separately 
on low heat and remove promptly.

• The frame may be wiped clean using a mild cleaning solution and 

a damp cloth. Do not use bleach. Do not use harsh or abrasive 
cleaners. Rinse clean with water to remove residue.

• La almohadilla y juguete se pueden lavar a máquina. Lavarlos por 

separado en agua fría, en ciclo para ropa delicada. No usar 
blanqueador. Meter la almohadilla a la secadora por separado 
a temperatura baja y sacarla inmediatamente después de 
finalizado el ciclo.

• Limpiar el armazón con un paño humedecido en una solución 

limpiadora neutra. No usar blanqueador. No usar limpiadores 
fuertes o abrasivos. Enjuagar con agua para eliminar el residuo.

Unbuckle

Desabrochar

Summary of Contents for W9442

Page 1: ...ons may vary from photographs Product features and decorations may vary from photographs IMPORTANTE IMPORTANTE Guardar estas instrucciones para futura referencia Guardar estas instrucciones para futura referencia Leer estas instrucciones antes de ensamblar y usar este producto Leer estas instrucciones antes de ensamblar y usar este producto Requiere montaje por un adulto Ver el dorso de esta hoja ...

Page 2: ...fornia Caracas 1071 ARGENTINA Mattel Argentina S A Curupaytí 1186 1607 Villa Adelina Buenos Aires COLOMBIA Mattel Colombia S A calle 123 7 07 P 5 Bogotá PERÚ Mattel Perú S A Av República de Panamá N 3531 Oficina 1003 San Isidro Lima Perú RUC 20425853865 Reg Importador 01720 10 JUE DIGESA AYUDA AL CONSUMIDOR 1 800 432 5437 US Fisher Price Inc 636 Girard Avenue East Aurora NY 14052 Hearing impaired ...

Page 3: ...El incumplimiento de estas advertencias e instrucciones puede resultar en lesiones graves o la muerte SIEMPRE usar el sistema de sujeción SIEMPRE usar la almohadilla proporcionada que incluye el sistema de sujeción NO añadir un colchón almohada edredón o almohadilla PELIGRO DE ASFIXIA Los niños pequeños se pueden asfixiar En los espacios entre un colchón adicional y el lado del producto En ropa de...

Page 4: ...jeción To tighten the waist belts Feed the anchored end of the waist belt up through the buckle to form a loop A Pull the free end of the waist belt B To loosen the waist belts Feed the free end of the waist belt up through the buckle to form a loop A Enlarge the loop by pulling on the end of the loop toward the buckle Pull the anchored end of the waist belt to shorten the free end of the waist be...

Page 5: ...lugar Jalar hacia arriba la conexión para asegurarse de que está segura IMPORTANT Before assembly and each use inspect this product for damaged hardware loose joints missing parts or sharp edges DO NOT use if any parts are missing or broken Contact Fisher Price for replacement parts and instructions if needed Never substitute parts Hint You may need the help of another adult to steady the product ...

Page 6: ...e nuevo Hub Tubes Tubos con conexión Base Tube Tubo de la base PRESS PRESS PRESIONAR PRESIONAR PRESS PRESS PRESIONAR PRESIONAR Assembly Montaje 4 While pressing the buttons on the upper hub tubes insert them into the tubes on the seat Hint The seat is easier to assemble if the base remains in the folded position Make sure each button on the hub tubes snaps into place Pull up on the seat to be sure...

Page 7: ...st Belt Waist Belt Cinturón de Cinturón de la cintura la cintura Waist Belt Cinturón de la cintura Waist Belt Cinturón de la cintura Slots Slots Ranuras Ranuras Fold the top of the pad up to fit it back into the seat Fit the button holes on the pad around the brackets on the seat Doblar hacia arriba la parte de arriba de la almohadilla para volver a ajustarla en el asiento Ajustar los orificios de...

Page 8: ...illa de los sujetadores Jalar hacia abajo el sistema de sujeción por las ranuras de la almohadilla y el cojín de soporte infantil Quitar la almohadilla del asiento Para regresar la almohadilla a su lugar seguir las instrucciones de montaje The pad and toy are machine washable Wash separately in cold water on the gentle cycle Do not use bleach Tumble dry separately on low heat and remove promptly T...

Reviews: