background image

W471

5pr

-0721

14

Troubleshooting • Solución de problemas • Guide de dépannage 

Î

 service.fi sher-price.com

A

B

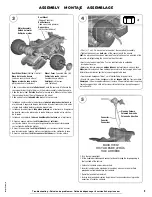
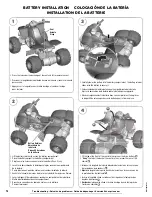
BATTERY INSTALLATION     COLOCACIÓN DE LA BATERÍA

INSTALLATION DE LA BATTERIE

• 

Press the tab under the back edge of the seat and lift to remove the seat.

• 

Presionar la lengüeta abajo del borde trasero del asiento y levantar el asiento 
para sacarlo.

• 

Appuyer sur la languette sous l’arrière du siège, et soulever le siège 
pour l’enlever.

• 

Lift the battery retainer to access the battery compartment.

• 

Place the battery upright in the battery compartment.

• 

Plug the motor harness connector into the battery. Push firmly.

• 

Levantar la abrazadera de la batería para lograr acceso al compartimento 
de la batería.

• 

Poner la batería en posición vertical en el compartimento de la batería.

• 

Enchufar el conector del arnés del motor en la batería. Empujar con firmeza.

• 

Lever le dispositif de retenue pour accéder au compartiment de la batterie.

• 

Mettre la batterie debout dans son compartiment.

• 

Brancher le connecteur du câble du moteur sur la batterie. 
Pousser fermement.

Seat
Asiento
Siège

Battery Retainer
Abrazadera de 
la batería
Dispositif de retenue 
de la batterie

1

2

• 

Carefully lower the battery into the battery compartment. The battery retainer 
slides over the battery to secure it.

• 

Colocar cuidadosamente la batería en el compartimiento de la batería. 
Ajustar la abrazadera de la batería sobre la batería para asegurarla.

• 

Abaisser soigneusement la batterie dans son compartiment. Faire glisser 
le dispositif de retenue par-dessus la batterie pour la fixer en place.

3

4

• 

Fit the tab at the front of the seat into the slot near the drive buttons 

A

.

• 

“Snap”

 the tab at the back of the seat into the slot near the rear of the 

vehicle 

B

.

• 

Introducir la lengüeta de la parte delantera del asiento en la ranura cerca 
de los botones para conducir 

A

.

• 

Ajustar

 la lengüeta de la parte de atrás del asiento en la ranura cerca de 

la parte de atrás del vehículo 

B

.

• 

Insérer la languette située sur le devant du siège dans la fente près des 
boutons de marche 

A

.

• 

Enclencher

 la languette située à l’arrière du siège dans la fente près de 

l’arrière du véhicule 

B

.

Summary of Contents for W6212 Power Wheels

Page 1: ...acid battery included Requires 1 12V charger included Funciona con 1 batería de 12V 9 5Ah de 6 células de plomo ácido sellada que no derrama líquido incluida Funciona con 1 cargador de 12V incluido Fonctionne avec une batterie au plomb à bac hermétique de 12 V 9 5 Ah 6 cellules fournie Fonctionne avec un chargeur de 12 V fourni Please read this manual and save it with your original sales receipt L...

Page 2: ...ea y detiene la operación del vehículo si este está sobrecargado o si las condiciones de manejo son muy severas Después de que un fusible se bloquea quitar el pie del pedal y esperar 25 segundos antes de echar a andar el vehículo otra vez Para evitar bloqueos automáticos seguidos evitar condiciones de manejo severas Si el fusible térmico de la batería se bloquea continuamente bajo condiciones de m...

Page 3: ...eas must be away from swimming pools and other bodies of water to prevent drownings generally level to prevent tipovers away from steps steep inclines cars roads and alleys Riding rules Make sure children know and follow these rules for safe driving and riding Always sit on the seat Always wear shoes Only 1 rider at a time Prévenir les blessures et la mort N utiliser que sous la surveillance d un ...

Page 4: ...a daños o gasto en exceso no usar el cargador ni la batería hasta que haya reemplazado la pieza dañada Nunca modificar el sistema eléctrico Las alteraciones podrían causar un incendio Usar solo una batería y cargador de Power Wheels Otras baterías o cargadores podrían causar un incendio o explosión To prevent injury Do not make direct contact between battery terminals as this can cause an explosio...

Page 5: ...ut pendant la charge First plug the charger connector into the battery socket Then plug the charger into a standard wall outlet Use the charger only in a wall outlet Do not plug the charger into a ceiling outlet If power flow to the wall outlet is controlled by a switch make sure the switch is ON Once the battery is charged remove the charger connector from the battery and then uplug the charger f...

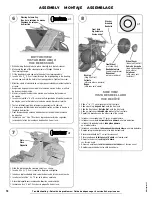
Page 6: ...el toalla para quitar el exceso de lubricante Se han incluido tapas protectoras en las piezas de metal enroscadas para evitar daños durante el envío Quitar y desechar las tapas Limpiar la superficie de cada pieza con un paño limpio y seco para eliminar cualquier suciedad o aceite No se muestra hoja de adhesivos En cas de problème avec ce produit ou s il manque une pièce composer le 1 800 348 0751 ...

Page 7: ...e commodité des éléments de fixation supplémentaires sont fournis Remarque Serrer et desserrer toutes les vis à l aide d un tournevis cruciforme Ne pas trop serrer 12 Volt Battery Batería de 12V Batterie de 12 V 12 Volt Charger Cargador de 12V Chargeur de 12 V Rear Axle Eje trasero Essieu arrière 2 Bushings 2 cojinetes 2 bagues 2 Hand Grips 2 mangos 2 poignées 4 Hubcaps 4 tapones 4 chapeaux de moy...

Page 8: ...e de que la broca de la rueda trasera se ajuste en las clavijas de la unidad del motor dentro del vehículo Mettre le véhicule à l envers Glisser l essieu arrière dans l ouverture située à l arrière du véhicule comme illustré S assurer que l organe moteur de roue arrière repose sur les tiges du boîtier du moteur Rear Axle Eje trasero Essieu arrière e Wheel Cover Indented Side Down Cubierta de rueda...

Page 9: ...nuré vers l extérieur Wheel Cover Indented Side Out Cubierta de rueda lado con hendidura hacia afuera Enjoliveur côté creux vers l extérieur Rear Wheel Pegged Side First Rueda trasera lado con clavija primero Roue arrière côté saillant d abord 3 Fit a 3 8 1 cm 16 hex nut onto the end of the rear wheel assembly Tighten the hex nuts on both ends of the rear axle with the wrench Hint An extra wrench ...

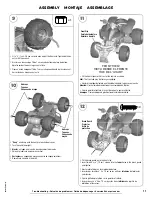
Page 10: ...la placa debajo de la columna de mando tal como se muestra Insertar un tornillo n 8 x 1 9 cm en la placa y apretarlo Glisser la plaquette sous la colonne de direction comme illustré Insérer une vis n 8 de 1 9 cm dans la plaquette Serrer la vis Plate Placa Plaquette 6 7 x1 BOTTOM VIEW VISTA DESDE ABAJO VUE DE DESSOUS Slide a 7 16 1 1 cm washer onto the front axle Slide a bushing ring end first onto...

Page 11: ...eaux de moyeu 9 10 x1 Fit the front clip onto the front of the vehicle as shown Hint The front clip may be factory assembled Ajustar el sujetador delantero en el frente del vehículo tal como se muestra Atención Quizá el sujetador delantero esté ensamblado de fábrica Fixer la garniture frontale à l avant du véhicule comme illustré Remarque Il est possible que la garniture frontale soit déjà assembl...

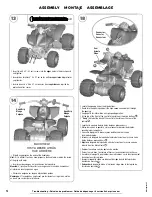
Page 12: ...g under the drive buttons Reach into the opening and pull the high speed connector out through the opening See page 16 for information on high speed operation Fit the tab at the front of the seat into the slot near the drive buttons A Snap the tab at the back of the seat into the slot near the rear of the vehicle B Localizar la apertura debajo de los botones para conducir Meter la mano en la apert...

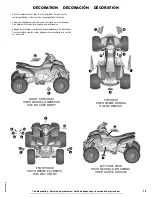
Page 13: ... muestra en las ilustraciones Para mejores resultados evitar reposicionar las etiquetas Apposer les autocollants exactement comme indiqué dans les illustrations Pour de meilleurs résultats éviter d apposer un autocollant plus d une fois sur le véhicule RIGHT SIDE VIEW VISTA DESDE LA DERECHA VUE DU CÔTÉ DROIT LEFT SIDE VIEW VISTA DESDE LA IZQUIERDA VUE DU CÔTÉ GAUCHE TOP VIEW VISTA DESDE ARRIBA VUE...

Page 14: ...mpartiment Brancher le connecteur du câble du moteur sur la batterie Pousser fermement Seat Asiento Siège Battery Retainer Abrazadera de la batería Dispositif de retenue de la batterie 1 2 Carefully lower the battery into the battery compartment The battery retainer slides over the battery to secure it Colocar cuidadosamente la batería en el compartimiento de la batería Ajustar la abrazadera de la...

Page 15: ...operate the vehicle in the daytime in a well lit area Driving near steep inclines can cause The vehicle to gain unsafe speed even if the pedal is released to stop The vehicle to tilt and tip over The wheels to lose traction causing the vehicle to slip The vehicle could roll backwards at an unsafe speed To prevent unsupervised use of the vehicle disconnect the motor harness from the battery when th...

Page 16: ...nector in the opening inside the front end of the vehicle Plug the high speed connector with yellow tag into the matching connector with yellow tag Re assemble the seat To prevent operation of the vehicle in high speed simply disconnect the high speed connectors Retirar el asiento para lograr acceso a la conexión de velocidad rápida Localizar el conector de velocidad rápida en el orificio dentro de...

Page 17: ...dures ménagères 2002 96 EC Consulter la municipalité pour obtenir des conseils sur le recyclage et connaître les centres de dépôt de la région 12V BATTERY CARE AND DISPOSAL MANTENIMIENTO Y ELIMINACIÓN DE LA BATERÍA DE 12V ENTRETIEN ET MISE AU REBUT DE LA BATTERIE DE 12 V VEHICLE CARE MANTENIMIENTO ENTRETIEN DU VÉHICULE Check all screws fasteners and their protective coverings regularly and tighten...

Page 18: ...ra sans frais le produit défectueux à sa discrétion Si Mattel Canada Inc répare ou remplace le produit la garantie ne sera pas prolongée La présente garantie accorde des droits légaux précis qui varient d un ressort territorial à l autre Pour se prévaloir de la présente garantie il faut fournir le reçu de caisse La présente garantie est en vigueur au Canada et aux États Unis seulement PÓLIZA DE GA...

Page 19: ...ntes medidas para corregir el problema Cambiar la orientación o localización de la antena receptora Aumentar la distancia entre el equipo y el receptor Conectar el equipo en un tomacorriente en un circuito diferente al del receptor Ponerse en contacto con el distribuidor o con un técnico de radio TV Nota los cambios o modificaciones no expresamente autorizados por el fabricante responsable del cum...

Page 20: ...nse from Mattel Inc BARBIE ainsi que les marques et les designs y afférents appartiennent à Mattel Inc Utilisation sous licence CONSUMER ASSISTANCE AYUDA AL CONSUMIDOR SERVICE À LA CLIENTÈLE 1 800 348 0751 US Canada Fisher Price Inc 636 Girard Avenue East Aurora NY 14052 Hearing impaired consumers Clientes con problemas auditivos Pour les malentendants 1 800 382 7470 Centro de Servicio en México 5...

Reviews: