background image

Do not omit any steps. Please set aside at least 

45 minutes for assembly.

9

1

2

3

4

5

6

7

8

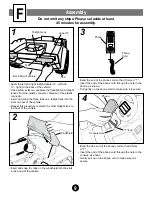
• Insert and snap the tabs on the windshield into the slots

in the hood of the vehicle.

• Apply the left and right taillight labels (12 - left and 

13 - right) to the back of the vehicle.

• Using safety scissors, separate the headlight and taillight

lenses from the plastic connector. Dispose of the plastic
connector.

• Insert and snap the three tabs on a taillight lens into the

slots on back of the vehicle.

• Repeat this procedure to attach the other taillight lens to

the back of the vehicle.

1

3

2

Tab

Tab

Back End of Vehicle

Taillight Lens

Label 13

Windshield

• Bend the free end of the phone cord so that it forms 

a "T".

• Insert the end of the phone cord through the hole in the

console, as shown.

• Gently pull up on the phone cord to make sure it is

secure.

• Bend the end of the phone cord so that it forms a "T".

• Insert the end of the phone cord through the hole in the

phone, as shown.

• Pull gently on the phone cord to make sure it is secure.

4

Phone

Phone
Cord

Assembly

F

"T" End

Console Hole

Phone

Summary of Contents for POWER WHEELS Barbie Lamborghini 78580

Page 1: ...and Safety Scissors Use only with a Power Wheels Type H 6 Volt 9 5 Amp hr Battery Power Wheels Thermal Fuse and Power Wheels Type H Super 6 Volt Charger all included CAUTION ELECTRIC TOY Not recommen...

Page 2: ...es by children 3 6 years of age To prevent damaging the motors and gears do not tow anything behind the vehicle or overload it Do not exceed the maximum weight capacity of 65 lbs 30 kg If you have any...

Page 3: ...ns could cause a fire resulting in injury and could also ruin the electrical system Use of the wrong type battery fuse or charger could cause a fire or explosion resulting in serious injury Use of Pow...

Page 4: ...ensure that no parts are discarded Metal parts have been coated with a lubricant to protect them during shipment Wipe all metal parts with a paper towel to remove any excess lubricant IMPO RTANT A 25...

Page 5: ...2 10 x 1 Screw 6 8 x 7 8 Screw 8 10 x 3 4 Bolt 2 Lock Nut 2 8 x 18 x 1 Screw All Shown Actual Size For your convenience an extra 354 cap nut has been included 354 Cap Nut 2 Wire Retainer Thermal Fuse...

Page 6: ...BIE Key Chain 9 Wire Retainer 10 Bracket 2 11 Windshield 12 Lock Nut 2 13 Battery Retainer 14 Lens Set B Headlight Lens 2 C Taillight Lens 2 15 Spoiler 16 Steering Column 17 10 Washer 2 18 354 Cap Nut...

Page 7: ...in products other than Power Wheels vehicles could cause overheating fire or explosion Read the cautions on the back panel of the battery Never lift or carry the battery by the wires or connectors Thi...

Page 8: ...a thermal fuse in good condition is installed If you are recharging your battery make sure the thermal fuse already installed in the battery is in good condition Remove the fuse from the battery and...

Page 9: ...illight lens into the slots on back of the vehicle Repeat this procedure to attach the other taillight lens to the back of the vehicle 1 3 2 Tab Tab Back End of Vehicle Taillight Lens Label 13 Windshi...

Page 10: ...cle body as shown Tighten the screws with a Phillips screwdriver Do not over tighten 6 Fit the spoiler onto the top back end of the vehicle Assembly 10 Spoiler 7 Wipe the steering column with a paper...

Reviews: