background image

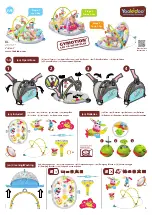
You can adjust the seat to two different positions: 
Recline or Upright.

• From behind the seat, press both seat position buttons.
• Push the seatback up until the buttons 

“snap” 

into the 

upright position. 

• Push the seatback down until the buttons

 “snap”

 into the 

recline position.

Front Edge 
of Seat

Press Seat Position Buttons

You can adjust the motion of the swing: side to side or
front to back.

• Press the seat tube button to unlock the seat tube.
• Rotate the seat tube to the desired position. 

Seat Tube Button

Seat Tube

PRESS

TURN

Upright

Recline

Storage

• Press the buttons on the back of the motorized frame while 

pushing the legs inward. 

• Lean the swing frame against a wall for storage.

IMPORTANT! 

Remove the batteries for long-term storage.

Button

Button

Lower Leg
Button

Lower Leg 
Button

Hint: 

The legs may be disassembled for long-term storage. Press the 

button on each lower leg and remove them from the upper legs.

Using the Tray

• Fit the tabs on the tray into the slots in the sides of the seat.
• To remove the tray, pull one edge of the tray out and lift.

Tray

Slot

Set Up

10

4

6

5

7

Cradle

Swing

Summary of Contents for H7185

Page 1: ...www fisher price co uk H7185 WARNING IMPORTANT KEEP INSTRUCTIONS FOR FUTURE REFERENCE Cradle Cradle Seat moves side to side Swing Swing Seat moves front to back ...

Page 2: ...wall Business Park Maidenhead SL6 4UB Helpline 01628 500303 www service mattel com uk AUSTRALIA Mattel Australia Pty Ltd 658 Church Street Locked Bag 870 Richmond Victoria 3121 Australia Consumer Advisory Service 1300 135 312 NEW ZEALAND 16 18 William Pickering Drive Albany 1331 Auckland ASIA Mattel East Asia Ltd Room 1106 South Tower World Finance Centre Harbour City Tsimshatsui HK China MALAYSIA...

Page 3: ...Restraint System 2 Feet Tray 4 Toys toys may be different Pad with Headrest ALL SHOWN ACTUAL SIZE 8 x 1 3 cm Screw 2 M5 x 30 mm Bolt 2 M5 Lock Nut 2 Lower Seat Tube Note Tighten the screws with the enclosed Allen wrench Parts Fabric Panel Allen Wrench 3 ...

Page 4: ...e hole in the lower leg Repeat this procedure to assemble the other upper leg to the other lower leg Red Dot Up Lower Leg Upper Leg Straight End Button Hole Assembly IMPORTANT Before assembly inspect this product for damaged hardware loose joints missing parts or sharp edges DO NOT use if any parts are missing or broken Contact Mattel for replacement parts and instructions if needed Never substitu...

Page 5: ... an R marking on the right foot If the feet are not flat upon the floor or the left and right feet have been reversed remove both lower legs from the upper legs Replace them onto the opposite upper leg Feet Feet Button Button L R Position the seat upright Place the pad onto the seat with the ruffle toward the top of the seat Fold the bottom of the pad up Insert the crotch belt through the slot in ...

Page 6: ...of the pad onto the rim on each side of the seat Seat Slots Waist Belts Pad Assembly Fit the lower seat tube into the short tube on the seat back Insert the tray tabs into the slots in each side of the seat Tray Slot Lower Seat Tube Short Tube 9 6 10 11 12 Fisher Price Inc a subsidiary of Mattel Inc East Aurora NY 14052 U S A PRINTED IN CHINA 2007 Mattel Inc All Rights Reserved and designate U S t...

Page 7: ...rench Turn the assembly upright Fit the string below the knot of a toy through the slot in a clip on the mobile Pull down on the toy to be sure it is secure on the mobile Repeat this procedure to assemble the other three toys to the mobile Clip Mobile Toy First fit an M5 lock nut into an opening in the upper seat tube Make sure the rounded side of the lock nut faces out Next insert an M5 x 30 mm s...

Page 8: ...the battery terminals Use only batteries of the same or equivalent type as recommended Do not charge non rechargeable batteries Remove rechargeable batteries from the product before charging If removeable rechargeable batteries are used they are only to be charged under adult supervision Loosen the screws in the battery compartment door with a Phillips screwdriver Remove the battery compartment do...

Page 9: ...raint Belts Place your child in the seat Pull the crotch belt up between your child s legs and fasten both waist belts to the crotch belt Make sure you hear a click on both sides Waist Belt Waist Belt Crotch Belt Anchored End Free End Buckle Anchored End Free End To tighten the waist belts Feed the anchored end of the waist belt up through the buckle to form a loop A Pull the free end of the waist...

Page 10: ...e the seat tube to the desired position Seat Tube Button Seat Tube PRESS TURN Upright Recline Storage Press the buttons on the back of the motorized frame while pushing the legs inward Lean the swing frame against a wall for storage IMPORTANT Remove the batteries for long term storage Button Button Lower Leg Button Lower Leg Button Hint The legs may be disassembled for long term storage Press the ...

Page 11: ...hild and let the other end of the blanket drape down while swinging Waterglobe Mobile Music and Sounds Turn the power dial to to turn power ON for waterglobe mobile music and sounds Hint The swing does not work on this power dial setting If you d like to use the waterglobe mobile music or sounds and swing at the same time turn the power dial to any of the six speed settings 11 To select waterglobe...

Page 12: ...n OFF position or waterglobe only position Mobile waterglobe lights turn off automatically after seven minutes Turn the power dial to one of six settings Remove the batteries and replace in correct orientation as indicated inside the battery compartment Replace all four batteries with four fresh D alkaline batteries To start swinging motion give the seat a light push Adjust the power dial to a hig...

Reviews: