background image

2

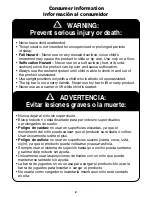
Consumer Information

Información al consumidor

   WARNING: 

Prevent serious injury or death:

   ADVERTENCIA: 

Evitar lesiones graves o la muerte:

• Never leave child unattended.
• This product is not intended for unsupervised or prolonged periods 

of sleep.

• 

Fall Hazard

 – Never use on any elevated surface, since child’s 

movement may cause the product to slide or tip over. Use only on a fl oor.

• 

Suffocation Hazard

 – Never use on a soft surface (bed, crib, sofa, 

cushion) since the product can tip over and cause suffocation.

• Always use the restraint system until child is able to climb in and out of 

the product unassisted.

• Use upright positions only with a child who is able to sit up unassisted.
• The toy bar is not a carry handle.  Never use toy bar to lift or carry product.
• Never use as a carrier or lift while child is seated.

• Nunca dejar al niño sin supervisión.
• Este producto no está diseñado para periodos no supervisados 

o prolongados de sueño.

• 

Peligro de caídas: 

no usar en superfi cies elevadas, ya que el 

movimiento del niño puede causar que el producto se resbale o voltee. 
Usar únicamente sobre el piso.

• 

Peligro de asfi xia: 

no usar en superfi cies suaves (cama, cuna, sofá, 

cojín), ya que el producto puede voltearse y causar asfi xia.

• Siempre usar el sistema de sujeción hasta que el niño pueda sentarse 

y salirse del producto sin ayuda.

• Únicamente usar las posiciones verticales con un niño que pueda 

mantenerse sentado sin ayuda.

• La barra de juguetes no es un asa para cargar el producto. No usar la 

barra de juguetes para levantar o cargar el producto.

• No usarla como cargador ni levantarla mientras el niño esté sentado 

en ella.

Summary of Contents for CMR13

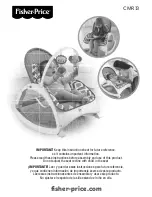
Page 1: ...before assembly and use of this product Do not adjust the seat recline with child in the seat IMPORTANTE Leer y guardar estas instrucciones para futura referencia ya que contienen información de importancia acerca de este producto Leer estas instrucciones antes de ensamblar y usar este producto No ajustar el respaldo de la silla estando el niño en ella ...

Page 2: ...andle Never use toy bar to lift or carry product Never use as a carrier or lift while child is seated Nunca dejar al niño sin supervisión Este producto no está diseñado para periodos no supervisados o prolongados de sueño Peligro de caídas no usar en superficies elevadas ya que el movimiento del niño puede causar que el producto se resbale o voltee Usar únicamente sobre el piso Peligro de asfixia ...

Page 3: ...es and decorations may vary from photographs Consumer Information Información al consumidor IMPORTANTE Previo al montaje y de cada uso revisar que este producto no tenga piezas dañadas conexiones sueltas piezas faltantes o bordes filosos NO usar el producto si falta o está rota alguna pieza No usar accesorios ni piezas de repuesto salvo aquellos aprobados por el fabricante No usar piezas de tercer...

Page 4: ...MER ASSISTANCE ATENCIÓN AL CLIENTE CO SU SS S 1 800 432 5437 US Fisher Price Inc 636 Girard Avenue East Aurora NY 14052 Hearing impaired consumers Clientes con problemas auditivos 1 800 382 7470 Centro de Servicio en México 59 05 51 00 Ext 5206 ó 01 800 463 59 89 ARGENTINA Mattel Argentina S A Curupaytí 1186 1607 Villa Adelina Buenos Aires Tel 0800 666 3373 COLOMBIA Mattel Colombia S A Calle 123 7...

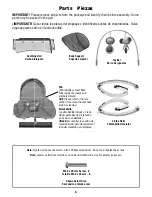
Page 5: ... Seat Back Tube inside the sleeve and a tethered brace Hint Please refer to the care section to remove the seat back tube for cleaning Almohadilla La almohadilla incluye un tubo del respaldo dentro de la funda y una barra conectada Atención consultar la sección de mantenimiento para desprender el tubo del respaldo para limpieza Note Tighten or loosen the screws with a Phillips screwdriver Do not o...

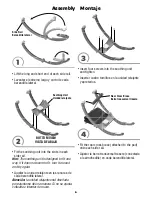
Page 6: ...elajante en las ranuras de cada barandilla lateral Atención la unidad relajante está diseñada para ajustarse de una manera Si no se ajusta voltearla e intentar de nuevo Insert four screws into the soothing unit and tighten Insertar cuatro tornillos en la unidad relajante y apretarlos Soothing Unit Unidad relajante 4 Fit the rear cross brace attached to the pad onto each side rail Ajustar la barra ...

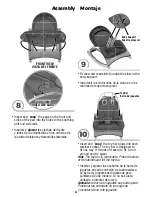
Page 7: ...dilla lateral Empujar cada barandilla para ajustarlas en su lugar 7 Insert the ends of the seat back tube inside the pad into the sockets in the side rails Push down on the seat back tube until you hear a click on each side Pull up on the seat back tube to be sure it is secure Insertar los extremos del tubo del respaldo dentro de la almohadilla en las conexiones de las barandillas laterales Empuja...

Page 8: ...cket The toy bar is designed to fit one way If it does not seem to fit turn it around and try again Hint The toy bar is removable Press the ends of the latches and lift the toy bar Insertar y ajustar los enchufes de la barra de juguetes en cada conexión de la abrazadera La barra de juguetes está diseñada para ajustarse de una manera Si no se ajusta voltearla e intentar de nuevo Atención la barra d...

Page 9: ...acar las pilas y volver a introducirlas en el compartimento Si las vibraciones pierden intensidad o dejan de funcionar sacar las pilas gastadas del compartimento de pilas y desecharlas apropiadamente Sustituir las pilas por 2 pilas nuevas alcalinas C LR14 x 1 5V 1 5V x 2 C LR14 Protect the environment by not disposing of this product with household waste 2012 19 EU Check your local authority for r...

Page 10: ... rechargeable batteries from the product before charging If removable rechargeable batteries are used they are only to be charged under adult supervision En circunstancias excepcionales las pilas pueden derramar líquido que puede causar quemaduras o dañar el producto Para evitar derrames No mezclar pilas nuevas con gastadas ni mezclar pilas alcalinas estándar carbono cinc o recargables níquel cadm...

Page 11: ...ever use toy bar to lift or carry product Never use as a carrier or lift while child is seated Nunca dejar al niño sin supervisión Este producto no está diseñado para periodos no supervisados o prolongados de sueño Peligro de caídas no usar en superficies elevadas ya que el movimiento del niño puede causar que el producto se resbale o voltee Usar únicamente sobre el piso Peligro de asfixia no usar...

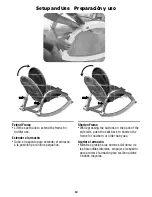
Page 12: ...niños pequeños Shorten Frame While pressing the buttons on the back of the side rails push the seat back to shorten the frame for newborn or older baby use Acortar el armazón Mientras presiona los botones del dorso de las barandillas laterales empujar el respaldo para acortar el armazón para recién nacidos o bebés mayores Setup and Use Preparación y uso ...

Page 13: ...ight Lift the seat back and fasten the straps on the back of the seat Make sure you hear a click Posición vertical Levantar el respaldo y abrochar los cinturones en el dorso de la silla Asegurarse de oír un clic Recline Unfasten the straps on the back of the seat and lower the seat back Reclinada Desabrochar los cinturones en el dorso de la silla y bajar el respaldo Straps Straps Cinturones Cintur...

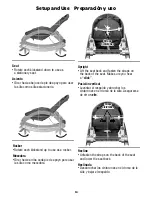
Page 14: ...olo en dirección opuesta al niño El sistema de sujeción debe permanecer conectado Apretar cada cinturón de la cintura de modo que el sistema de sujeción quede bien ajustado al niño a Consultar la siguiente sección para mayores detalles sobre cómo apretar los cinturones 2 TIGHTEN APRETAR LOOSEN AFLOJAR To tighten Feed the anchored end of the waist belt up through the buckle to form a loop A Pull th...

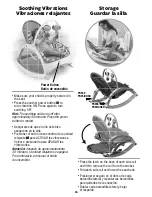
Page 15: ... Make sure your child is properly secured in the seat Press the soother power button to turn vibration ON Press again to turn soothing OFF Hint The soothing unit turns off after approximately 30 minutes Press the power button to restart Asegurarse de que el niño esté bien asegurado en la silla Presionar el botón de encendido de la unidad relajante para ACTIVAR las vibraciones Volver a presionarlo ...

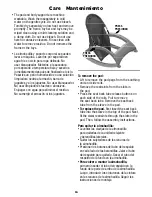
Page 16: ...remove the pad Lift to remove the pad pegs from the soothing unit and side rails Remove the restraints from the slots in the pad Press the seat back tube release buttons on each side of the rails Pull to remove the seat back tube Remove the seat back tube from the sleeve in the pad To replace the pad first insert the seat back tube into the sleeve in the top of the pad Next fit the waist restraint...

Reviews: