background image

17

Setup

Wi-Fi

Settings

3.0°C

Fridge

Pantry

12.0°C

Chill

-0.5°C

Setup

Wi-Fi

Settings

3.0°C

Fridge

Pantry

12.0°C

Chill

-0.5°C

Setup

Wi-Fi

Settings

3.0°C

Fridge

Pantry

12.0°C

Chill

-0.5°C

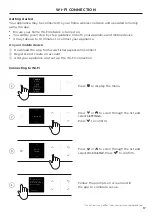
Getting started

Your appliance may be connected to your home wireless network and operated remotely 
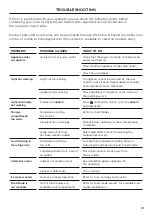
using the app.


z

Ensure your home Wi-Fi network is turned on.


z

You will be given step by step guidance on both your appliance and mobile device.


z

It may take up to 10 minutes to connect your appliance.

1

2

4

3

Press 

Fridge

3.0 °C

Fridge

3.0 °C

Fridge

5.0 °C

 to display the menu. 

Press 

Fridge

3.0 °C

Fridge

3.0 °C

Fridge

5.0 °C

 or 

Fridge

3.0 °C

Fridge

3.0 °C

Fridge

5.0 °C

 to scroll through the list and 

select 

SETTINGS

Press 

Fridge

3.0 °C

Fridge

3.0 °C

Fridge

5.0 °C

 to confirm.

Press 

Fridge

3.0 °C

Fridge

3.0 °C

Fridge

5.0 °C

 or 

Fridge

3.0 °C

Fridge

3.0 °C

Fridge

5.0 °C

 to scroll through the list and 

select 

WI-FI SETUP. 

Press 

Fridge

3.0 °C

Fridge

3.0 °C

Fridge

5.0 °C

 to confirm.

WI-FI CONNECTION

Connecting to Wi-Fi

Illustrations may differ from your purchased appliance.

Follow the prompts on screen and in  
the app to complete set-up.

On your mobile device:

Download the app from www.fisherpaykel.com/connect

Register and create an account.

Add your appliance and set up the Wi-Fi connection.

Setup

Wi-Fi

Settings

37.0°F

Fridge

Pantry

54.0°F

Chill

32.0°F

Wi-Fi 

CONNECTED

CONNECTED

Wi-Fi

GE_MODULE_03D4

TBPHMPNQ

Connect

To complete

connection,

follow the app

instructions

Summary of Contents for RS6019B

Page 1: ...TEGRATED REFRIGERATOR FREEZER INTEGRATED REFRIGERATOR FREEZER RS6019B models INTEGRATED REFRIGERATOR RS6019S2 RS6019S3 models INTEGRATED FREEZER RS6019F2 RS6019F3 models USER GUIDE NZ AU UK IE HK SG E...

Page 2: ......

Page 3: ...tings 16 Wi Fi connection 17 Adjusting the temperature 18 Food mode presets 19 Changing features 20 Changing settings 21 Water dispenser 22 Ice maker 23 Storage features 24 Care and cleaning 25 Food c...

Page 4: ......

Page 5: ...d Failure to do so can result in death electric shock fire or injury to persons Read and follow the safety and warnings outlined in this user guide before operating this appliance WARNING This applian...

Page 6: ...ns to accelerate the defrosting process other than those recommended by the manufacturer z Do not damage the refrigerant circuit In case of damage to the refrigerant circuit ventilate the area by open...

Page 7: ...locate multiple portable socket outlets or portable power supplies at the rear of the appliance Temperature control z This refrigerating appliance is intended to be used at ambient temperatures rangin...

Page 8: ...s Flush the water filter connected to a water system if water has not been drained for 5 days z Use only soap based cleaning products Many commercially available cleaning products contain solvents tha...

Page 9: ...cold Food removed from freezer compartment may be cold enough to cause damage when brought into contact with bare skin eg frozen ice cubes z Opening the door for long periods of time can cause a sign...

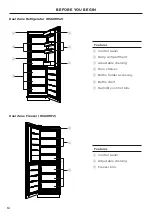
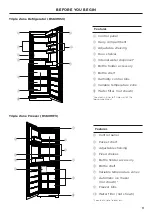
Page 10: ...al Zone Freezer RS6019F2 Features 1 Control panel 2 Dairy compartment 3 Adjustable shelving 4 Door shelves 5 Bottle holder accessory 6 Bottle shelf 7 Humidity control bins 2 1 6 4 3 7 5 Features 1 Con...

Page 11: ...shelf 8 Humidity control bins 9 Variable temperature zone 0 Water filter not shown Located in inner left side wall of the top compartment Features 1 Control panel 2 Pocket shelf 3 Adjustable shelving...

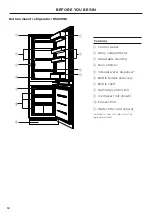
Page 12: ...iry compartment 3 Adjustable shelving 4 Door shelves 5 Internal water dispenser 6 Bottle holder accessory 7 Bottle shelf 8 Humidity control bin 9 Ice maker not shown 0 Freezer bins 1 Water filter not...

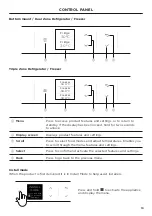
Page 13: ...ngs 4 Select Press to confirm and activate the selected features and settings 5 Back Press to go back to the previous menu 4 3 2 1 5 18 0 C 3 0 C Freezer 18 0 C 18 0 C Freezer Freezer 3 0 C 3 0 C Frid...

Page 14: ...nd vegetables dairy products jams and chutneys preserves meats and drinks CHILL 0 5 C CHILL mode is an extension of FRIDGE mode providing the perfect storage zone for highly perishable food to ensure...

Page 15: ...LL Rapidly chills your beverages in the freezer for 15 minutes Depending on the size of your beverage the default time may not be enough to chill your beverage If your beverage is not cold enough afte...

Page 16: ...shing the water filter after a vacation or when the filter has been replaced DISPLAY SOUND Enables you to silence all control panel sounds DISPLAY BRIGHTNESS Enables you to adjust the brightness of th...

Page 17: ...Fridge 5 0 C or Fridge 3 0 C Fridge 3 0 C Fridge 5 0 C to scroll through the list and select SETTINGS Press Fridge 3 0 C Fridge 3 0 C Fridge 5 0 C to confirm Press Fridge 3 0 C Fridge 3 0 C Fridge 5 0...

Page 18: ...the temperature Adjusting the temperature from quick access When you turn on your appliance for the first time the cooling system will automatically cool all compartments to their default food mode an...

Page 19: ...lected by a dot adjacent to the preset number 5 Press Fridge 3 0 C Fridge 3 0 C Fridge 5 0 C or Fridge 3 0 C Fridge 3 0 C Fridge 5 0 C to scroll through the list to Food Mode Presets Press Fridge 3 0...

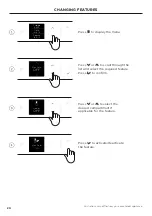
Page 20: ...ge 5 0 C or Fridge 3 0 C Fridge 3 0 C Fridge 5 0 C to select the desired compartment if applicable for the feature Press Fridge 3 0 C Fridge 3 0 C Fridge 5 0 C to activate deactivate the feature Illus...

Page 21: ...the list and locate the desired setting Press Fridge 3 0 C Fridge 3 0 C Fridge 5 0 C to change the setting or to enter the setting for more setting options Press Fridge 3 0 C Fridge 3 0 C Fridge 5 0...

Page 22: ...An alarm will sound Please wait 4 minutes before dispensing again Locking unlocking the water dispenser Press Fridge 3 0 C Fridge 3 0 C Fridge 5 0 C to display the menu Press Fridge 3 0 C Fridge 3 0...

Page 23: ...s z An ice scoop is provided for hygienic use If a large amount of ice is required remove the storage bin and allow ice to fall into the larger bin For maximum ice storage level the stored cubes with...

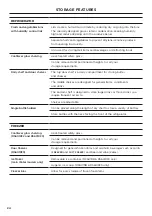
Page 24: ...utter and cheeses The middle shelves are designed for general items condiments and drinks The bottom shelf is deisgned to store large drinks or those drinks you require frequent access to Shelves are...

Page 25: ...liquid detergent dissolved in warm water and a soft cloth Rinse with clean water and dry with a clean lint free cloth Exterior cleaning Condenser coils The condenser coils of your appliance requires...

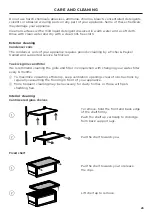
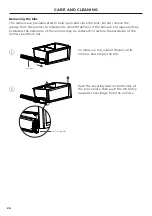
Page 26: ...e bins are not regularly fully extended the extension of the runners may be reduced To restore the extension of the runners pull them out CARE AND CLEANING 1 2 To remove a bin extend the bin on its ru...

Page 27: ...umidity control lids Upper Compartment 1 2 Remove the bin Pull the humidity control lid towards you to release the clip Humidity control lids Lower Compartment Lift the humidity control lid upwards to...

Page 28: ...e ice maker Discard the first full bin of ice Pull the bin towards you to remove Push both runners back into the appliance Push the bin slowly onto the securing tabs until you feel it clip onto the ru...

Page 29: ...ur appliance z We recommend using MAX COLD when you are adding food items to your appliance such as after grocery shopping This feature will ensure the food is chilled frozen within the shortest perio...

Page 30: ...ir flow This product has fans which change speed depending on demand During cooling periods such as after frequent door openings fans circulate the cold air in the appliance producing some air flow so...

Page 31: ...isolating switch Light and display not working Product in SABBATH Press Fridge 3 0 C Fridge 3 0 C Fridge 5 0 C and hold to unlock scroll to SABBATH and deactivate Storage compartments too warm Temper...

Page 32: ...vice technician Bin does not slide in and out evenly Packaging trapped Check to ensure no food or packaging is trapped behind the tray bin Door not closing An obstruction is blocking door closing Move...

Page 33: ...s and clean ice storage bin Refer to Interior cleaning Wrap or cover strong smelling foods Poor taste from incoming water Replace filter cartridge product parts and accessories can be purchased throug...

Page 34: ...serial plate or on the documents accompanying the product indicates that this appliance cannot be treated as household waste It shall be handed over to the applicable collection point for the recycli...

Page 35: ...environment This product is not designed for any commercial use Any commercial use by the customer will affect this products Manufacturer s Warranty To access your Warranty and Service Guide Scan the...

Page 36: ...e or assistance Faults and Troubleshooting If after checking these points you still need assistance or parts please refer to your nearest Fisher Paykel trained and supported service technician Custome...

Page 37: ...rvice Fisher Paykel has a network of Fisher Paykel trained and supported service technicians that can carry out any service necessary on your appliance Our Customer Care Centre can recommend a Fisher...

Page 38: ......

Page 39: ......

Page 40: ...ge at any time The product specifications in this guide apply to the specific products and models described at the date of issue Under our policy of continuous product improvement these specifications...

Reviews: