


56
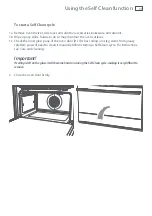
Using the Self Clean function
3
Select the Self Clean Function
The display will show
The
P
will flash
4
Adjust the cycle time (optional)
You may set the time between 1-1/2 hours (P1:30 and 3 hours (P3:00). For normal soiling
use a 3 hour cycle. For light or localised soiling decrease the time.
Press the
button - the
P
will go out.
Use the
and
buttons to change the time.
After a few seconds the
P
will start to flash again.
Alternatively, press the Start
button and the
P
will flash.
5
Start the cycle
Press the Start
button. The
P
will stop flashing.
The oven will come on and the
indicator will show in the display.
After a few seconds the door will lock and the door lock indicator light will come on.
The display will start to count down.
Note: If the door is not shut completely, after a few minutes the oven will switch off, the display
will show ‘
Fdor
’ and the oven will beep. See ‘Troubleshooting’.
6
At the end of the Self Clean cycle
The oven will turn off.
The display will show
P:00
and a flashing
A.
7
Turn the function dial to
o
(Off ).
The door will remain locked.
The door lock indicator will remain on.
The display will show ‘hot’.
When the oven has cooled to a safe temperature, the door lock indicator will go out and the
door will unlock. The display will show the time of day. This may take 30 minutes.
Note: The oven will still be very warm. To avoid burns, wait for the oven to cool completely
before wiping out the ash and replacing side racks and shelves.
To cancel a Self Clean cycle
Turn the function dial to
o
(Off ).
Note: The oven door will remain locked until the oven has cooled to a safe temperature. The door
lock indicator light will remain on, and the display will show ‘
hot
’.
P1:30
A
Summary of Contents for OR90SDBGFPX
Page 1: ...NZ AU Installation instructions and User guide Freestanding cooker OR90SDBGFPX models...
Page 2: ......
Page 22: ......
Page 62: ......
Page 63: ......