Installation Instructions
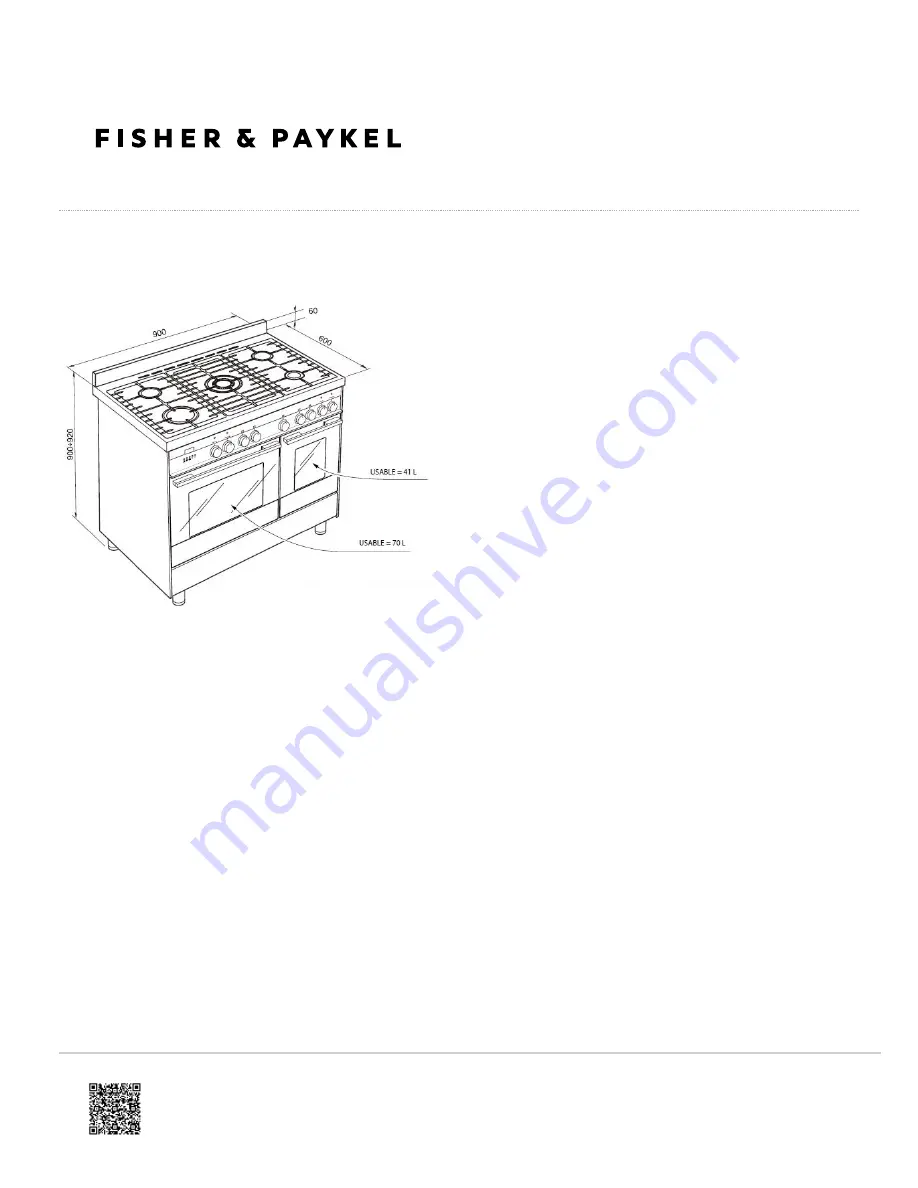
Fig. 1 Cooker dimensions and capacity
https://producthelp.fisherpaykel.com/eu/Cook/Freestanding_Cookers/Dual_Fuel/OR90LDBGFX3/User_Guide_OR90LDBGFX…
Updated: Fri, 10 Apr 2020 07:18:41 GMT
Powered by
1
Page 1: ...on Instructions Fig 1 Cooker dimensions and capacity https producthelp fisherpaykel com eu Cook Freestanding_Cookers Dual_Fuel OR90LDBGFX3 User_Guide_OR90LDBGFX Updated Fri 10 Apr 2020 07 18 41 GMT Po...
Page 2: ...Curtains must not be fitted immediately behind appliance or within 500 mm of the sides If the cooker is located on a pedestal it is necessary to provide safety measures to prevent falling out It is e...
Page 3: ...g the Cooker Level the cooker by screwing the bottom of the feet in or out as shown Fig 5 Levelling the cooker https producthelp fisherpaykel com eu Cook Freestanding_Cookers Dual_Fuel OR90LDBGFX3 Use...
Page 4: ...table feet Fig 6 Correctly raising the cooker DO NOT DRAG the cooker Lift the feet clear of the floor Fig 7 Incorrectly raising the cooker https producthelp fisherpaykel com eu Cook Freestanding_Cooke...
Page 5: ...fore assembling remove any protective film adhesive tape Remove the two spacers A and the screw B from the rear of the cooktop Assemble the backguard as shown and fix it by screwing the central screw...
Page 6: ...lling the holes check that you will not damage any pipes or electrical wires 3 Loosely attach the anti tilt bracket with the two screws supplied 4 Move the cooker to the wall and adjust the height of...
Page 7: ...termine the correct amount of free area ventilation requirements Gas installation GB IE only This cooker uses NATURAL GAS only and cannot be used on any other gas without modification This appliance i...
Page 8: ...nform to the relevant British Standards Only a suitably qualified and registered person may convert the appliance to a different gas type When using Butane gas a supply pressure of 28 30 mbar is requi...
Page 9: ...the gasket Figs 11a 11b 4 To avoid damage to the appliance gas rail inlet pipe tighten the fittings using two suitable spanners Fig 11b 5 Using a suitable leak detection fluid solution e g Rocol chec...
Page 10: ...jectors To Replace the Injectors Remove pan supports and burners from the cooktop Using a wrench substitute the nozzle injectors with those most suitable for the kind of gas for which it is to be used...
Page 11: ...burner remains lit even when the gas tap is turned quickly from the maximum to the minimum position If the burner does not remain lit increase the minimum gas rate setting To Adjust the Minimum Gas Ra...
Page 12: ...ced Power KW G 30 28 30 mbar G 31 37 mbar G 20 20 mbar Injector 1 100 mm Injector 1 100 mm Auxiliary 1 00 0 30 50 72 X Semi Rapid 1 75 0 45 65 97 Z Rapid 3 00 0 75 85 115 Y Triple Ring Wok 3 50 1 50 9...
Page 13: ...the cooker Feed the supply cable through the cable clamp D See the Feeder cable section following for the correct size for the cable Connect the wires to the terminal block B as shown in the diagram...
Page 14: ...00W 16 1A 230V Feeder Cable Section TYPE H05RR F 230V 3 x 2 5 mm2 Connection with wall box connection https producthelp fisherpaykel com eu Cook Freestanding_Cookers Dual_Fuel OR90LDBGFX3 User_Guide_O...
Page 15: ...Fig 16b Connecting the feeder cable https producthelp fisherpaykel com eu Cook Freestanding_Cookers Dual_Fuel OR90LDBGFX3 User_Guide_OR90LDBGFX Updated Fri 10 Apr 2020 07 18 41 GMT Powered by 15...