Fisher & Paykel Galaxy DI1203 Series User Manual Download Page 25

23

Galaxy cooktop/hob

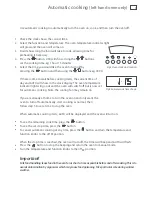
If the burner has not ignited within 15 seconds, stop operating the igniter and wait at least 1 
minute before attempting a further ignition of the burner.  In the event of the burner flames 
being accidently extinguished, turn off the burner control and do not attempt to re-ignite the 
burner for at least 1 minute.

Safety features

Your Galaxy cooktop has a flame failure safety device fitted.  A metal probe behind the burner 
generates a small electrical current when a flame is present.  After 5 seconds the metal probe 
gets hot enough to hold a valve open and maintain the gas supply.  If the flame is blown out 
then the gas to the burner is cut off.  To operate the flame failure you need to hold the burner 
knob down for 5 seconds after the burner has ignited.  Letting go of the burner knob too soon 
will extinguish the flame.

Flame failure cooktop models have two probes at the back of the burners, one will be the  
spark electrode and the other is the flame failure probe.

Cooktop/hob utensils

To get the best out of your Galaxy cooktop follow these simple suggestions:


Do not use an asbestos mat between the flame and the saucepan as this may cause serious 
damage to your cooktop. 


Never use plastic or aluminium foil dishes on the burners. 


Saucepans should have thick flat bottoms.  Food in a saucepan with an uneven bottom will take 
longer to cook.  Heavy saucepans may bend the trivets/pan support or deflect the flame.  Match 
the bottom of your saucepans with the cooking zone and see that it is stable.  This will give you 
the most efficient cooking.  Do not let large saucepans or frying pans over lap the bench as this 
can deflect heat onto your benchtop and damage the surface.


For the simmer (auxiliary) and semi rapid burners pots should be larger than 12cm in diameter.  
The griddle burner may be used with pots 18cm in diameter and above. The wok burner is 
primarily designed for woks but may be used with 17-23cm diameter pots with care.  A fish 
kettle on the griddle burner is not only useful for fish, but for steaming long vegetables like cobs 
of corn, asparagus, Chinese broccoli and long beans.

Summary of Contents for Galaxy DI1203 Series

Page 1: ...Galaxy drop in cooking system User guide NZ AU GB IE DI1203 models...

Page 2: ......

Page 3: ...functions 8 Automatic cooking 9 Oven shelves 10 Accessories 11 Oven temperature conversion chart 12 Cooking function options 13 Cooking charts 14 Galaxy cooktop hob 22 Care and cleaning 26 Warranty a...

Page 4: ...d this user guide taking special note of the Safety and warnings section following Remove all accessories and packaging Set the clock The oven will not work until the clock has been set See the Clock...

Page 5: ...as oven shelves or dishes Take care when opening the oven door Let hot air or steam escape before removing or replacing food Do not touch the cooktop components burners trivets pan supports or the st...

Page 6: ...h as this can deflect heat onto your benchtop and damage the surface Do not let large saucepans frying pans or woks push any other pans aside This could make them unstable or deflect heat onto your be...

Page 7: ...press the button briefly then the and buttons to set the time you want After a few seconds the clock will show the time of day with the symbol in the display To check the remaining time press the butt...

Page 8: ...If the right hand oven is in use the timer will ring and turn the oven off when the selected time has elapsed The timer can be set for up to 120 minutes To set the timer Turn the timer control clockwi...

Page 9: ...has reached the set temperature and then it will go out 3 When you have finished cooking turn the function and temperature control knobs to the off O position Note the oven cooling fan comes on automa...

Page 10: ...t Fan grill with the oven door closed DEFROST Fan only The fan circulates air around the oven speeding up the defrosting process by approximately 30 CLASSIC BAKE Bottom element CLASSIC BAKE uses heat...

Page 11: ...main on If you are already at home to turn the oven on and only want the oven to turn off automatically start cooking as normal then follow step 5 to set a time to stop the oven When automatic cooking...

Page 12: ...grill roast pan have a stop notch so that you do not accidentally pull them right out of the oven Make sure you put the stop notch towards the back of the oven as shown in Fig 7 Shelf slides Shelf sli...

Page 13: ...to handle The glass tray will not distort or corrode and it will not shatter into small pieces if knocked Pizza stone and paddle Your pizza stone will allow you to cook homemade pizza like those from...

Page 14: ...ure conversion chart Celsius C Fahrenheit F Gas Mark 110 225 Cool 130 250 140 275 1 150 300 2 Moderately cool 170 325 3 180 350 4 Moderate 190 375 5 200 400 6 Moderately hot 220 425 7 230 450 8 Hot 24...

Page 15: ...AN BAKE CLASSIC BAKE GRILL FAN GRILL Baked products Biscuits single tray Biscuits 2 3 tray Slices Butter cake Fruit cake Sponge Meringues Scones Muffins Pastry Filo parcels Apple pie Lemon meringue pi...

Page 16: ...d the faster it will cook and brown The higher the temperature the faster the food will cook and brown and we recommend you grill at high temperatures However you can use lower temperatures Grill only...

Page 17: ...0 4 180 200 15 20 Chops well done 4 High 20 25 4 190 200 20 25 Rack medium 6 190 200 25 35 Pork Chops well done 4 High 15 20 5 180 200 20 30 Ham steaks well done 4 High 10 15 5 180 200 15 20 Bacon wel...

Page 18: ...it crumble 7 150 160 30 40 Macaroni cheese 7 175 180 20 25 Lasagne 7 150 160 25 30 Moussaka 7 150 160 30 35 Cannelloni 5 150 160 25 30 Vegetables 5 175 200 20 30 Snacks Cheese on toast 2 High 4 5 Nach...

Page 19: ...one shelf at a time Space the shelves evenly in the oven so the hot air can circulate freely Bread and rich fruitcakes are best cooked on BAKE If two shelves of baking are cooked on this function swa...

Page 20: ...5 Quiche 7 180 200 20 30 Bacon egg pie 7 180 200 35 45 Custard tart pastry case 7 180 200 14 18 Custard tart filling 7 180 120 7 20 25 Lemon meringue pie pastry case 7 180 200 14 18 Lemon meringue pie...

Page 21: ...0 200 25 30 7 160 175 25 30 7 175 190 30 35 7 200 220 10 20 7 210 225 10 20 7 175 200 30 40 7 185 210 35 45 7 170 190 20 30 7 180 200 20 30 7 170 190 30 40 7 180 200 35 45 7 175 195 12 16 7 180 200 14...

Page 22: ...e meat fibres to relax Fewer juices will be lost when it is cut and the meat will be juicier and more tender To keep the meat warm cover with foil The meat will continue to cook during standing so all...

Page 23: ...e 7 160 170 45 60 75 80 Hogget medium 7 160 170 30 40 65 70 Hogget well done 7 160 170 45 60 75 80 Pork well done 7 180 185 40 45 75 80 Chicken well done 7 160 180 25 30 82 85 Venison rare 7 220 3 5 p...

Page 24: ...on the selected burner The flame can be adjusted anywhere between the HI symbol and the LO symbol Do not regulate the flame between high and the OFF position If the cooktop hob does not light Check th...

Page 25: ...other is the flame failure probe Cooktop hob utensils To get the best out of your Galaxy cooktop follow these simple suggestions Do not use an asbestos mat between the flame and the saucepan as this...

Page 26: ...g do not leave the Barbeque while it is on Turn to Off at the end of the cooking time Barbeque first use Wash the barbeque grid in warm water Use a scouring pad to remove any residue that might be on...

Page 27: ...y once about halfway through the cooking time To test press the surface of the steak The softer the meat is the rarer or less well done it will be Griddle scones pancakes pikelets polenta and eggs are...

Page 28: ...clean the oven while it is still warm using household detergents or an ammonia based cleaner You may use off the shelf oven cleaners if you carefully follow the manufacturers instructions To make cle...

Page 29: ...insertedintothe smallslotsatthetopoftheoven Cleaning the shelf slides Important Donotwashtheshelfslidesinthedishwasher Donotimmersetheminsoapywater oruseovencleaneron them Removingthe white lubricatin...

Page 30: ...are kept clear When replacing the burner rings after cleaning turn the rings until the positioning teeth are placed correctly Be careful of sharp edges at each end of the cooktop hob Cleaning the bar...

Page 31: ...e and check that 1 Your product is correctly installed 2 You are familiar with its normal operation If after checking these points you still need assistance please refer to the Service Warranty book f...

Page 32: ...BURNERS NATURAL GAS LP GAS Injector orifice MJ h 1kPa Injector orifice MJ h 2 75kPa Semi Rapid RH Front RH Rear 1 3 mm 8 1 MJ h 0 80 mm 8 0 MJ h Auxiliary Burner LH Front 0 85 mm 3 5 MJ h 0 55 mm 3 9...

Page 33: ...118 2 60 080 2 50 182 140 3 60 095 3 60 263 II 2L3 B P 30 118 2 40 080 2 50 182 145 3 50 095 3 60 263 II 2E3 B P 50 118 2 60 070 2 60 190 140 3 60 076 3 60 263 DI1203DG Auxiliary Semi Rapid RH front R...

Page 34: ...32...

Page 35: ......

Page 36: ...s described at the date of issue Under our policy of continuous product improvement these specifications may change at any time You should therefore check with your Dealer to ensure this booklet corre...

Reviews: