


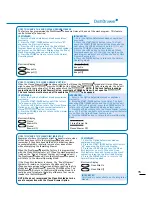


CLEANING THE
The
may need wiping down from time to time.
We recommend a clean damp cloth.
We do not recommend the use of the following cleaning
agents on your
as they may damage it:
Plastic or stainless steel scouring pads. Abrasive, solvent,
household cleaners, acid or alkaline cleaners. Hand
washing liquids, soap, laundry detergents or disinfectants.
If a dishwasher cleaner/descaler is used, you must run a
wash program with detergent immediately afterward to
prevent any damage to the
.
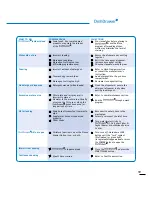
CLEANING THE DRAIN FILTER, SPRAY ARM AND
FILTER PLATE
We recommend the drain fi lter be cleaned whenever there
is evidence of food particles. The fi lter plate is designed
to be self cleaning, but food scraps may accumulate. The
spray arm and fi lter plate may need cleaning about once
a month in normal use or more often, should the need
arise.
CLEANING THE DRAIN FILTER
1. Lift up the drain fi lter access panel, if fi tted on
the basket.
2. Lift and remove the drain fi lter out of the
.
3. Empty, rinse under clean running water and
replace back into the allocated space.
4. Ensure the drain fi lter is fl ush with the fi lter plate.
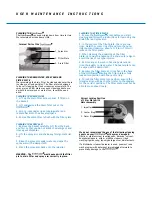
CLEANING THE SPRAY ARM
1. Remove the basket carefully. Lift from the back
end fi rst so that you do not knock the detergent and
rinse agent dispenser.
2. Lift the spray arm and shake any foreign material
out.
3. Rinse the spray arm under water and wipe the
spray arm with a damp cloth.
4. Place the spray arm back onto the impeller.
WARNING - The
must be used with the fi lter
plate, drain fi lter and spray arm correctly in place.
U S E R M A I N T E N A N C E I N S T R U C T I O N S
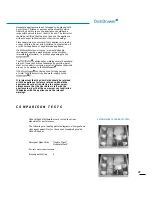
CLEANING THE FILTER PLATE
1. Ensure the
is cool before you start
cleaning and follow the instructions for removing the
drain fi lter and spray arm.
2. In the center of the fi lter plate, there are two
rings. Hold the center ring still and turn the outer
ring counter-clockwise, about a 1/8 turn. This will
release the fi lter plate.
3. When cleaning the underside of the fi lter
plate, care must be taken on the sharp outer edge to
avoid the risk of cut type injuries.
4. Remove any soil, wash in hot soapy water and
rinse thoroughly in clean water. The heater plate can
be wiped with a damp cloth.
5. Replace the fi lter plate so it lies fl at in the base
of the
ensuring the fi lter plate is fully
locked into position with the centre ring.
6. To lock the fi lter plate into position, ensure the
triangles align with each other (refer to the diagram
for the correct position). The fi lter plate must not be
able to move about freely.
1. Spray Arm
3. Drain Filter
2. Filter Plate
Internal Parts of the
Correct Locking Position
of Filter Plate with
Motor Assembly
1. Impeller
3. Outer Ring
2. Center Ring
Summary of Contents for DishDrawer DD603 PREFINISHED
Page 1: ...U S E R G U I D E ...


