Fisher & Paykel DCS BE1-30 User Manual Download Page 9

7

SAFETY AND WARNINGS

z

z

Do not store a full LP tank in direct sunlight.

z

z

After a period of storage or non-use, the appliance should be checked for gas leaks, 

deterioration, proper assembly, and burner obstructions before use.

General Use

z

z

This appliance is not intended to be installed in or on recreational vehicles, trailers or 

boats. 

z

z

After lighting burners, ensure they are operating correctly.

z

z

When using the appliance, be sure that all parts of the unit are firmly in place and that 

everything is stable.

z

z

On cart mounted units, never move without first allowing the appliance to cool, 

disconnecting the cable and ensuring that the gas supply is turned off.

z

z

Do not move the appliance during use.

z

z

Children should not be left alone or unattended in an area where the product is being 

used. Never allow them to sit, stand or play on or around the unit at any time.

z

z

Do not store items of interest to children around or below the appliance.

z

z

Never use the appliance in a windy area.

z

z

To put out flare-ups, adjust the controls to lower the temperature.

z

z

Do not obstruct the flow of combustion and ventilation to the appliance.

z

z

Spiders and insects can nest in the burners or openings and can block or restrict the 

burner. This can cause a flash back to the control panel which can cause a fire.

z

z

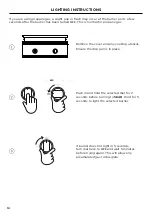
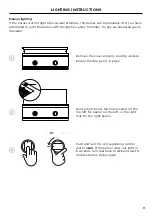
Do not try lighting this appliance without reading the lighting instruction in the user 

guide.

z

z

Do not locate, store or operate the appliance on a slope.

z

z

This product must be installed by a licensed plumber or gas fitter when installed within 

the Commonwealth of Massachusetts.

z

z

Never use a dented or rusty LP tank. Keep the ventilation openings of the cylinder 

enclosure free and clear from debris.

z

z

Clean and perform general maintenance on the appliance regularly. Watch for corrosion, 

cracks, or insect activity. Check the regulator, hoses, burner ports, air shutter, and 

venturi/valve section carefully. Always turn off gas at the source prior to inspecting.

z

z

You must inspect the unit at least once a year or immediately if the smell of gas is 

present in conjunction with the burner flames appearing yellow, the appliance does not 

reach temperature or heats unevenly or the unit makes popping noises.

z

z

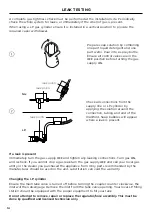
Do not smoke while leak testing and extinguish all open flames.

z

z

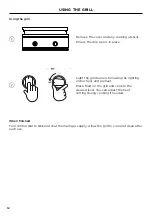
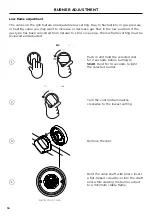
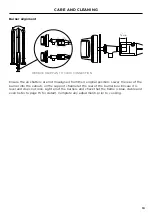
When cleaning the burners centre the burner onto the orifice correctly and ensure they 

are level before lighting to prevent fire hazard or explosion. Refer to the user guide for 

detailed guidance. 

z

z

Use only a Ground Fault Interrupter (GFI) protected circuit with this outdoor cooking 

gas appliance.

z

z

Unplug from the outlet when not in use and before cleaning. Allow to cool before 

putting on or taking off parts.

z

z

Do not operate the appliance with a damaged cord, plug, or after the appliance 

malfunctions or has been damaged in any manner. Contact the manufacturer for repair.

z

z

Do not let the cord hang over the edge of a table or touch hot surfaces.

z

z

When connecting, first connect plug to the appliance then plug appliance into the 

outlet.

z

z

Do not place the unit directly on the ground or other surface without support. This will 

prevent damage to the regulator/hose assembly.

Summary of Contents for DCS BE1-30

Page 1: ...USER GUIDE US CA OUTDOOR GRILL BE1 30 Models ...

Page 2: ...p away from the appliance and immediately call your gas supplier or your fire department WARNING Do not store or use gasoline or other flammable liquids or vapors in the vicinity of this or any other appliance An LP cylinder not connected for use must not be stored in the vicinity of this or any other appliance ...

Page 3: ...TENTS Introduction 3 Safety and warnings 4 Before you begin 9 Lighting instructions 10 Using the grill 12 Leak testing 14 Burner adjustment 15 Care and cleaning 17 Troubleshooting 20 Warranty and service 21 ...

Page 4: ......

Page 5: ...ill gives you 525 square inches of flat top grilling space with up 50 000 BTU Designed with flexibility in mind the All Grill can be built in to match the full suite of professional styled DCS Series 9 products or mounted on a freestanding cart to create the complete outdoor kitchen for your backyard ...

Page 6: ... A marking Do not immerse cord or plugs in water or other liquid WARNING Fire Hazard Failure to follow this advice may result in a fire causing death or serious injury This unit is for outdoor use only Do not operate under un protected combustible construction Do not use in buildings garages sheds breezeways covered structures or other such enclosed areas Never store a spare LP cylinder under or n...

Page 7: ...ention to what you are doing Be certain you are pushing the burner dial when you attempt to light Never operate the unit without a drip tray Let hot grease cool before attempting to handle it Avoid letting grease deposits collect in the drip pan Ensure all controls are turned off and the unit is cool before using any type of aerosol cleaner on or around the product The chemical that produces the s...

Page 8: ...check for gas leaks z z Do not attempt to disconnect any gas connections while your appliance is in use or the gas supply is on z z Never connect an unregulated gas line to the appliance z z Have an ABC rated Fire Extinguisher accessible never attempt to extinguish a grease fire with water or other liquids Storage z z When not in use ensure the gas supply is turned off at the supply cylinder z z K...

Page 9: ... must be installed by a licensed plumber or gas fitter when installed within the Commonwealth of Massachusetts z z Never use a dented or rusty LP tank Keep the ventilation openings of the cylinder enclosure free and clear from debris z z Clean and perform general maintenance on the appliance regularly Watch for corrosion cracks or insect activity Check the regulator hoses burner ports air shutter ...

Page 10: ...inder valve z z An installer supplied gas shut off valve must be installed in an easily accessible location z z All installer supplied parts must conform to local codes or in the absence of local codes with the National Electrical Code ANSI NFPA 70 or the Canadian Electrical Code CSA C22 1 and the National Fuel Gas Code ANSI Z223 1 or CSA B149 1 Natural Gas Installation Code or CSA B149 2 Propane ...

Page 11: ...riodically to protect the grate surface from corrosion and to stop food sticking 1 Pour two teaspoons of vegetable oil on a soft cloth and rub on both sides of the grates Only a light coating is needed 2 Turn the dial to a medium heat setting Some smoke may be visible during the preheating stage 3 Turn the dial to OFF when the oil begins to smoke and allow the grill to cool 4 Repeat as needed Dial...

Page 12: ...ht in 5 seconds turn dial back to OFF and wait 5 minutes before trying again This will allow any accumulated gas to dissipate 2 3 1 Remove the cover and any cooking utensils Ensure the drip pan is in place If you are using propane gas a slight pop or flash may occur at the burner ports a few seconds after the burner has been turned OFF This is normal for propane gas ...

Page 13: ...lated gas to dissipate Hold a match over the hole located on the top left for burner on the left or the right hole for the right burner Push and turn the corresponding control dial to SEAR If the burner does not light in 5 seconds turn dial back to OFF and wait 5 minutes before trying again 2 1 3 LIGHTING INSTRUCTIONS Remove the cover and any cooking utensils Ensure the drip pan is in place ...

Page 14: ...n the grill and cook to the desired level You can adjust the heat setting during cooking if needed 2 Using the grill When finished Turn control dial to OFF and shut the main gas supply Allow the grill to cool and clean after each use Remove the cover and any cooking utensils Ensure the drip pan is in place ...

Page 15: ... away from food The other side has a radius surface area providing more support for handling of delicate food items Grilling guidelines Grilling requires high heat for searing and browning Most foods are cooked at the MED to HI heat setting for the entire cooking time however when grilling large pieces of meat or poultry it may be necessary to turn the heat to LOW after the initial browning Foods ...

Page 16: ...vide the required vapor withdrawal If a leak is present Immediately turn the gas supply OFF and tighten any leaking connections Turn gas ON and recheck If you cannot stop a gas leak turn the gas supply OFF and call your local gas utility or the dealer you purchased the appliance from Only parts recommended by the manufacturer should be used on the unit substitution can void the warranty Changing t...

Page 17: ...ner and light to check If the flame is blue and stable remove the burner tighten the air shutter screw and replace all parts If flame is still unstable repeat the above steps Ensure the grill is OFF and cool To access the air shutters remove the grate radiant and U burner With a screw driver loosen the lock screw on the face of the air shutter so it can be adjusted If the flame is yellow turn the ...

Page 18: ...low flame setting must be reviewed and adjusted 1 3 4 2 Remove the dial Hold the valve shaft with pliers insert a flat tipped screwdriver into the shaft and while viewing the burner adjust to a minimum stable flame Turn the control dial counter clockwise to the lowest setting BEZEL FRONT VIEW Push in and hold the selected dial for 2 seconds before turning to SEAR Hold for 10 seconds to light the s...

Page 19: ...y food particles loosened in the process will fall onto the ceramic rods and burn off or fall into the drip pan Sear clean Turn burners on HI for 15 20 minutes to burn any remaining food particles After turning the grill OFF use a bristle brush to remove any remaining food particles or ash Ceramic rods If grease can be seen on the rods or there are a lot of flare ups during cooking turn the rods o...

Page 20: ...ean the exterior of the burner with a stainless steel wire brush Clear stubborn scale with a metal scraper Clear any clogged ports with a straightened paper clip Never use a wooden toothpick as it may break off and clog the port Shake out any debris through the air shutter Use a flashlight to inspect the burner inlet to ensure it is not blocked If obstructions can be seen use a metal wire to remov...

Page 21: ...saligned from their original position Lower the rear of the burner into the cutouts on the support channel at the rear of the burner box Ensure it is level and does not rock Light all of the burners and check that the flame is blue stable and even refer to page 15 for detail Complete any adjustments prior to cooking ...

Page 22: ...ow or orange in conjunction with the odor of gas Dirt or dust may be present in the area Move to a less dusty area and check for obstructions Incorrect gas supply or type Confirm gas supply and type Low heat with dial in the HI position Fuel hose may be bent or kinked Check hose is routed correctly Burner may need cleaning Follow cleaning instructions If using LP gas supply may be low or empty Che...

Page 23: ...ound on the inside right side panel behind the drip pan handle z z Code can be found on the inside right side panel behind the drip pan handle z z Date of installation If after checking these points you still need assistance or parts please refer to the Service Warranty book for warranty details and your nearest Service Centre Customer Care or contact us through our website www dcsappliances com o...

Page 24: ...ment apply to the specific products and models described at the date of issue Under our policy of continuous product improvement these specifications may change at any time You should therefore check with your Dealer to ensure this document correctly describes the product currently available DCSAPPLIANCES COM ...

Reviews: