background image

12

STORAGE FEATURES

REFRIGERATOR

Fruit and vegetable bins

Separate fruits and vegetables to prevent 
ethylene-sensitive produce from ripening too quickly 
helps to extend their storage life.

Also used for storing deli items and beverages, or 
for defrosting foods.

Cantilever glass shelving

Heat-treated safety glass

Can be removed and positioned at heights to suit 
your storage requirements.

The half-width shelves can be positioned side by side; 
best when storing large items such as platters. 

Maximize the storage space when storing items of 
varying heights by positioning the half-width shelves 
at different levels.

Dairy shelf and door shelves

The top door shelf is a dairy compartment for storing 
butter and cheeses.

The middle shelves are designed for general items, 
condiments and drinks. 

The bottom shelves are designed to store large drinks 
or those drinks you require frequent access to. 

Clear windows give ultimate visibility to what is being 
stored in the door shelves. 

Adjustable door shelves with dividers.

Single bottle holders

Placed along the length of any shelf to store a 
variety of bottles. 

Store bottles with the neck facing the front of 
the refrigerator.

Unused bottle holders can be stacked on top of one 
another to maximize shelf space.

FREEZER

Ice maker* 

Removable ice container.

Hygienic ice scoop.

Freezer bins

Allow for easy storage of frozen food items.

* Ice & Water and Automatic Ice models only.

Summary of Contents for ACTIVESMART RF203QD

Page 1: ...USER GUIDE US CA ACTIVESMART FREESTANDING REFRIGERATOR CONTEMPORARY QUAD DOOR REFRIGERATOR FREEZER ICE WATER RF203QDU QUAD DOOR REFRIGERATOR FREEZER NON ICE WATER RF203QD...

Page 2: ......

Page 3: ...3 CONTENTS Registration To register your product visit our website fisherpaykel com register 4 9 10 12 13 27 28 34 35 36 37 42...

Page 4: ...o can result in death electric shock fire or injury to persons Read and follow the safety and warnings outlined in this User guide before operating this appliance WARNING Risk of fire flammable materi...

Page 5: ...area by opening all windows z Do not operate electrical equipment or any other equipment that may produce arcs sparks or flames in the area Contact your Fisher Paykel trained and supported service te...

Page 6: ...appliance as they may explode z Never freeze liquids in glass containers Liquid expands during freezing which may cause the container to explode z Never freeze carbonated drinks They may explode Serv...

Page 7: ...e to replace the disposable filter at recommended intervals may lead to reduced filter performance and failure of the filter causing property damage from water leakage or flooding z In cases of excess...

Page 8: ...o 4 hours during a power outage Keep the door closed as much as possible Discard refrigerated perishable food such as meat poultry fish eggs and leftovers after 4 hours without power IMPORTANT This de...

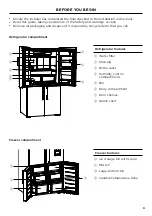
Page 9: ...ll packaging and dispose of it responsibly Recycle items that you can 3 6 8 4 5 1 2 Refrigerator compartment Freezer compartment 7 1 3 2 Refrigerator features 1 Water filter 2 Shelving 3 Bottle racks...

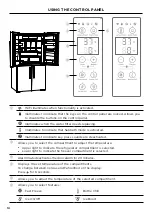
Page 10: ...are deactivated 2 Allows you to select the compartment to adjust the temperature z Upper light to indicate the refrigerator compartment is selected z Lower light to indicate the freezer compartment is...

Page 11: ...compartment without waiting for it to thaw Meats seafood soups sauces pureed foods bread desserts and pastries Not recommended for storage of creamy desserts such as ice cream 5 CHILL MODE 0 5 C 31 F...

Page 12: ...nt levels Dairy shelf and door shelves The top door shelf is a dairy compartment for storing butter and cheeses The middle shelves are designed for general items condiments and drinks The bottom shelv...

Page 13: ...the temperature of all compartments accurately and independently The internal control panel default setting is to show the set temperature for the refrigerator compartment For common foodstuffs the f...

Page 14: ...tivate after 20 minutes or when the door is closed Key Mute 86 116 150 70 To activate deactivate KEY MUTE press for four seconds Once KEY MUTE is activated the icon on the internal control panel illum...

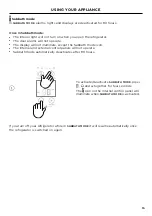
Page 15: ...ll not illuminate except the Sabbath mode icon z The internal and external control panels will not operate z Sabbath mode automatically deactivates after 80 hours To activate deactivate SABBATH MODE p...

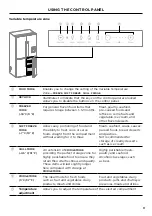
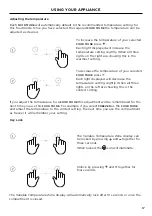
Page 16: ...st setting The FOOD MODE selected will illuminate 2 Unlock the Variable Temperature Zone display by pressing and together for four seconds 1 The default temperature for each FOOD MODE will show as one...

Page 17: ...ncrease the temperature of your selected FOOD MODE press Each light displayed will increase the temperature setting slightly When all three lights on the right are showing this is the warmest setting...

Page 18: ...2 To activate press on the internal display The FAST FREEZE light will illuminate To deactivate before the 12 hours has elapsed press again When FAST FREEZE is deactivated the light is off 1 Features...

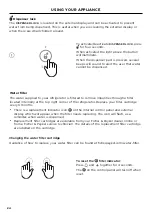
Page 19: ...alarm will sound after 15 minutes to remind you to remove your beverage For non water dispensing models Open the refrigerator compartment door and press any button on the control panel to silence the...

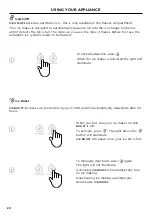
Page 20: ...ng automatically deactivates ICE BOOST 1 150 70 ICE BOOST increases ice production by up to 30 and will automatically deactivate after 24 hours IceOn Off ICE ON OFF activates automatic ice this is onl...

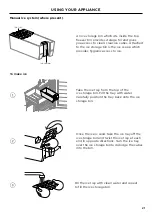
Page 21: ...to ice 1 Fill the ice tray with clean water and repeat to fill the ice storage bin 3 2 Take the ice tray from the top of the ice storage bin Fill the tray with water Carefully position the tray back...

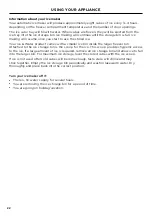
Page 22: ...larger freezer bin Attached to the ice storage bin is the scoop for the ice This scoop provides hygienic access to the ice If a large amount of ice is required remove an ice storage bin and allow ice...

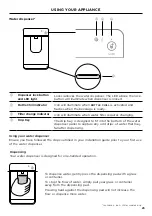
Page 23: ...the water dispenser The LED above the lock button will illuminate when dispenser is locked 2 Bottle Chill indicator Icon will illuminate when BOTTLE CHILL is activated and flashes when the beverage i...

Page 24: ...d internally at the top right corner of the refrigerator Replace your filter cartridge every 6 months z There is a replacement indicator icon on the internal control panel and external display which w...

Page 25: ...to ensure optimum performance of your water filter USING YOUR APPLIANCE To flush through the automatic icemaker 1 2 Press and hold and together for 4 seconds then close the door s The ice tray will f...

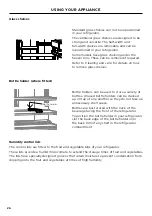
Page 26: ...not be repositioned in your refrigerator The cantilever glass shelves are designed to be strong and versatile The half width and full width shelves are removable and can be repositioned in your refri...

Page 27: ...ted z Ensure your home WiFi network is turned on z You will be given step by step guidance on your mobile device z It may take up to 10 minutes to connect your appliance On your mobile device 1 Downlo...

Page 28: ...wind feet down 1 Wind up the feet and carefully ease the refrigerator out of its position Switch off and unplug 2 Exterior Clean all surfaces with liquid dishwashing detergent dissolved in warm water...

Page 29: ...s may dissolve damage and or discolour the interior of your refrigerator Remove the shelves from the cabinet and door Wipe all interior surfaces using only liquid dishwashing detergent dissolved in wa...

Page 30: ...he shelf towards you Slide the shelf towards you Lift the shelf up vertically 1 3 2 Cantilever glass shelves half width and full width To remove Hold the front and back edge of the shelf firmly Push t...

Page 31: ...solved in water and a tube brush or a clean lint free cloth 1 Humidity control lid To remove Remove all shelving follow the steps in section Glass shelving Hold the lid firmly and lift the outside edg...

Page 32: ...t of the bin handle Lift vertically to unclip from the runners Pull bin towards you to remove from the refrigerator Push both runners back into the refrigerator 1 2 How to replace Extend the runners o...

Page 33: ...t the ice scoop is placed in correct position in the bin right hand side or at the front of the bin model dependent Glass shelves Freezer if present To remove Remove the bin above the glass shelf refe...

Page 34: ...ign of spoilage z Keep door openings to a minimum to maintain optimum storage temperatures inside your appliance z We recommend using FAST FREEZE when you are adding food items to your appliance such...

Page 35: ...of warm water and a small amount of liquid dishwashing detergent Rinse with clean water and dry with a soft lint free cloth Holiday Vacation time Leave your refrigerator operating while you are on hol...

Page 36: ...te the cold air in the refrigerator and freezer compartments producing some air flow sound This is quite normal z Cracking or popping sounds This may occur when the automatic defrost function is opera...

Page 37: ...k refrigerator is turned on at wall Light and display not working Product in SABBATH MODE Press and hold and together for 4 seconds Motor operates for long periods Hot weather Minimise door openings t...

Page 38: ...et leaking Check that gasket is sitting flat and sealing tightly Not unusual during periods of high humidity Wipe dry Door out of alignment With time and usage movement may occur Refer to your install...

Page 39: ...t unusual during periods of high humidity Wipe dry Door handles out of alignment With time and usage movement may occur Refer to your installation guide Tray bin does not slide in and out evenly Packa...

Page 40: ...Interior of freezer needs cleaning Ice storage bin needs to be emptied and washed Clean refrigerator Poor taste from incoming water Filter may need to be replaced with new one Force 2 3 ice tray flip...

Page 41: ...On first installation there may be air in water system To remove air run 3 4 gal 3L of water through the dispenser Filter may be blocked and need replacing Replace filter see your Service Warranty doc...

Page 42: ...ided with your refrigerator This product has been designed for use in a normal domestic residential environment This product is not designed for any commercial use Any commercial use by the customer w...

Page 43: ......

Page 44: ...ge at any time The product specifications in this guide apply to the specific products and models described at the date of issue Under our policy of continuous product improvement these specifications...

Reviews: