Fisher & Paykel Active Smart Dual Installation Manual Download Page 13

11

!1

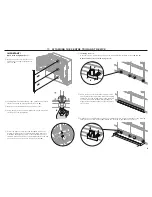
   ATTACHING THE CENTRE TRIM AND TOE KICK

IMPORTANT!

Open both refrigerator doors.

1

  Bring the centre trim in front of the 

gap between the two refrigerators 
(refer to 

A

).

2

  Starting from the upper spring clips, squeeze the clips to 

slot between the two refrigerators (refer to 

B

).

3

  Repeat on the middle and then the lower clips.

4

  Using the palm of your hand, push trim all the way down 

the length of the refrigerator.

C

B

6


Installing toe kick

Unscrew the toe kick bracket screws mid-way, and bring forward (refer to 

D

 and 

E

).

Repeat this process for both refrigerators.

5

  Screw the M8 set screw into the threaded hole of the 

bottom joiner bracket to support the middle trim. This 
maintains the height position of the trim. Once you are 
satisfied with the location of the middle trim, use the M8 
nut to lock the set screw into location (refer to 

C

). 

7

  Place toe kick over the brackets and position 

the outer brackets until flush with surrounding 
cabinetry. Use the folded edge of the supplied 
toe kick or another suitable straight edge to 
align the inner brackets. Once aligned, remove 
the toe kick.

8

  Tighten the toe kick bracket screws to lock brackets into position and remove the backing 

from the Velcro strip (refer to 

F

). Attach the toe kick to the adhesive surfaces.

A

F

D

E

Summary of Contents for Active Smart

Page 1: ...ACTIVESMART INTEGRATED REFRIGERATOR RS36W and RS91W Models FRAMED AND FRAMELESS CABINETRY DUAL INSTALLATION GUIDE NZ AU GB IE HK SG IN US CA...

Page 2: ......

Page 3: ...5 Attaching foam pads 5 6 Removing hinge bracket and fitting alcove bracket 6 7 Attaching top joiner bracket and alcove fixing bracket to alcove 7 8 Location of products into alcove Right product 8 9...

Page 4: ......

Page 5: ...MPORTANT For correct and complete installation of your refrigerator s follow the Installation guide booklet supplied with your refrigerator This booklet is supplementary providing instructions which a...

Page 6: ...pads 6 Spring clips provided with the appliance 6 Centre trim 1 Bottom joiner bracket 1 M8 nut 1 M8 Nut M8 Nut M8 set screw 1 M8 Screw Set M8 Screw Set M5 x 12 Socket head cap screw 11 M5 x 12 SHCS S...

Page 7: ...ge of the cabinet 2 50mm from the cabinet top 35 890mm from the cabinet top 13 50mm from the floor Repeat on the left side of the right hinge product IMPORTANT Foam pads should be placed at identical...

Page 8: ...he alcove bracket This process is required for both left and right hinge refrigerators 1 4 6mm Top trim 1 Ensure the distance between the end of the top trim and the side of the cabinet is not greater...

Page 9: ...ce 1 should be 1 1 4 108mm x x distance the product sits proud Face 2 should be lined up with the centre of the alcove Using 8 x 16 mush washer screws 4 align and fix the joiner bracket to the centre...

Page 10: ...r height refer to separate Installation guide booklet supplied with your refrigerator 3 Screw two M5 x 12 Socket head cap screws to connect the alcove bracket to the joiner bracket refer to A 4 If the...

Page 11: ...efrigerator refer to separate Installation guide booklet supplied with your refrigerator on how to achieve flushness 2 Open the left hinge refrigerator door to access the brackets refer to B 3 Adjust...

Page 12: ...de booklet supplied with your refrigerator 4 Mark out three locations for the spring clips along the centre trim to match foam pad locations on cabinet 5 Insert right hand spring clip into the centre...

Page 13: ...process for both refrigerators 5 Screw the M8 set screw into the threaded hole of the bottom joiner bracket to support the middle trim This maintains the height position of the trim Once you are satis...

Page 14: ......

Page 15: ......

Page 16: ...ooklet apply to the specific products and models described at the date of issue Under our policy of continuous product improvement these specifications may change at any time You should therefore chec...

Reviews: