Firstech Computrack CT-501-PA Installation Manual Download Page 10

CT-501-PA U

sers

/I

nsTAll

 M

AnUAl

C

oMPUTrACk

 GPs s

ysTeM

www.computracklive.com

CT-501-PA U

sers

/I

nsTAll

 M

AnUAl

C

oMPUTrACk

 GPs s

ysTeM

www.computracklive.com

Copyright 2009 Firstech, LLC.

Page 10

Copyright 2009 Firstech, LLC.

Page 15

- The wiring harness includes a 5-amp fuse on the RED wire, providing Power. 

The fuse must be installed close to the 12 Volt source. If you connect the RED 

wire directly to the vehicle’s battery Positive Post, then the fuse MUST be 

installed within 12 inches of the Positive battery terminal. Optionally, a second 

5-amp fuse may also be used at the monitoring unit’s mounting location.

It is now time to power-up the unit. Proceed as follows:

1. Make sure the vehicle is parked outside and away from buildings    

that may block the GPS signals. 

2. Make sure the backup battery switch is in the OFF position.

3. Plug the keyed harness connector into its mating receptacle on the    

monitoring unit. The receptacle is marked “Input/Output.” 

4. The unit should now have power. The LEDs will start flashing. The    

GREEN LED will stop flashing within a minute or two, as it achieves    

signal lock with the AT&T GSM (Global System for Mobile Com 


munications) network. The RED LED will stop flashing when it locks    

onto its GPS (Global Positioning Satellite) signal, usually within three    

minutes.

5. Switch the Battery switch to the ON position.

Congratulations! You’ve completed the physical installation. It is now time 

for the final test.


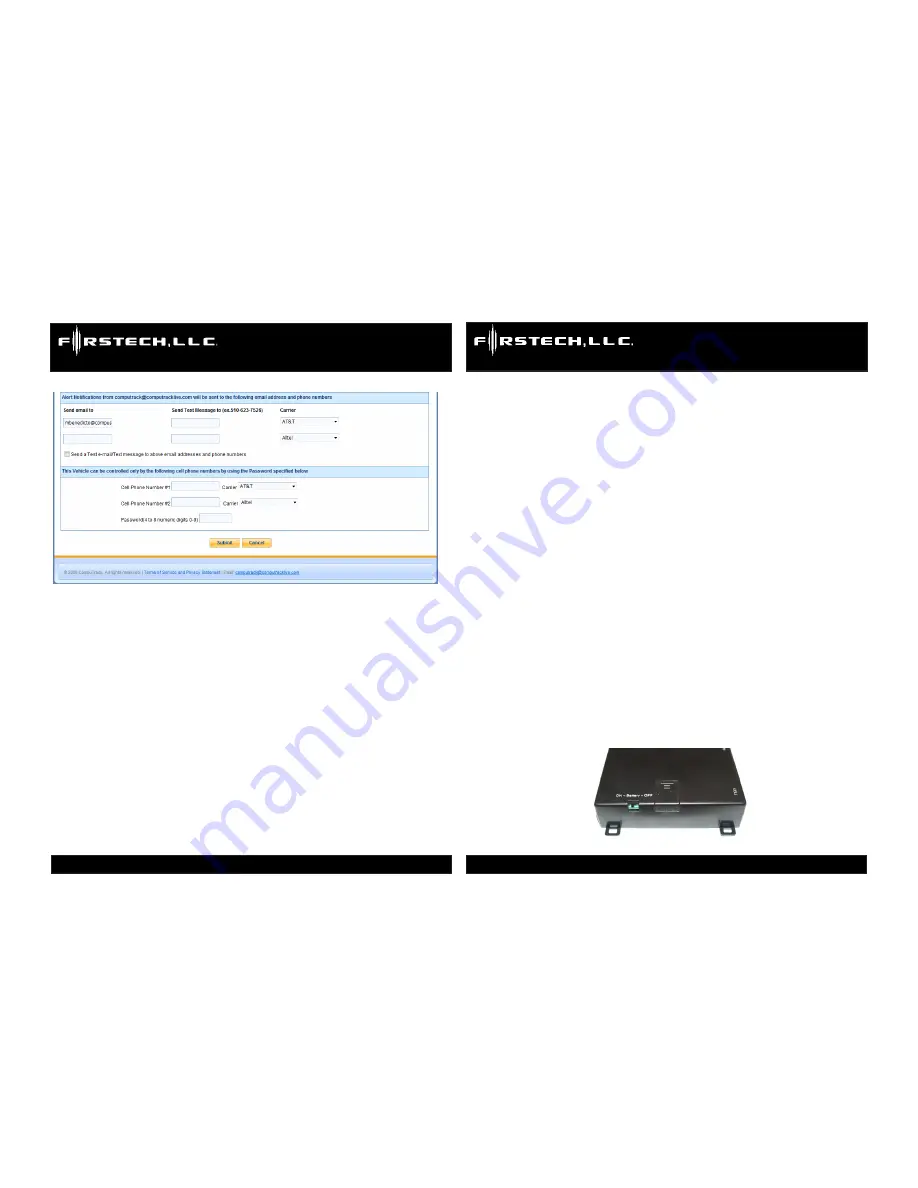
Input the customer’s information in the section marked “Alert Notifications 

from [email protected] will be sent to the following email address 

and phone numbers”.  

You should also input the customer’s information in the section marked 

“This vehicle can be controlled only by the following cell phone numbers 

by using password specified below.” 

Note: 

If you intend to use your own cell phone for testing purposes, you can 

temporarily submit your own cell phone information. Your cell phone 

should be capable of sending and receiving text messages if you intend 

to use it for testing. Remember to return to the Configuration Page to re

-

move your cell phone info when you have completed testing, and before 
you deliver the system to your customer. 

When you’ve finished inputting the required information, click the “Submit” 

button at the bottom of the page.

Summary of Contents for Computrack CT-501-PA

Page 1: ...Please visit www computracklive com for additional installation resources Firstech LLC 21911 68th Ave S Kent WA 98032 Phone 888 820 3690 Fax 206 957 3330 Installation Manual Computrack CT 501 PA...

Page 2: ...r lock actuators White Positive Alarm Sense THEFT ALARM Alarm trigger sense input Alarm sounding devices are powered by 12 volts positive The CompuTrack GPS unit monitors 12 volt positive and or negat...

Page 3: ...BE USED TO IN TERRUPT THE VEHICLE FUEL PUMP OR IGNI TION AS THE LIABILITY OF A VEHICLE LOOS ING STEERING OR BRAKING IS SIGNIFICANT CT 501 PA Users Install Manual Computrack GPS System www computrackli...

Page 4: ...___ The customer s full contact info including name address cell phone number and cellular service provider and email address Address ______________________________________________________ Cellular Op...

Page 5: ...h Lights commands require an Advanced Instal lation Congratulations You ve completed the physical installation the regis tration and final test You are now ready to deliver the system to your customer...

Page 6: ...uration Page you can use it to send a Locate Now command to the CompuTrack unit Message Format The format for the Locate Now command consists of the password followed by a single blank space followed...

Page 7: ...to test the CompuTrack GPS unit The test will consist of using a cell phone to send a Locate Now command to the remote Compu Track unit and receiving a response from it on a cell phone Here s how you...

Page 8: ...tton at the bottom of the page to complete the regis tration C Configuration After completing the registration you will be taken to the customer s Home Page which will look something like this Check t...

Page 9: ...ces near the bottom of the page This section will enable you to specify which cell phones are allowed to send messages to the CompuTrack monitoring unit and to receive messages from it That section of...

Page 10: ...ing within a minute or two as it achieves signal lock with the AT T GSM Global System for Mobile Com munications network The RED LED will stop flashing when it locks onto its GPS Global Positioning Sa...

Page 11: ...ck with a meter if you are not sure Connect the RED wire from the wiring harness to a known good source of full time 12 volt positive power Make sure that the power source has constant 12 volts Congra...

Page 12: ...S monitoring unit OR Use the wiring harness that is included with the CompuTrack GPS monitoring unit Simply disconnect the wiring harness from the monitoring unit mak ing sure the 5 amp fuse is in pla...

Reviews: