background image

MANTENIMIENTO Y ALMACENAMIENTO

PROGRAMA DE MANTENIMIENTO

ITEM

OBSERVACIONES

A diario (Antes 
de usar)

Primeras 
25 horas

Cada 
50 horas

Cada 100 
horas (o 
anualmente)

Accesorios
/Cierres

Bujía

Aceite del 
motor

Filtro de aire

Filtro de 
Carburante

Línea de 
combustible

Sistema de 
escape

Carburador

Sistema de 
arrancado

Comprobar el estado. Ajustar la 
separación y limpiar. Cambiar si 
es necesario.

Comprobar el nivel de aceite.

Limpiar, reemplazar si es necesario.

Limpiar el filtro de carburante y el 
colador del depósito de combustible.

Comprobar que no haya fugas. 

Volver a ajustar o reemplazar la 

junta si es necesario.

Revisar el funcionamiento del 
estárter.

Comprobar el funcionamiento 
del arrancador de retroceso.

Revisar. Reemplazar si es necesario.

Comprobar que no haya grietas u otros 
daños en la manguera de carburante. 
Reemplazar si es necesario.

Recomendaciones Generales

Reemplazar.

Revisar la rejilla del apagachispas. 
Limpiar/Reemplazar si es necesario.

 23

Spanish                                                                                                                                                Servicio al Cliente: 1-844-FIRMAN1

Summary of Contents for P03608

Page 1: ...and level before performing any maintenance or service IMPORTANT Record product information to reference when ordering parts or obtaining warranty coverage Serial Number PORTABLE GENERATOR MODEL NUMB...

Page 2: ...the Generator Electric Start 19 Starting the Generator Remote Start 20 Connecting Electrical Loads 21 Stopping the Engine 21 Low Oil Shutdown 22 Do Not Overload Generator 22 Introduction Battery Cabl...

Page 3: ...mation The manufacturer cannot possibly anticipate every possible circumstance that might involve a hazard The warnings in this manual and the tags and decals affixed to the unit are therefore not all...

Page 4: ...SAFETY PRECAUTIONS Page 02 WARNING POISONOUS GAS HAZARD WARNING WARNING English Customer Service 1 844 FIRMAN1...

Page 5: ...de and downwind far away from windows doors and vents Direct exhaust away from occupied spaces INCORRECT USAGE Do not operate in any of the following locations Near any door window or vent Garage Base...

Page 6: ...ns fire or explosion resulting in death or serious injury and or property damage WHEN ADDING OR DRAINING FUEL Turn generator engine OFF and let it cool at least 2 minutes before removing fuel cap Loos...

Page 7: ...T handle generator or electrical cords while standing in water while barefoot or while hands or feet are wet DO NOT allow unqualified persons or children to operate or service generator WARNING Exhaus...

Page 8: ...wer medical devices or medical appliances Inform your electricity provider immediately if you or anyone in your household depends on electrical equipment to live Inform your electrical provider immedi...

Page 9: ...following instructions and pictures to remove the attached engine support brackets red under the engine 3 You may discard these brackets as it is no longer required for normal operation of your gener...

Page 10: ...embly prior to usage If problem arise when assembling the generator call 1 844 347 6261 H K 1 Before adding wheels tip the generator on its side 2 Slide the axle pin A through the wheel B 3 Slide the...

Page 11: ...ed boot is securely tightened to the positive battery post Make sure boot is over battery post 2 Remove bolt M5X10 and M5 nut from black cable ring 3 Remove vinyl cap from the negative battery post Lo...

Page 12: ...5 Fuel Valve 6 Air Filter 7 208cc FIRMAN OHV Engine 8 Recoil Starter 9 8 0 Flat Free Wheel 10 Oil Filler Cap 11 Outlet Cover 12 Control Panel 13 Handle 14 Battery English Customer Service 1 844 FIRMA...

Page 13: ...debris 10 11 Page 11 NOTE Total power drawn from all receptacles must not exceed the name plate rating Engine Start Switch Used to start engine from the starter motor Electric start model only To sta...

Page 14: ...1 844 FIRMAN1 Remote Control Programming 1 Flip the engine switch to the RUN l position 2 Flip the battery switch to the ON l position 3 Push and hold the program button on the control panel for appro...

Page 15: ...z 0 6L Counter Clockwise Facing P T O Float Brushed Polyurethane Type Yes 4550 FIRMAN Rated Fequency 60Hz Oil Type See Add Engine Oil Section Spark Plug AN IMPORTANT MESSAGE ABOUT TEMPERATURE When ope...

Page 16: ...l activate a warning device or stop the engine If generator shuts off and the oil level is within specifications check to see if generator is sitting at an angle that forces oil to shift Place on an e...

Page 17: ...oke when filling the fuel tank 1 Clean area around fuel fill cap remove cap 2 Slowly add unleaded fuel to fuel tank Be careful not to fill above the red fuel level indicator This allows adequate space...

Page 18: ...g or steel work DO NOT touch bare wires or receptacles DO NOT use generator with electrical cords which are worn frayed bare or otherwise damaged DO NOT operate generator in the rain or wet weather DO...

Page 19: ...the weather Keep exhaust pipe clear of foreign objects Keep generator away from open flame Keep generator on a stable and level surface WARNING Surge Protection Voltage fluctuation may impair the prop...

Page 20: ...r to stablize WARNING When starting engine pull cord slowly until resistance is felt and then pull rapidly to avoid kickback 4 Turn the fuel valve to the ON l position 8 Pull the starter cord slowly u...

Page 21: ...t 2 Check oil level and fuel 3 Disconnect all electrical loads from the generator Never start or stop the generator with electrical devices plugged in or turned on 4 Turn the fuel valve to the ON l po...

Page 22: ...CONVENIENCE ANDITISREADYTO STARTTHEGENERATOR If the remote control is replaced then you will need to go through programming procedure in Remote Control Programming section 3 Disconnect all electrical...

Page 23: ...actory for correct output Readjusting will void warranty CAUTION When applying a load do not exceed the maximum wattage rating of the generator when using one or more receptacles Also do not exceed th...

Page 24: ...op the engine Check oil level with dipstick If oil level is between LOW and HIGH mark on dipstick 1 DO NOT try to restart the engine 2 Contact an Authorized FIRMAN Service Dealer 3 DO NOT operate engi...

Page 25: ...ar maintenance will improve the performance and extend the life of the generator See any authorized dealer for service The generator s warranty does not cover items that have been subjected to operato...

Page 26: ...ry animals Thoroughly wash exposed areas with soap and water a Drain oil by removing the drain plug and the oil filler cap while the engine is warm Change engine oil every 100 hours for a new engine c...

Page 27: ...asoline c Tightly fasten the cup to main body making sure to avoid fuel leak SCREEN O ring CUP BODY b Remove spark plug using provided wrench Inspect spark plug for damage and clean with a wire brush...

Page 28: ...rfaces of the generator Use a soft bristle brush to remove dirt and oil Use an air compressor 25 PSI to clear dirt and debris from the generator Inspect all air vents and cooling slots to ensure that...

Page 29: ...t position Store generator in a well ventilated low humidity area NOTE We recommend always using a fuel stabilizer A fuel stabilizer will minimize the formulation of fuel gum deposits during storage T...

Page 30: ...tank and carburetor fill with fresh fuel 7 Connect wire to spark plug 8 Replace spark plug 9 Drain gas tank and carburetor fill with fresh fuel 10 Wait 5 minutes and re crank engine 11 Contact author...

Page 31: ...Page 29 PARTS DIAGRAM AND PART LIST P03608 PARTS DIAGRAM English Customer Service 1 844 FIRMAN1 122...

Page 32: ...Page 30 208cc ENGINE PARTS DIAGRAM English Customer Service 1 844 FIRMAN1...

Page 33: ...52 Lock Washer 8 Flat Washer 8 Flange Bolt M6 179 Lock Washer 6 Flat Washer 6 Ground Wire Flange Bolt M6 12 Nut M6 AVR Flange Bolt M5 16 Bolt washer Assemblies Generator End Cover Cap Ground Wire Term...

Page 34: ...rburetor Insulator Gasket Carburetor Carburetor Gasket Air Cleaner Nut M6 Elbow Air Cleaner Clapboard Cover Subassembly Cylinder Head Gasket Cylinder Head Cover Plate Subassembly Lifter Stopper Head S...

Page 35: ...ranty Do Not Return the Unit to the Place of Purchase Contact the FIRMAN Service Center and FIRMAN will troubleshoot any issue via phone or e mail If the problem is not corrected by this method FIRMAN...

Page 36: ...wear items accessory parts failures due to acts of God and other force majeure events beyond the manufacturer s control problems caused by parts that are not original FIRMAN parts WeareFIRMANPOWER And...

Page 37: ...n emissions related parts is as follows 1 Any warranted part that is not scheduled for replacement as required maintenance in the owner s manual supplied is warranted for the warranty period stated ab...

Page 38: ...esult in eligible warranty service being performed 1 Ignition system including Spark plug Ignition coil 2 Fuel metering system Fuel tank Fuel cap Fuel line and related fittings clamps Carburator assem...

Page 39: ...P N 336745457 Rev 00 Firman Power Equipment Inc Peoria AZ 85381 www firmangenerators com 14131 N Rio Vista Blvd Suite 9...

Page 40: ...antenimiento o servicio IMPORTANTE Guarde la informaci n del producto como referencia de consulta al realizar pedidos de piezas u obener la cobertura de la garant a N mero de serie Fecha de compra DEL...

Page 41: ...xi n Por Nivel de Aceite Bajo 22 No Sobrecargue El Generador 22 Conexi n por Cable de la Bater a Solucion de Problemas 28 Diagrama de Las Piezas Y Lista de Piezas 29 Diagrama de Las Piezas Generador 2...

Page 42: ...encias en este manual y las etiquetas y pegatinas adheridas en la unidad no incluyen todas las posibilidades Si usted sigue un procedimiento un m todo de trabajo o una t cnica de funcionamiento que el...

Page 43: ...a casa o de un garaje INCLUSO SI las puertas o las ventanas est n abiertas Utilizar solo EN EL EXTERIOR y lejos de ventanas puertas y conductos de ventilaci n verlo ni notarlo al gusto Incluso si uste...

Page 44: ...Direccionar el tubo de escape lejos de espacios ocupados USO INCORRECTO No utilizar en ninguno de los lugares siguientes Cerca de una puerta ventana o conducto de ventilaci n Garaje S tano S tano de p...

Page 45: ...re r pidamente para evitar el retroceso A ADIR O VACIAR COMBUSTIBLE NO llene demasiado el dep sito Deje espacio para la expansi n del combustible Si se vierte combustible espere hasta que se evapore a...

Page 46: ...FF y luego enci ndalo ON para ponerlo en funcionamiento NO utilizar el generador con cuerdas el ctricas que est n gastadas peladas o da adas de alg n modo NO hacer funcionar el generador bajo la lluvi...

Page 47: ...os m dicos de potencia o electrodom sticos m dicos Informe a su proveedor el ctrico inmediatamente si usted o alguien en su hogar depende de un equipo el ctrico para vivir Informe a su proveedor el ct...

Page 48: ...siguientes instrucciones y las fotos de las instrucciones del encendido para retirar los soportes rojos del motor adjuntos debajo del motor 2 Quite los tornillos y las tuercas que se indican de los s...

Page 49: ...E G H K 1 Antes de a adir las ruedas gire el generador hacia un lado 2 Deslice el sujetador del eje A a trav s de la rueda B 3 Deslice el sujetador del eje A a trav s del punto de montaje en el marco...

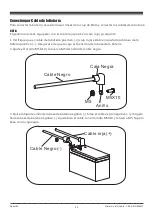
Page 50: ...a la base de la bater a positiva Aseg rese de que la caja est encima de la base de la bater a 2 Quite el tornillo M5X10 y la tuerca M5 del anillo del cable negro 3 Quite la tapa de vinilo de la base...

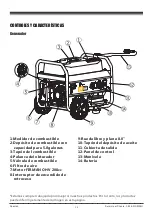
Page 51: ...6 Filtro de aire 7 Motor FIRMAN OHV 208cc 8 Interruptor de encendido de retroceso 9 Rueda libre y plana 8 0 10 Tap n del dep sito de aceite 11 Cubierta de salida 12 Panel de control 13 Manivela 14 Bat...

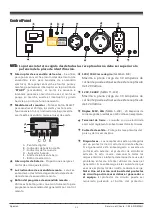
Page 52: ...de encendido remoto Bot n del programa de encendido remoto Utilice este bot n junto con el control remoto para programar el encendido del generador por control remoto 120V 30A Cierre de giro NEMAL5 30...

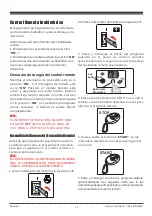
Page 53: ...puede drenar completamente 12 Spanish Servicio al Cliente 1 844 FIRMAN1 EncendidodelGenerador EncendidoRemoto 1 Gire el interruptor del motor hacia la posici n l 2 Voltee el interruptor de la bater a...

Page 54: ...rea bien ventilada y lejos de puertas ventanas y otros conductos de ventilaci n Cuando se hace funcionar con temperaturas superiores a los 77 F 25 C podr a haber una disminuci n de la potencia El vati...

Page 55: ...ite Inferior L 5 Vuelva a poner el tap n varilla de nivel y aseg relo completamente Apagado por Bajo Nivel de Aceite Grados Cent grados exterior Completamente Sint tico 5W 30 Grados Fahrenheit Exterio...

Page 56: ...lenado de combustible retire el tap n PRECAUCI N A ada lentamente gasolina sin plomo al dep sito de combustible No llene demasiado el dep sito No llene el dep sito por encima de la parte superior de l...

Page 57: ...el ctrica No usar un interruptor de circuito con falla a tierra GFCI de las siglas en ingl s en ningun rea h meda o altamente conductora como entablados de metal u obras de acero NO tocar cables o re...

Page 58: ...e y nivelada Protecci n contra Sobrecargas PELIGRO POR GAS T XICO No bloquee el conducto de ventilaci n del generador con papel u otro material Inclinarlo podr a causar derramamiento de combustible AD...

Page 59: ...ula del carburante en posici n ON l 8 Tire lentamente de la cuerda de arranque hasta que note resistencia luego tira r pidamente ADVERTENCIA NOTA 18 Spanish Servicio al Cliente 1 844 FIRMAN1 6 Voltee...

Page 60: ...cenadas emiten gas hidr geno EXPLOSIVO mientras est n carg ndose No permita que se fume que hayan llamas abiertas chispas o equipos produciendo chispas en el rea mientras se realiza la carga El flu do...

Page 61: ...mota desde un m ximo de 164 pies 50 metros aproximadamente de distancia utilizando un control remoto con pilas nuevas y recientemente cargadas en el control remoto A medida que el estado de carga de l...

Page 62: ...ara que el generador es estabilice Conexi n de Cargas El ctricas 1 Deje que el motor se estabilice y se caliente durante unos minutos tras el arrancado 2 Aseg rese de que el cortacircuitos en el panel...

Page 63: ...e el nivel de aceite sea correcto Si el nivel de aceite est por debajo de la marca LOW en la varilla medidora 1 A ada aceite hasta llegar al nivel de la marca HIGH 2 Reinicie el motor y si el motor se...

Page 64: ...el nivel de aceite Limpiar reemplazar si es necesario Limpiar el filtro de carburante y el colador del dep sito de combustible Comprobar que no haya fugas Volver a ajustar o reemplazar la junta si es...

Page 65: ...e el aceite cada 25 horas Por favor utilice un contenedor para vaciar el aceite usado para proteger el medio ambiente b Vuelva a instalar el tap n de drenaje y a llenar el motor con aceite hasta que a...

Page 66: ...dad y agua en el carburante se eliminan mediante el filtro de carburante a Quite el c liz del filtro y tire el agua y la suciedad b Limpie las rejillas y el c liz del carburante con gasolina c Ajuste...

Page 67: ...r la suciedad y los desechos del generador Revise todos los orificios y ranuras de refrigeraci n para asegurar que est n limpias y despejadas Dependiendo del tipo de carburante utilizado el tipo y can...

Page 68: ...encendido dificultoso Para eliminar el encendido dificultoso siga las siguientes instrucciones 1 Encienda el generador almenos 30 minutos cada mes 2 Encienda el generador entonces apague la v lvula d...

Page 69: ...o cerrada 13 El motor ha perdido compresi n 14 Filtro obstruido o sucio combustible est en posici n OFF O 28 Spanish Servicio al Cliente 1 844 FIRMAN1 1 Ponga el interruptor del motor en posici n ON...

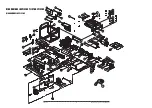
Page 70: ...DIAGRAMA DE LAS PIEZAS Y LISTA DE PIEZAS DIAGRAMA DE LAS PIEZAS 29 Spanish Servicio al Cliente 1 844 FIRMAN1 122...
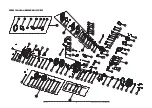
Page 71: ...30 Spanish Servicio al Cliente 1 844 FIRMAN1 FIRMAN 208cc Motor DIAGRAMA DE LAS PIEZAS...
Page 72: ...amortiguador de impactos II Montaje de la bandeja del acumulador Placa a presi n del acumulador Tornillos con cabeza hexagonal M8x45 Funda de conexi n Acumulador 7 5AH Tornillos con ranura de cruz M5...

Page 73: ...Conjunto del carburador Junta del filtro de aire Tuercas con cabeza hexagonal M6 Montaje de la base del filtro de aire Tablilla NO Qty 336723559 336723560 336723561 336723556 336723600 336723601 33672...

Page 74: ...los puntos de venta FIRMAN como comprobante de compra Env e su registro de garant a y el comprobante de compra en un plazo de diez 10 d as tras la fecha de compra GARANT A No Devuelva la Unidad al Lu...

Page 75: ...lando en funci n de la fecha de compra de la unidad original Esta garant a le otorga ciertos derechos legales que pueden variar de estado a estado Su estado puede que tambi n tenga otros derechos a lo...

Page 76: ...que el motor est Dise ado fabricado y equipado para cumplir con todas las regulaciones aplicables asoptadas por la Junta de Recursos de Aire y EPA Agencia de Protecci n Ambiental de Estados Unidos y...

Page 77: ...ncluyendo piezas y juntas internas 3 Ensamblaje del silenciador catal tico incluyendo Colector del escape Convertidor catal tico Junta del silenciador V lvula de tensi n 4 Sistema de inducci n por air...

Page 78: ...los derechos reservados Cualquier reimpresi n o uso no autorizado sin la autorizaci n por escrito queda expl citamente prohibido Firman Power Equipment Inc Peoria AZ 85381 www firmangenerators com 141...

Reviews: