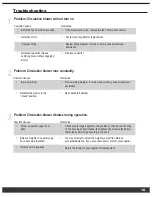
Fire Chief FC450 Owner'S Manual Download Page 15

12

the break in period.  Adequate ventilation within the home and furnace room or area is recommended during the initial firing and break 

in period to accommodate this possibility.  Your new Fire Chief Furnace is classified as having airtight construction.  This type of design 

should enable you to experience an average burn time between 6 and 12 hours per full load of fuel (dry, seasoned hardwood).  However, 

abnormally cold weather may reduce the burn time somewhat. If your burn cycle is significantly less, for instance, 2 to 4 hours, you are 

over-firing your furnace.  This type of occurrence is usually symptomatic of heat demands in excess of furnace capacity.  Contact an 

authorized professional to determine if your Fire Chief Furnace has been improperly sized for your home.

Loading Wood:

When opening the fuel door during operation, wait 10 seconds after releasing the first latch, then open the door the rest of the way.  The 

dual latch system has been incorporated as a safety feature, designed to eliminate the possibility of gaseous ignition.  Laboratory testing 

has determined that when incomplete combustion occurs the partially spent fuel sometimes concentrates large amounts of potentially 

hazardous gases within the fire chamber.  If the door is opened suddenly under these conditions, the oxygen may combine with these 

gases and cause ignition referred to as “back flash.”  Use EXTREME CAUTION when opening the fuel door.
When reloading the furnace, spread embers evenly over the grate.  Place smaller pieces of wood or coal on the hot embers and layer 

larger pieces on top of them.  Finally, due to the wide variety of temperature ranges during the winter, you may experience periods 

when it is not necessary to fully load the fire chamber in order to maintain an overnight burn.  Your Fire Chief Furnace will operate 

at the highest efficiency by adding fuel in amounts needed to maintain comfortable temperatures in your home.

Starting the First Coal Fire:

Burning coal is much harder than burning wood.  There is more care and work in building and maintaining a coal fire than a wood fire.  

Anthracite is the best coal to burn, due to its long even burn with higher heat output and clean burn quality but is more difficult to manage 

than Bituminous coal. 
The size of coal is important.  “Nut” coal sizes of 4 inches for Bituminous and 2¾ to 4½ inches for Anthracite coal are recommended.  

Never use coal other than the sizes recommended.  If the coal is too small it will smother the fire and if it is too large the coal will not burn 

well.
When burning Bituminous coal, start the fire with wood (as described above).  Always use dry kindling, as this will provide a hotter fire 

and add small pieces of wood until you get a good hot ember bed.  At this point add a small amount of coal.  When the coal is hot enough 

to ignite, add small amounts at a time, so as not to smother the fire.  Keep in mind that Bituminous coal will require more maintenance as 

this type of coal will produce more soot, requiring more frequent cleaning to prevent buildup.
Also make sure that the spin draft is wide open to establish the correct burn pattern.  When adding coal to Bituminous fires always add 

coal to the center of the bed creating the cone effect.  Bituminous coal is more volatile and adding coal to the center of the bed causes 

the flames to drive off the volatile gases.  Remember that no two installations and chimney set-ups are the same, so be prepared to 

experiment until you achieve the desired results.  Always allow enough air to the firebox and keep the damper open so that volatile gases 

are properly burned.  When adding fuel, remember to break up the cone with a poker if it has formed a crust, but be careful to avoid 

mixing the coal as this can form clinkers.  Excessive movement wastes fuel and exposes the grate to extreme heat, which will cause 

warping or burnout.  For overnight burn operations, follow the above instructions and adjust the chimney damper.
When burning Anthracite coal, start the fire with wood (as described above).  Add layers of coal making sure not to smother the fire, the 

third layer should be a little heavier, but should not extend above 2 inches below the top of the brick in the firebox.  Before adding 

more fuel, be sure to leave a red spot in the center of the bed.  This hot spot will help ignite the gases given off the new charge.  A deep 

charge will give a more even heat and a longer fire.  It may take up to a couple hours before the whole bed is fully ignited.  When the fire 

is established and the home is becoming warm, you may adjust the damper. Once the coal bed has reduced to half its original depth it 

is time to add fuel to the furnace.  Open the fuel door, using a small rake or hoe pull the coals towards the front of the bed, trying not to 

disturb the fire too much.  Next, add coal to the back, being careful not to seal off the top.  Allow the ash to fall into the ash pan.  Keep 

the ash pan cleaned out to ensure good airflow.  You may want to start this banking process early in the evening before retiring or before 

leaving the home so that you may make proper adjustments after the fire is well established.
WARNING: It is unsafe to load any type of coal within 2 inches of the top of the firebrick.  Load fuel carefully or damage may result.

*BE SURE TO KEEP WOOD COVERED YEAR ROUND!*

Summary of Contents for FC450

Page 1: ...URNING INDOOR FURNACE MODEL FC450 Manufactured by Fire Chief Industries 10950 Linpage Place Saint Louis MO 63132 1 800 875 4788 MADE IN USA Revision V MAY 2015 Tested to UL391 and CSA B366 1 2011 Standards Contains Proper Burn Practices ...

Page 2: ......

Page 3: ...sture content will create creosote in the chimney and cause flue fires See Pages 10 and 13 for proper wood handling practices There should be no alteration of the Fire Chief Furnace in any way as this will void the UL391 listing and affect the operation of the furnace This will also void the warranty of the unit Fire Chief Furnace makes two types of units indoor as well as outdoor furnaces The ind...

Page 4: ...uld be noted on the freight bill at the time of delivery If upon unpacking your Fire Chief Furnace you find damage has occurred during transit notify your supplier immediately Your supplier will advise you what actions must be taken to address the problem Disclaimer Notice The listed BTU rating for your new Fire Chief Furnace was obtained using laboratory calculations The actual BTU output you exp...

Page 5: ... Ashes 13 CREOSOTE FORMATION 13 CREOSOTE PREVENTION 13 Chimney Fire Warning 13 Power Failure 13 Canadien Requirements 14 Furnace Diagram with Parts List 15 Grate System Diagram FC450 16 Blower Motor Assembly Diagram 16 Wiring Diagram 17 Troubleshooting 18 Warranty Information 23 DOUBLE CHECK TO MAKE SURE YOU HAVE RECEIVED ALL OF THE REQUIRED COMPONENTS IF YOU FIND THAT THERE IS A PART MISSING CALL...

Page 6: ...be connected to return air for the central furnace A qualified installer should perform the installation IMPORTANT FOR TECHNICAL SUPPORT OR CUSTOMER SERVICE ISSUES DO NOT RETURN TO THE DEALER THE DEALER DOES NOT HAVE REPLACEMENT PARTS CALL 1 800 875 4788 Forced Hot Air Circulation The plenum size of your Fire Chief Furnace must not be reduced to less than 10 inches in diameter or 79 square inches ...

Page 7: ...SSING CALL 1 800 875 4788 FOR FASTEST SERVICE PLEASE DO NOT GO BACK TO THE DEALER DEALER DOES NOT CARRY REPLACEMENT PARTS NOTE For your convenience your Fire Chief Furnace has been factory assembled and the electrical control assembly pre wired 1 Fasten the right and left side angle brackets to the circulation blower using 4 20 bolts and nuts Place brackets to lowest position on housing 2 Line up ...

Page 8: ... the bottom of the furnace covering the rear distribution blower Make sure the filter box is tightly pressed to the back of the furnace Use 8 10 self tapping screws included to firmly attach the filter box to the sides of the furnace Top Panel A Side Panel With Electric B Side Panel C Bottom Panel D 10 Sheet Metal Screw Twelve Places Side Panel C Bottom Panel D Side Panel with Electric B 10 Sheet ...

Page 9: ... screws provided Assemble junction box B to side of furnace usin 2 10 screws provided Mount green wire with eyelet to the bottom of the junction box mounting screw Install wires to Thermo disc posts Wires are interchangeable Re install junction box cover 6 Plug motor into the back of the electrical box 7 Plug the 3 pronged grounded plug into a grounded electrical outlet B C A ...

Page 10: ...equired to connect the furnace to the chimney should be a minimum of 24 gauge black or stainless steel NEVER USE GALVANIZED PIPE Horizontal run should not exceed 5 feet and should have a minimum rise of 2 inches per foot No installation should have more than 2 elbows a 45 elbow is recommended over a 90 elbow As a safety precaution all pipe selections should be fastened together with a minimum of 3...

Page 11: ...ing a brick chimney you must line the entire chimney with stainless steel liner The liner must be a 6 inch liner The diameter of the chimney stack should be consistent throughout the length of the chimney The chimney stack should have a built in airtight clean out WARNING Do not operate with clean out uncapped USE LISTED UL 103 TYPE HT 2100 CHIMNEY ONLY The chimney size should be at least as large...

Page 12: ...xceed 02 water column inches while developing air velocities of 450 600 feet per minute at the registers The heat outlet area should never be less than 10 inches round or 79 square inches The furnace can be installed with a cold air return system or the return air can be drawn from the basement If the return air is drawn from the basement you will have to install 3 open and close air register vent...

Page 13: ...URFACES KEEP CHILDREN AWAY DO NOT TOUCH DURING OPERATION CAUTION INSPECT FLUE PIPES JOINTS AND SEALS REGULARLY TO ENSURE THAT SMOKE AND FLUE GASES ARE NOT DRAWING INTO AND ARE NOT BEING CIRCULATED BY THE AIR CIRCULATION SYSTEM CLEANING OF THE HEAT EXCHANGER FLUE PIPE AND CHIMNEY IS ESPECIALLY IMPORTANT AT THE END OF THE HEATING SEASON TO MINIMIZE CORROSION DURING THE SUMMER MONTHS CAUSED BY THE AC...

Page 14: ...wing you to add more wood do not overload which would smother the fire Add more wood slowly so the flames have time to engulf the fresh wood Once the fire is burning and there is a glowing ember bed adjust the draft to achieve desired burn pattern Learning how to adjust the draft to maintain the desired temperature for your home may take several days After a short time you will know which settings...

Page 15: ...tuminous coal start the fire with wood as described above Always use dry kindling as this will provide a hotter fire and add small pieces of wood until you get a good hot ember bed At this point add a small amount of coal When the coal is hot enough to ignite add small amounts at a time so as not to smother the fire Keep in mind that Bituminous coal will require more maintenance as this type of co...

Page 16: ...EALER THE DEALER DOES NOT HAVE REPLACEMENT PARTS CALL 1 800 875 4788 Creosote Formation and Need for Removal When wood is burned slowly it produces compounds in exhaust smoke which combine with expelled moisture to form creosote The creosote vapors condense in the relatively cooled chimney flue of a slow burning fire As a result creosote residue accumulates on the flue lining When ignited this cre...

Page 17: ...N WITH APPROPRIATE DUCTWORK CONFIGURATIONS ONLY DO NOT RELOCATE OR BYPASS ANY OF THE SAFETY CONTROLS IN THE ORIGINAL GAS OIL ELECTRIC FURNACE INSTALLATION DO NOT CONNECT TO ANY GAS FURNACE THAT HAS NOT BEEN CERTIFIED INITIALLY AS COMPLYING WITH CAN CGA 2 3 THE OPERATION OF THE GAS FURNACE MUST BE VERIFIED FOR ACCEPTABLE OPERATION BEFORE AND AFTER INSTALLATION OF THE ADD ON APPLIANCE BY A GAS FITTE...

Page 18: ...1 Draft Control FCDCA 3 1 Furnace Shell FC45SHELL 4 1 Right Side Panel with Insulation FC45RA 5 1 Thermo Disc FCTDADJ 6 1 Electrical Box FC45ECC 7 1 Filter Box FCFB 8 1 Blower Assembly FC3SPMOTOR 9 1 Top Panel FC45TOP 10 1 Left Side Panel with Insulation FC45LA 11 4 Door Hinge Pin FCDP 12 1 Fuel Door Assembly FCFDA 13 1 Spin Draft FCSD ...

Page 19: ...am 1 2 FC450 PARTS LIST 1 10 FIRE BRICK 2 2 WOOD GRATES PARTS LIST DESCRIPTION QTY ITEM BLOWER WHEEL 1 1 BLOWER HOUSING 1 2 MOTOR CAPACITOR 1 3 BLOWER MOTOR 1 4 2 1 3 4 FC450 PARTS LIST 1 1 BLOWER WHEEL 2 1 BLOWER HOUSING 3 1 MOTOR CAPACITOR 4 1 BLOWER MOTOR ...

Page 20: ...o adjust settings Note Never attempt to make adjustments while a fire is burning in the furnace 1 Make sure power cord is disconnected from electric outlet Caution to prevent electrical shock never attempt to adjust Thermo Disc with electric connected 2 Remove cover from 2 X 4 electric junction box on side of furnace 3 Adjust the dial on the Thermo Disc clockwise for the blower to turn on and off ...

Page 21: ...e securely to the shaft Possible Causes Remedies Balance weights on squirrel cage have become dislocated You may attempt to adjust the weights yourself to obtain an acceptable balance If you are unsuccessful contact your supplier Return the blower to your supplier for replacement Defective main bearings 2 3 18 Problem Circulation blower will not turn on Defective fan Thermo Disc switch If the blow...

Page 22: ... 5 feet and has a 2 inch rise per foot The run should not contain more than 2 elbows Replace with a larger flue providing a minimum of 50 square inches but not more than 100 square inches of draft area If the flue is within these specifications check the draft with a draft gage manometer Your flue should provide a minimum of 04 water column inches and a maximum of 08 water column inches Too many e...

Page 23: ...ly sufficient amount of oxygen for combustion Install an aperture to the outside consisting of a minimum of 12 square inches or 4 inches round Install stainless steel liner in masonry chimney to reduce creosote formation and improve draw Use appropriate size stainless liner for the furnace DANGER Never use uninsulated stove pipe as chimney It must not be used on the inside of your home due to high...

Page 24: ... obstruction outside chimney such as a tree Flue is located too close to the peak of the roof or does not rise above it to provide the proper draft Backdraft damper is in the closed position 9 Problem Odor detected in home during initial firing There is an oily film that remains on the steel after the manu facturing process Firing the furance has raised the tempera ture of the fire box to a level ...

Page 25: ...d cooling contractor Check and replace filter Proper filter size is 20 by 25 by 1 Furnace room may be too airtight Install an aperature to the outside consisting of a minimum of 12 square inches or 4 inches round Consult a professional to determine correct sizing Excessive dirt accumulation in air filter Combustion chamber not receiving an adequate amount of oxygen Furnace size is inadequate for y...

Page 26: ...be advised that the firebrick and door gaskets are excluded from this warranty In order to exercise the aforementioned warranty a certified professional must determine the appliance part to be defective He or she must submit a written statement to Fire Chief Industries detailing an assessment of the problem This assessment MUST be accompanied by substantiating proof of purchase dated invoice bill ...

Page 27: ......

Reviews: