Finlux FL3220CBS Owner'S Manual Download Page 5

English

   - 32 -

mode automatically because there was no signal 

for a long time.” 

Press 

OK

 to continue.

If the TV is on and it isn’t being operated for a while 

it will go into standby. When you next switch-on, the 

following message will be displayed. 

“TV switched to 

stand-by mode automatically because no operation 

was made for a long time.” 

Press 

OK

 to continue.

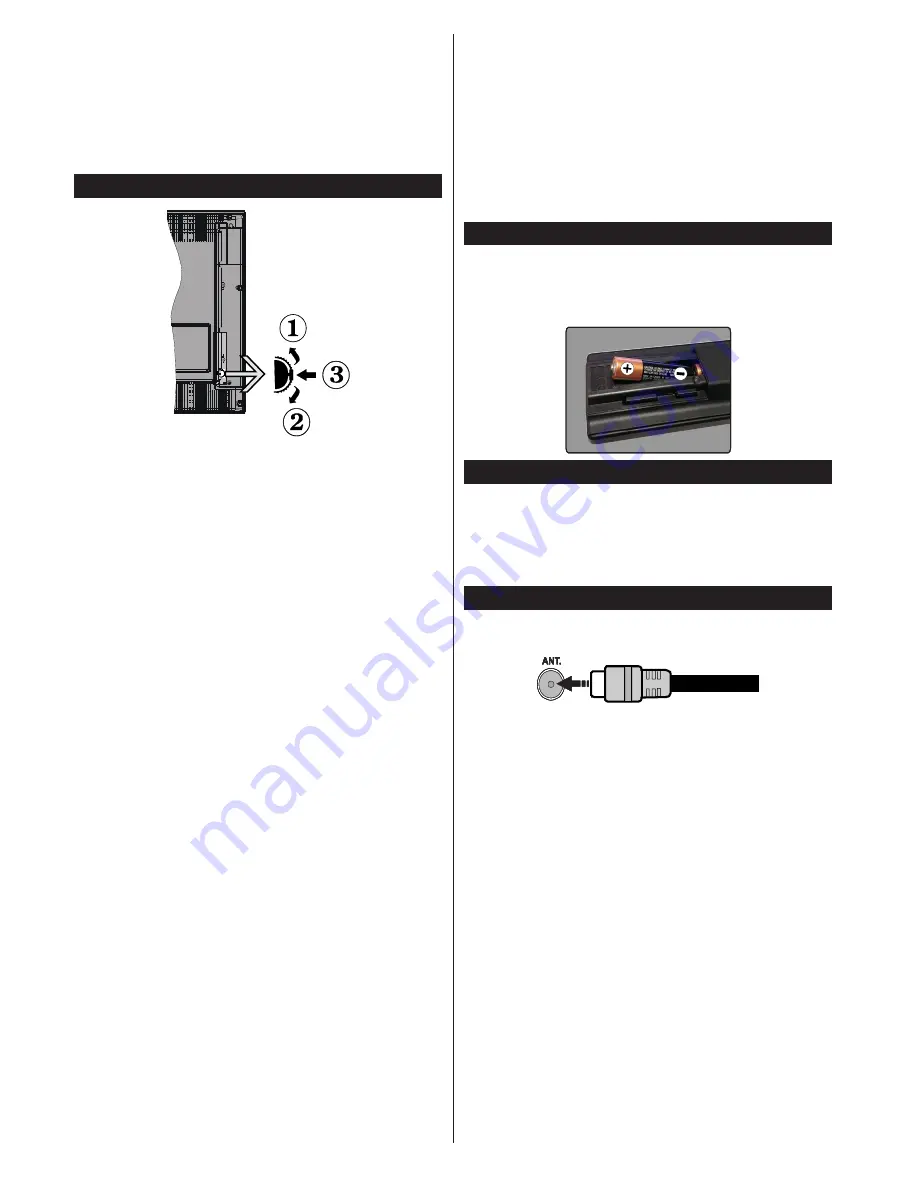
TV Control Switch & Operation

1. 

Up direction

2. 

Down direction

3. 

Volume / Info / Sources List selection and 

Standby-On switch

The Control button allows you to control the Volume 

/ Programme / Source and Standby-On functions of 

the TV.

To change volume:

 Increase the volume by pushing 

the button up. Decrease the volume by pushing the 

button down.

To change channel:

 Press the middle of the button, 

the information banner will appear on the screen. 

Scroll through the stored channels by pushing the 

button up or down.

To change source:

 Press the middle of the button 

twice(for the second time in total), the source list will 

appear on the screen. Scroll through the available 

sources by pushing the button up or down.

To turn the TV off:

 Press the middle of the button 

down and hold it down for a few seconds, the TV will 

turn into standby mode.

Notes:


• 

If you turn the TV off, this circle starts again 

beginning with the volume setting.

• 

Main menu OSD cannot be displayed via control 

button.

Operation with the Remote Control

Press  the 

Menu

 button on your remote control to 

display main menu screen. Use the directional buttons 

to select a menu tab and press 

OK

 to enter. Use the 

directional buttons again to select or set an item. Press 

Return/Back 

or 

Menu

 button to quit a menu screen.

Input Selection

Once you have connected external systems to your 

TV, you can switch to different input sources. Press the 

Source

 button on your remote control consecutively 

to select the different sources.

Changing Channels and Volume

You can change the channel and adjust the volume 

by using the 

/-

 and 

Programme


+/-

 buttons 

on the remote. 

Inserting the Batteries into the Remote

Lift the cover on the back of the remote gently. Insert 

two 

AAA

 batteries. Make sure the (+) and (-) signs 

match (observe correct polarity). Place the cover 

back on.

Connect Power 

IMPORTANT

: The TV set is designed to operate on 

220-240V AC, 50 Hz

 socket. After unpacking, allow 

the TV set to reach the ambient room temperature 

before you connect the set to the mains. Plug the 

power cable to the mains socket outlet.

Antenna Connection

Connect the aerial or cable TV plug to the AERIAL 

INPUT (ANT) socket located on the back of the TV.

Summary of Contents for FL3220CBS

Page 1: ...FL4922SMART Kleurentelevisie Colour television T l vision en couleur Colour television T l vision en couleur Owner s manual Manuel d utilisateur De handleiding...

Page 2: ...used to disconnect TV set from the mains and therefore it must remain readily operable If the TV set is not disconnected electrically from the mains the device will still draw power for all situation...

Page 3: ...rating conditions Caution See Operating Instructions The marked area s contain s user replaceable coin or button cell batteries Class 1 Laser Product This product contains Class 1 laser source that is...

Page 4: ...found in the System Picture menu Note that some picture settings will be unavailable to be changed If pressed Right button while Auto option is selected or Left button while Custom option is selected...

Page 5: ...urn into standby mode Notes If you turn the TV off this circle starts again beginning with the volume setting Main menu OSD cannot be displayed via control button Operation with the Remote Control Pre...

Page 6: ...iate recycling facilities and systems for the disposal of these products Notice The sign Pb below the symbol for batteries indicates that this battery contains lead Products Battery Specification TV B...

Page 7: ...Displays teletext where available press again to superimpose the teletext over a normal broadcast picture mix 21 Media browser Opens the media browsing screen 22 EPG Electronic programme guide Displa...

Page 8: ...onnection If an external device is connected via the SCART socket the TV will automatically switch to AV mode When receiving DTV channels Mpeg4 H 264 or while in Media Browser mode output will not be...

Page 9: ...inished press OK to continue You can activate Store Mode option at this point This option will configure your TV s settings for store environment and depending on the TV model being used the supported...

Page 10: ...ed for the PVR ready features Some stream packets may not be recorded because of signal problems as a result sometimes videos may freeze during playback Record Play Pause Display for PlayListDialog ke...

Page 11: ...in the System Settings More menu should be set as Enabled at first Press the Source button and select the HDMI input of the connected CEC device from the Sources List menu When new CEC source device i...

Page 12: ...ess of the picture by pressing Left or Right buttons Picture Zoom Sets the desired image size format Film Mode Films are recorded at a different number of frames per second to normal television progra...

Page 13: ...ge depending on the broadcaster and the country Parental Enter correct password to change parental settings You can easily adjust Menu Lock Maturity Lock Child Lock or Guidance in this menu You can al...

Page 14: ...nected HDMI CEC compatible device to turn on the TV and switch to its input source automatically Press Left or Right button to enable or disable the feature Speakers To hear the TV audio from the conn...

Page 15: ...maturity level is disabled disables access to the broadcast Note If the country option in the First Time Installation is set as France Italy or Austria Maturity Lock s value will be set to 18 as defau...

Page 16: ...r channel or source while there is an active recording or timer on the current channel It is not possible to set timer or record timer for two or more individual events at the same time interval Telet...

Page 17: ...you cannot record try switching off the TV and then re inserting the USB device USB is too slow If a USB disk writing speed too slow to record message is displayed on the screen while starting a recor...

Page 18: ...0Hz O 1080i 50Hz 60Hz O HDMI 480i 480p 60Hz O 576i 576p 50Hz O 720p 50Hz 60Hz O 1080i 50Hz 60Hz O 1080p 24Hz 25Hz 30Hz 50Hz 60Hz O X Not Available O Available In some cases a signal on the TV may not...

Page 19: ...n JPEG 640x480 30fps 10 Mbps Other 1080P 30fps 40 Mbps avi MPEG1 2 MPEG4 Sorenson H 263 H 263 H 264 WMV3 Motion JPEG mkv MPEG1 2 MPEG4 H 263 H 264 WMV3 Motion JPEG asf Sorenson H 263 H 264 WMV3 Motion...

Page 20: ...8Kbps 384Kbps MPEG1 2 Layer3 8Kbps 320Kbps WMA 128bps 320Kbps 8KHz 48KHz WMA 10 Pro M0 192kbps 48KHz WMA 10 Pro M1 384kbps 48KHz WMA 10 Pro M2 768kbps 96KHz mkv mka MPEG1 2 Layer1 32Kbps 448Kbps 16KH...

Page 21: ...2Kbps 640Kbps 32KHz 44 1KHz 48KHz AAC HEAAC 8KHz 48KHz swf MPEG1 2 Layer3 8Kbps 320Kbps 16KHz 48KHz ec3 EAC3 32Kbps 6Mbps 32KHz 44 1KHz 48KHz rm rmvb ra AAC HEAAC 8KHz 48KHz LBR cook 6Kbps 128Kbps 8KH...

Page 22: ...using DVI converter cable DVI to HDMI cable not supplied you can refer to the following resolution information 56Hz 60Hz 66Hz 70Hz 72Hz 75Hz 640x400 640x480 800x600 832x624 1024x768 1152x864 1152x870...

Page 23: ...esired one and press Left or Right button to change the setting from Automatic to Manual Now you can enter the Manual IP and or Manual DNS values Select the related item in the drop down menu and ente...

Page 24: ...mobile device with the router and then activate the sharing software on your mobile device Then select files that you want to share with your TV If the connection is established correctly you will be...

Page 25: ...not installed onto the companion device Please prepare your PC with the Nero Media Home programme For more information about the installation please refer to the Nero Media Home Installation section 2...

Page 26: ...dds your TV a feature that allows you to connect a server on the Internet and view the content provided by this server over your Internet connection Portal feature allows you to view the music video c...

Page 27: ...TV Getting Started To use Smart Center features connections have to be done properly To get connected to your network wirelessly plug in the Wi Fi dongle to one of the USB ports if your TV doesn t ha...

Page 28: ...uters operation range Notes Note that only digital DVB T C S SD channels are supported Multilanguage audio support and subtitle on off features are not functional The streaming performance may change...

Reviews: