Finlux FCH-1820 BG Manual Download Page 5


13 Infrared receiver for remote control 


1.

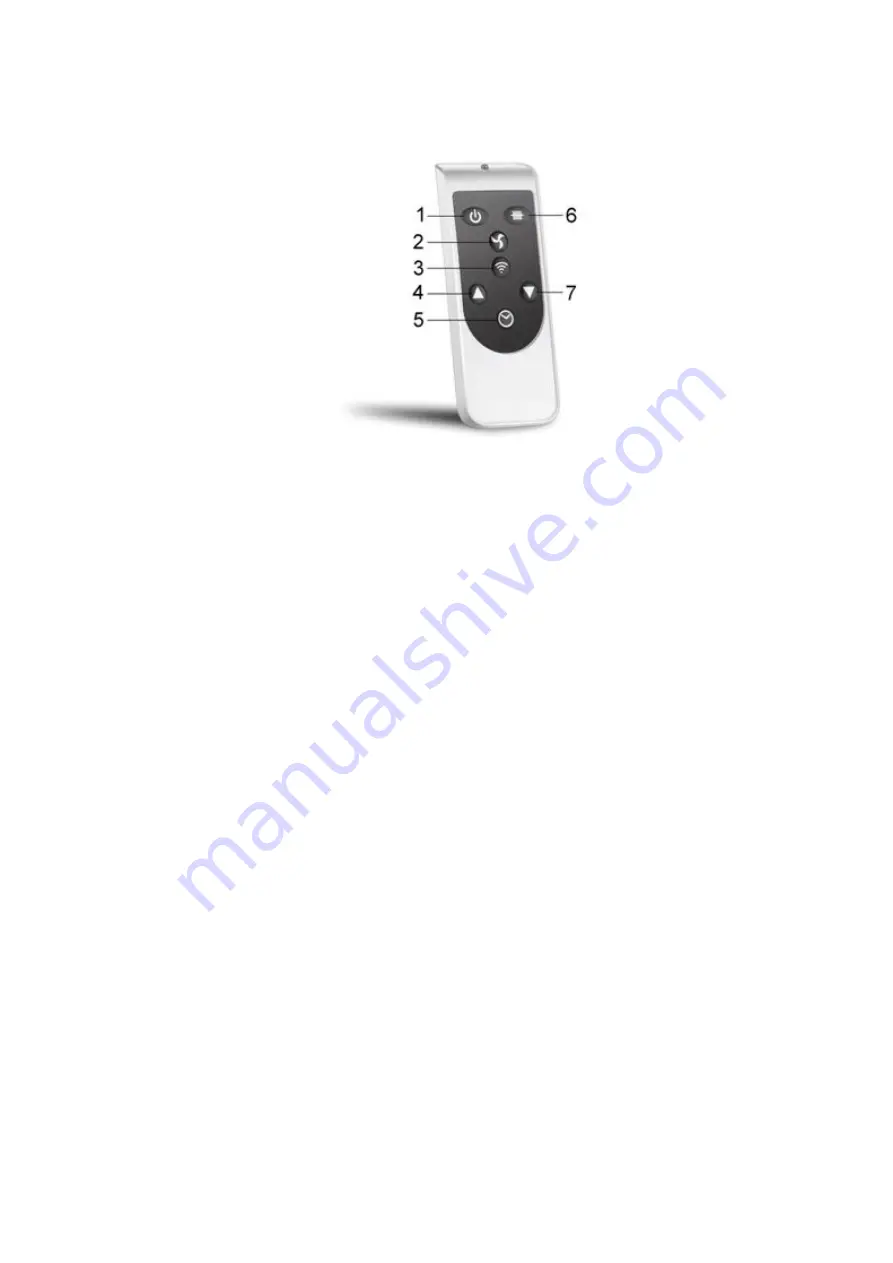
 On/Off button                        5. Timer button


    2.

 Fan button                            6. Button for selecting the heat setting


3.

 Wi-Fi button                          7. Reduce temperature


    4.

 Increase temperature


Key function introduction   

POWER function 

Insert the plug in a suitable power socket. After turn on the main switch (on the right side) ,the computer board emits a "click" 

sound ,the screen displays the current room temperature ,and turn on the panel control switch ,to enter the standby state and display 

the current room temperature and set temperature at the same time .In the meantime ,other displays are not displayed . 

   Then press the button for selecting the heat setting ,you can select the 1000/1300/2300W/Anti-frost four modes .When you select 

the 1000W or 1300W or 2300W .The heater will be heated according to your setting . 


Timer and temperature setting 

Timer 

Press the timer button, each time the time is increased by 1 hour, when the timer time is 24:00, press the timer button, then the 

function is turned off, when the timer function is set, the timer countdown starts in 5 seconds, and after the timer is over, it enters 

standby mode; 


Temperature 

Press the temperature shift key to change the temperature display mode. The default is Celsius degree.  Press 1 time, degree to 

Fahrenheit and 2 times conversions.   

Press "+" or "-" key to set the temperature (set temperature must be greater than the current temperature)

 .


For  Celsius,  cycle  through  Internal  temperature  (room  temperature)  is  displayed  every  time  the  appliance  is  started  up.  The 

temperature can be set when the appliance is in stand-by or heating. When the room temperature reaches the set level, the heater 

stops to work ;When room temperature is 1 degrees over the set temperature,  the heater also will stop tor work .The heater will 

9


Running time display


10


Set temperature display


11


Measured temperature display


12


On/Off button


Summary of Contents for FCH-1820 BG

Page 1: ...Convector Heater Model FCH 1820 BG This product is only suitable for well insulated spaces or occasional use...

Page 2: ...5 Before cleaning or carrying out maintenance on the appliance disconnect it from the electrical mains by removing the plug from the electrical outlet or by switching off the system switch 6 If the ap...

Page 3: ...aced by the manufacturer or its service agent or a similarly qualified person in order to avoid a hazard 7 Children of less than 3 years should be kept away unless continuously supervised 8 Children a...

Page 4: ...and fumes This will disappear when the heater has been on a short while Operation panel function introduction 1 Selected heating level display 14 Wi Fi button 2 Fan symbol 15 Button for selecting the...

Page 5: ...etting Timer Press the timer button each time the time is increased by 1 hour when the timer time is 24 00 press the timer button then the function is turned off when the timer function is set the tim...

Page 6: ...ly enters the high grade 2300W heating mode When the room temperature reaches 9 C the heating is turned off to standby followed by cycling Operating sound The appliance emits a beep upon each operatio...

Page 7: ...uickly to indicate the unit is in AP connection mode Please ensure your device is in the correct WiFi connection mode for the connection type you are attempting the flashing WiFi indicator on your hea...

Page 8: ...REGISTER THE APP...

Page 9: ...your home It can also be set up to work with multiple devices within different houses as such during the setup process the app requires that different areas are created and named to allow easy manage...

Page 10: ...tiating the connection make sure the unit is in standby mode Power switch ON but unit turned off with the WiFi Light Indicator flashing once per second Also ensure your phone is connected to the WiFi...

Page 11: ...G YOUR APPLIANCE THROUGH THE APP THE HOME SCREEN Each device has its own entry on the home screen to allow the user to either quickly turn the unit on or off or to enter the device screen to make othe...

Page 12: ...EVICE SCREEN The device screen is the main control screen for the heater providing access to the controls to amend the functions and settings Level Use to choose among 3heat settings 1000W 1300W 2300W...

Page 13: ...re intelligent actions These are split into two categories Scene and Automation SCENE Scene allows for a one touch button to be added to the Home Screen The button can be used to change a number of se...

Page 14: ...TION Automation allows an automatic action to be set up for the device This can be triggered by the Time and a range of other influences depending on what other TUYA enabled devices you have on the ne...

Page 15: ...WiFi you are connecting the device to 4 Ensure the network you are connecting it to is 2 4Ghz 5Ghz WiFi networks are not supported and that there is a strong WiFi signal to the item 5 If your router...

Page 16: ...EMC directive 2004 108 EC as amended Correct Disposal of this product This marking indicates that this product should not be disposed with other household wastes throughout the EU To prevent possible...

Reviews: