background image

English

   - 18 -

DLNA 

DLNA support is only available in the Media Browser 

folder mode. To enable folder mode, go to the 

Settings

 tab in the main media browser screen and 

press 

OK

. In the settings options, highlight 

View Style


and change to 

Folder

 using the “ ” or “ ” buttons. 

Select the desired media type and press 

OK.

If sharing configurations are set properly, the following 

OSD message will be displayed after selecting the 

desired media type. Select 

OK

 to display the selected 

network or USB memory content. If you want to refresh 

the device list, press the 

GREEN

 button. You can 

press 

MENU

 to exit. 

If available networks are found, they will be listed on 

this screen. Select media server or network that you 

want to connect to using the “ ” or “ ” buttons and 

press 

OK

.

If you select the media type as 

Video

 and choose a 

device from the selection menu, a new menu screen 

will appear on the screen as below:

Select 

Videos

 from this screen to list all the available 

video files from the selected network.

To play other media types from this screen, you must 

go back to main Media Browser screen and select 

the media type as desired and then perform the 

network selection again. Refer to the Media Browser 

USB Playback section for further information on file 

playback.

Subtitle files do not work if you watch videos from your 

network through DLNA.
You can connect only one television with DLNA to 

the same network. If a problem occurs with the DLNA 

network, please switch your television off at the wall 

socket and back on again. Trick mode and jump are 

not supported with the DLNA function.

Note: 

There may be some PC’s which may not be able 

to utilize the DLNA function due to administrator and 

security settings (such as business PC’s).
For best home network streaming with this TV, the 

supplied Nero software should be installed.
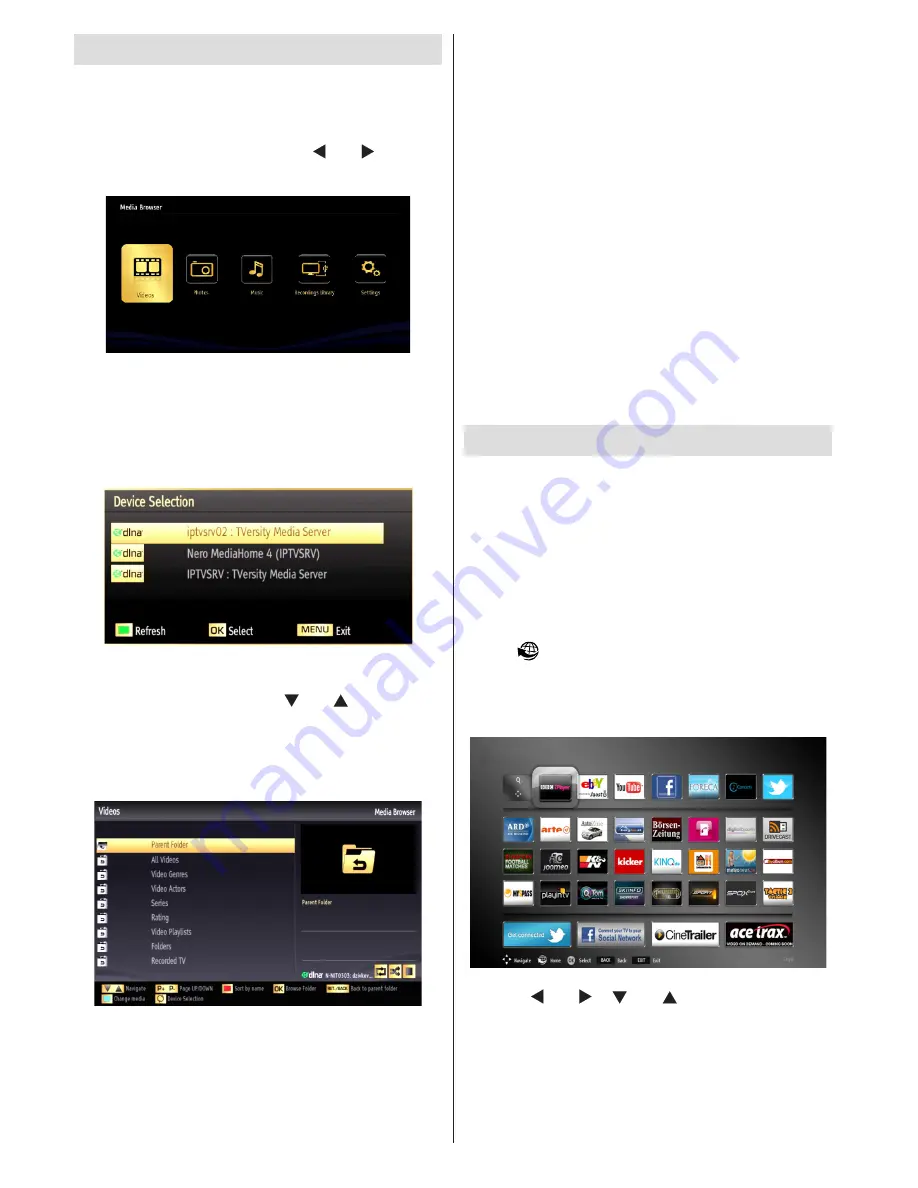
Internet Portal

Ensure the TV is connected to a Wired/Wireless 

Internet connection. After the connection is 

established, you can select or view portal options.
Note: A Broadband Internet connection is required 

for high quality viewing. Ensure that the internet 

connection is made properly. You must set the 

Country and Language data correctly in the First 

Time Installation for the proper operation of the 

internet portal.
Press “

” button on your remote control and the 

portal application options will be displayed. The 

application options will be displayed in a manner 

similar to the template below.

Use the “ ” or “ ”, “ ” or “ ” to navigate between 

the items on Portal screen. Press the 

OK

 button to 

confirm your selection. Press the 

BACK

 button to go 

to the previous screen. 
Press the 

EXIT

 button to quit the Internet portal mode.

Summary of Contents for 55S8090-T

Page 1: ......

Page 2: ...ons 10 Electronic Programme Guide EPG 13 Recording a Programme 13 Timeshift Recording 14 Instant Recording 14 Watching Recorded Programmes 14 Recording Configuration 14 Product Safety 14 Wired Connectivity 15 Wireless Connectivity 16 Other Information 17 Connectivity Troubleshooting 17 DLNA 18 Internet Portal 18 iPlayer Application 19 Digital Teletext 19 Software Upgrade 19 Troubleshooting Tips 19...

Page 3: ... securely attached to the wall in accordance with the installation instructions Screen Occasionally a few non active pixels may appear on the screen as a fixed blue green or red point Please note that this does not affect the performance of your product Take care not to scratch the screen with fingernails or other hard objects Cleaning Before cleaning unplug the TV from the wall socket Do not use ...

Page 4: ...y 5ºC up to 45ºC 85 humidity max Note Don t block ventilation holes Intended Use This device is used to receive and display TV programmmes The different connection options expand the reception and display sources possible various external devices This device is only suitable for operation in dry interiors This appliance is intended solely for private domestic use and may not be used for industrial...

Page 5: ...s programme Viewing Main Menu Menu screen cannot be displayed by using the control switch AV Mode Press the control switch consecutively until the source OSD is displayed on the screen Operation with the Remote Control Press the MENU button on your remote control to display the main menu screen Use the or buttons to select a menu tab and press the OK button to select option Use the or buttons to s...

Page 6: ...XT mode 27 Programme up down 28 Mute 29 Previous programme Now in EPG mode 30 Numeric buttons 31 AV Source TV NOTE The Remote Control range is approximately 7m 23ft Using My button 1 Thisbutton smainfunctionistorunYoutubelink However if you want to change this function you can press MY BUTTON 1 for five seconds when on a desired source channel or link until the MY BUTTON IS SET message isdisplayed...

Page 7: ...he scart socket When using the wall mounting kit optional we recommend that you plug all your cables into the back of the TV before mounting on the wall Insert or remove the CI module only when the TV is SWITCHED OFF You should refer to the module instruction manual for details of the settings AV Connection Cable supplied Scart Connection back VGA Connection back PC YPbPr Audio Connection back HDM...

Page 8: ...standby mode To power down the TV completely unplug the power cord from the mains socket Note When the TV is switched to standby mode the standby LED can blink to indicate that features such as Standby Search Over Air Download or Timer is active The LED can also blink when you switch on the TV from standby mode First Time Installation When turned on for the first time the language selection menu a...

Page 9: ...ore file capacity you can experience problems with the formatting process Quickly plugging and unplugging USB devices is a very hazardous operation This may cause physical damage to the USB player and the USB device itself Do not pull out the USB module while playing a file Media Browser Menu You can play photo music and movie files stored on a USB disk by connecting it to your TV Connect a USB di...

Page 10: ...hannel List You can edit this channel list set favourites or set active stations to be listed by using the Channel List options Press the MENU button to view the main menu Select the Channel List item by using Left or Right button Press OK to view menu contents Select Edit Channel List to manage all stored channels Use Up or Down and OK buttons to select Edit Channel List Press the Up or Down butt...

Page 11: ...e size to Auto 16 9 Subtitle 14 9 14 9 Zoom 4 3 or Cinema Movie Sense Movie Sense Press Use Left Right to set Movie Sense Low Med High or Off While Movie Sense is active it will optimize the TV s video settings for motional images to acquire a better quality and readability When Movie Sense option is set to Low Med or High Movie Sense demo option will be available If one of these options is select...

Page 12: ...nnel supports that mode AVL Automatic Volume Limiting AVL function sets the sound to obtain a fixed output level between programmes For instance volume level of advertisements tend to be louder than programmes Headphone Lineout optional When you connect an external amplifier to your TV using the headphone jack you can select this option as Lineout If you have connected headphones to the TV set thi...

Page 13: ...ncluding television and movies You can use this feature only if the broadcaster supports the additional narration track Auto TV Off You can set the timeout value of the auto off feature After the timeout value is reached and the TV has not been operated for a selected time the TV will go into standby mode Standby Search optional If you change Standby Search to Off this function will be unavailable...

Page 14: ...Timer option The timer will be cancelled Note It is not possible to record two channels at the same time Recording a Programme IMPORTANT When using a new USB hard disk drive it is recommended that you first format the disk using your TV s Format Disk option To record a programme you should first connect a USB disk to your TV while the TV is switched off You should then switch on the TV to enable t...

Page 15: ...gs Library Slow Forward If you press PAUSE button while watching recorded programmes the slow forward feature will be available You can use button to slow forward Pressing button consecutively will change slow forwarding speed Recordings Library To view the list of recordings select Recordings Library and press the OK button The Recordings Library will then be displayed with available recordings A...

Page 16: ...t This may result in discoloration and cracks and may cause the screen display to peel off Do not let water come into contact with the product when cleaning it Ensure that water does not enter the product This may result in an electric shock or fire Since the surface of the product is easily scratched make sure you clean the product with a soft cloth As the product may be scratched if there is any...

Page 17: ...ppliances The standard values of the transmission speed are the theoretical maximum values for the wireless standards They are not the actual speeds of data transmission The location where the transmission is most effective differs depending on the usage environment The Wireless LAN adaptor should be connected directly to the TV s USB port USB hubs are not supported To configure wireless settings ...

Page 18: ...walls of your network allow the TV wireless connection Ensure the USB WiFi dongle supplied is plugged in fully If the wireless network does not function properly try using the wired network in your home Refer to the Wired Connection section for more information on the process If the TV does not function using the wired connection check the modem router If the router does not have a problem check t...

Page 19: ... further information on file playback Subtitle files do not work if you watch videos from your network through DLNA You can connect only one television with DLNA to the same network If a problem occurs with the DLNA network please switch your television off at the wall socket and back on again Trick mode and jump are not supported with the DLNA function Note There may be some PC s which may not be...

Page 20: ...ade mode While the TV is connected to the Internet if new software is found it downloads the upgrades automatically when the TV next powers on from standby 3 00am search and upgrade mode While the TV is connected to an aerial signal If Automatic scanning in the Upgrade Options menu is enabled the TV wakes up at 03 00 and searches broadcast channels for new software upgrades If new software is foun...

Page 21: ...by and the double D symbol are trademarks of Dolby Laboratories DLNA the DLNA Logo and DLNA CERTIFIED are trademarks service marks or certification marks of the Digital Living Network Alliance HDMI the HDMI logo and High Definition Multimedia Interface are trademarks or registered trademarks of HDMI Licensing LLC ...

Page 22: ... Click the Next button The integrated serial is displayed Do not change the serial number 6 Click the Next button The License Conditions EULA screen is displayed 7 Click the Next button The Select Installation Type screen is displayed It is possible to choose between Typical meaning standard installation or Custom installation User defined installation allows you to determine languages to be insta...

Page 23: ... 85Hz 36 1360x768 60Hz 37 1400x1050 60Hz 38 1400x1050 75Hz 39 1400x1050 85Hz 40 1440x900 60Hz 41 1440x900 75Hz 42 1600x1200 60Hz 43 1680x1050 60Hz 44 1920x1080 60Hz 45 1920x1200 60Hz Appendix C AV and HDMI Signal Compatibility Input Signal Types X Not Available O Available In some cases a signal on the TV may not be displayed properly The problem may be an inconsistency with standards from the sou...

Page 24: ...EAAC AC3 EAC3 LPCM ADPCM H 264 1080Px2 25fps 1080P 50fpsOther 1080P 30fps50Mbit sec RMVB RM rv30 rv40 LBR cook AAC HEAAC 1080P 30fps 50Mbit sec avi MPEG1 2 4 Xvid H 264 VC1 WMV3 Sorenson H 263 Motion JPEG MPEG1 2 Layer 1 2 3 AAC HEAAC AC3 EAC3 LPCM ADPCM WMA H 264 1080Px2 25fps 1080P 50fps Other 1080P 30fps 50Mbit sec flv H 264 Sorenson H 263 MPEG1 2 Layer 3 AAC HEAAC LPCM ADPCM H 264 1080Px2 25fp...

Page 25: ...e red light on the Sky remote control blinks twice 4 Key in 065 The light on the Sky remote control should blink twice 5 Press the STANDBY button on your Sky remote control If your TV switches off press SELECT The light on the Sky remote control blinks twice Now try the other functions Specifications RF AERIAL INPUT 75 Ohm unbalanced OPERATING VOLTAGE 220 240V AC 50 Hz AUDIO OUTPUT POWER WRMS 10 T...

Page 26: ...50229970 ...

Reviews: