background image

English

   - 15 -

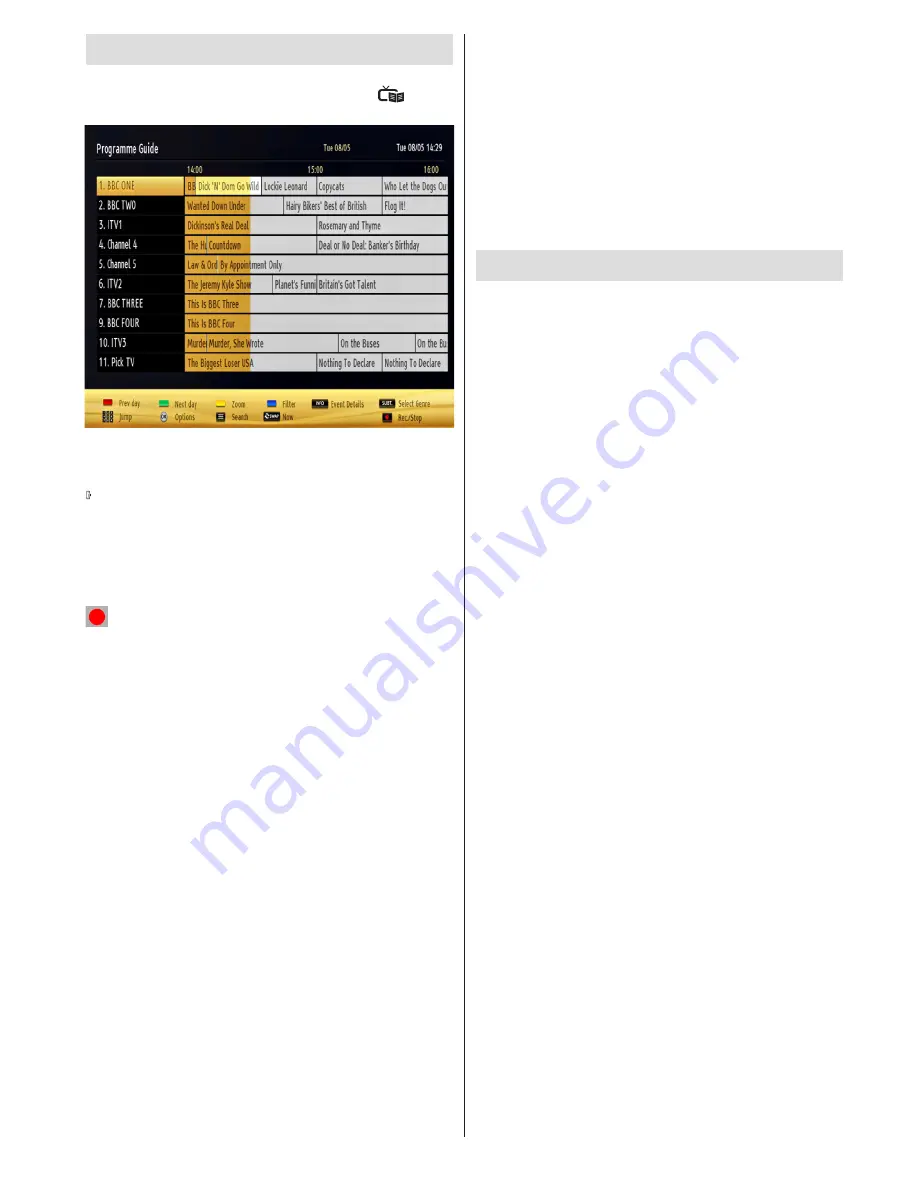
Electronic Programme Guide (EPG)

Some, but not all channels send information about the 

current and next programmes. Press the 

 button 

to view the EPG menu.

Up/Down/Left/Right:

 Navigate EPG.

OK:

 Displays programme options.

:

 Displays, in detail, information on 

the programme 

selected.

GREEN:

 Switches to List Schedule EPG.

YELLOW:

 Switches to Timeline Schedule EPG.

BLUE:

 Displays filtering options. 

 (RECORD): The TV will start to record the selected 

progamme. You can press again to stop the recording.

IMPORTANT

: To record a programme, you should first 

connect a USB disk to your TV while the TV is switched off. 

You should then switch on the TV to enable the recording 

feature. Otherwise, the recording feature will not be available.

Note

: Switching to a different broadcast or source is not 

available during a recording.

Programme Options

In the EPG menu, press the 

OK

 button to enter the 

Event Options

 menu.

Select Channel

In the EPG menu, using this option, you can switch 

to the selected channel.

Record / Delete Record Timer

After you have selected a programme in the EPG 

menu,  press  the 

OK

 button and and the 

Options


screen will be displayed. Select the “

Record

” option 

and press the 

OK

  button. After  this  operation, 

a recording will be scheduled for the selected 

programme.

To  cancel  an  already  set  recording,  highlight  that 

programme and press the 

OK

 button and select the 

option “

Delete Rec. Timer

”. The recording will be 

cancelled.

Set Timer / Delete Timer

After you have selected a programme in the EPG 

menu,  press  the 

OK

 button and and the 

Options


screen will be displayed. Select the “

Set Timer on 

Event

” option and press the 

OK

 button. You can set 

a timer for future programmes. To cancel an already 

set timer, highlight that programme and press the 

OK


button. Then select “

Delete Timer

” option. The timer 

will be cancelled.

Note

: It is not possible to record two channels at the same 

time.

Recording a Programme

IMPORTANT

: When using a new USB hard disk drive, it is 

recommended that you first format the disk using your TV’s 

“Format Disk” option.

To record a programme, you should first connect a 

USB disk to your TV while the TV is switched off. You 

should then switch on the TV to enable the recording 

feature.

To use the recording function, you need to connect 

a USB disk or an external hard disk drive to the TV 

and the connected USB disk should have at least 1 

GB capacity and should have 2.0 speed compatibility. 

If the connected USB device does not support 2.0 

speed, an error message will be displayed.

Note

: Recorded programmes are saved into the connected 

USB disk. If desired, you can store/copy recordings onto a 

computer; however,  these files will not be available to be 

played on a computer. You can play the recordings only 

via your TV.

Note

: Lip Sync delay may occur during the timeshifting. 

Radio record is not supported

. The TV can record 

programmes up to ten hours.
Recorded programmes are split into 4GB partitions. 
If the writing speed of the connected USB disk is not 

sufficient, the recording may fail and the timeshifting 

feaute may not be available.
Recordings of HD programmes can occupy more 

space on the USB disk compared to SD programmes. 

For this reason it is recommended to use USB hard 

disk drive to record HD programmes.
Do not plug out the USB/HDD during a recording. This 

may harm the connected USB/HDD.
Multipartiton support is available. A maximum of 

two different partitions are supported. If the disk has 

more  than  two  partitions,  a  crash  may  occur. The  

first partition of the USB disk is used for PVR ready 

features. It also must be formatted as the primary 

partition to be used for PVR ready features.
Some stream packets may not be recorded  because 

of  signal  problems,  so  sometimes  the  video  may 

freeze during playback. 

Summary of Contents for 42FME249S-T

Page 1: ......

Page 2: ...BACK NO USER SERVICEABLE PARTS INSIDE REFER SERVICING TO QUALIFIED SERVICE PERSONNEL OR BACK NO USER SER PARTS INSIDE REFER SER QUALIFIED SERVICE PERS RISK OF EL DO N CAU CAUTION TO REDU SHOCK D OR BACK PARTS IN QUALIFIE The lightning flash with arrowhead symbol within an equilateral triangle is intended to alert the user to the presence of uninsulated dangerous voltage within the product s enclos...

Page 3: ...a humid or damp place avoid using in the bathroom or near the kitchen sink Do not expose this TV to rain or water as this may be dangerous Do not place objects filled with liquids such as flower vases on top of the TV Avoid from dripping or splashing If any solid object or liquid falls into the cabinet unplug the TV and have it checked by qualified personnel before operating it any further Ventila...

Page 4: ...urniture and the television set to a suitable support Educating children about the dangers of climbing on furniture to reach the television set or its controls If your existing television set is being retained and relocated the same considerations as above should be applied i CLASS 1 LASER PRODUCT Environmental Information This television is designed to consume less energy to help save environment...

Page 5: ... Volume Limiting PC input Plug Play for Windows 98 ME 2000 XP Vista Windows 7 Game Mode optional Ethernet LAN for Internet connectivity 802 11n built in WiFi Support DLNA TV Control button Operation 1 Standby button 2 TV AV button 3 Programme Up Down buttons 4 Volume Up Down buttons Viewing the TV Menu Access Press the MENU button on your remote control to display the main menu screen Use the or b...

Page 6: ... again to superimpose the teletext over a normal broadcast picture mix 21 Media browser Opens the media browsing screen 22 EPG Electronic programme guide Displays the electronic programme guide 23 Exit Closes and exits from displayed menus or returns to previous screen 24 Navigation buttons Helps navigate menus content etc and displays the subpages in TXT mode when pressed Right or Left 25 Quick M...

Page 7: ... before mounting on the wall Insert or remove the CI module only when the TV is SWITCHED OFF You should refer to the module instruction manual for details of the settings Obtain the Conditional Access Module CAM and the viewing card by subscribing to Digiturk or D Smart Insert the CAM and then the viewing card to the slot that is located in the terminal cover at the rear side of the TV The module ...

Page 8: ...4 Connect the TV to the mains supply switch on and then wait for few moments until the card is activated 5 When no module is inserted No Common Interface module detected message appears on the screen You can refer to the module instruction manual for details of the settings CAM module Standby Notifications If the TV does not receive any input signal e g from an aerial or HDMI source for 5 minutes ...

Page 9: ...itched to standby mode standby LED can blink to indicate that features such as Standby Search Over Air Download or Timer is active The LED can also blink when you switch on the TV from standby mode First Time Installation When turned on for the first time the language selection menu appears The message Welcome please select your language is displayed and all language options are listed alphabetica...

Page 10: ...s e g MP3 Players or USB hard disk drives memory sticks may not be compatible with this TV The TV supports FAT32 and NTFS disk formatting but recording will not be available with NTFS formatted disks Note While formatting a USB hard disk that has 1TB Tera Byte or more file capacity you can experience problems with the formatting process Quickly plugging and unplugging USB devices is a very hazardo...

Page 11: ...y using or and OK buttons Quick Menu The Quick Settings menu allows you to access some options quickly This menu includes Power Save Mode Picture Mode Favourites Sleep Timer FollowMe TV FollowMe TV to DMR CEC RC Passthrough and Information booklet options Press Q MENU button on the remote control to view the quick menu See the following chapters for details of the listed features FollowMe TV With ...

Page 12: ...o be enabled or disabled under the Settings Other Settings menu The TV supports also ARC Audio Return Channel feature This feature is an audio link meant to replace other cables between the TV and the audio system A V receiver or speaker system WhenARC is active TV does not mute its other audio outputs automatically So you need to decrease TV volume to zero manually if you want to hear audio from ...

Page 13: ... Warm or Cool Picture Zoom Sets the picture size to Auto 16 9 Subtitle 14 9 14 9 Zoom 4 3 or Cinema HDMI True Black While watching from a HDMI source this feature will be visible in the Picture Settings menu You can use this feature to enhance the blackness in the picture Film Mode Filmsarerecordedatadifferentnumberofframespersecondtonormaltelevisionprogrammes Turnthis featureonwhenyouarewatchingf...

Page 14: ...d DTS TruSurround mode can be changed as On or Off Digital Out Sets digital audio output type Install and Retune Menu Contents Automatic Channel Scan Retune DigitalAerial Searches and stores aerial DVB stations Manual Channel Scan This feature can be used for direct broadcast entry First Time Installation Deletes all stored channels and settings resets TV to factory settings and starts first time ...

Page 15: ...tandby mode available broadcasts will be searched If the TV locates any new or missing broadcasts a menu screen will be displayed asking you whether or not to execute these changes The Channel list will be updated and changed after this process Please activate the Standby Search setting in order to enable yourTV to automatically update the broadcast frequency of the broadcaster broadcast definitio...

Page 16: ...te Timer option The timer will be cancelled Note It is not possible to record two channels at the same time Recording a Programme IMPORTANT When using a new USB hard disk drive it is recommended that you first format the disk using your TV s Format Disk option To record a programme you should first connect a USB disk to your TV while the TV is switched off You should then switch on the TV to enabl...

Page 17: ...mmes the slow forward feature will be available You can use button to slow forward Pressing button consecutively will change slow forwarding speed Recordings Library To view the list of recordings select Recordings Library and press the OK button The Recordings Library will then be displayed with available recordings All the recordings are kept in a list in the recordings library RED button Delete...

Page 18: ...ion Status This section displays the status of the connection Select Connected if you want to activate a connection Select as Not Connected to end an active connection IP Address If an active connection is available the IP address will be displayed on this section If you want to configure an IP address preference press the GREEN button and switch to the advanced mode Configuring Wired Network Sett...

Page 19: ... network from the list If the selected network is protected with a password please enter the correct key by using the virtual keyboard You can use this keyboard via the navigation buttons or or and the OK button on the remote control Wait until the IP address is shown on the screen Press the GREEN button to switch to advanced mode and then press the OK button to edit settings This means that the c...

Page 20: ...em router If the router does not have a problem check the internet connection of your modem Try searching for wireless networks again using the Network Settings menu screen Connection is slow See the instruction book of your wireless modem to get information on the internal service area connection speed signal quality and other settings You need to have a high speed connection for your modem Distr...

Page 21: ...eless Internet connection After the connection is established you can select or view portal options Note A Broadband Internet connection is required for high quality viewing Ensure that the internet connection is made properly You must set the Country and Language data correctly in the First Time Installation for the proper operation of the internet portal Press button on your remote control and t...

Page 22: ...kesurethecorrect input source has been selected 2 Is the aerial connected properly 3 Are the plugs connected to the aerial socket 4 Is the aerial cable damaged 5 Are suitable plugs used to connect the aerial 6 If you are in doubt consult your dealer No sound 1 HastheTVbeensettomute Tocancelmute pressthe button or increase the volume level 2 Sound is coming from only one speaker Is the balance set ...

Page 23: ... MPEG2 DVB T MPEG4 HD DVB T MHEG 5 Engine for UK only DVB C MPEG2 DVB C MPEG4 HD DVBT 2 MPEG2 DVBT 2 MPEG4 HD RECEIVING CHANNELS VHF BAND I III UHF BAND U HYPERBAND NUMBER OF PRESET CHANNELS 1000 CHANNEL INDICATOR On Screen Display RF AERIAL INPUT 75 Ohm unbalanced OPERATING VOLTAGE 220 240V AC 50 Hz AUDIO DTS TruSurround AUDIO OUTPUT POWER WRMS 10 THD 2 x 8 POWER CONSUMPTION W 75 W max PANEL 16 9...

Page 24: ...search keywords by clicking the search button in the address dialog box or another way to navigate to pages is by clicking on links on web pages and these will take you to the appropriate pages When you scroll the pointer down to the middle of the screen the remote control s shortcuts will be shown Use the zoom shortcut buttons or the zoom menu to zoom in or zoom out You can clear cookies or clear...

Page 25: ...ed and must be installed before continuing installation 5 Click the Install button The integrated serial will be displayed Please do not change the displayed serial 6 Click the Next button The License Conditions EULA screen will be displayed Please read the license agreement carefully and select the appropriate check box if you agree to the terms of the agreement Installation is not possible witho...

Page 26: ...0Hz 28 1360x768 60Hz 29 1280x768 75Hz 30 1280x768 85Hz 31 1280x960 60Hz 32 1280x960 75Hz 33 1280x960 85Hz 34 1280x1024 60Hz 35 1280x1024 75Hz 36 1280x1024 85Hz 37 1400x1050 60Hz 38 1400x1050 75Hz 39 1400x1050 85Hz 40 1440x900 60Hz 41 1440x900 75Hz 42 1600x1200 60Hz 43 1680x1050 60Hz 44 1920x1080 60Hz 45 1920x1200 60Hz Appendix B PC Input Typical Display Modes The display has a maximum resolution o...

Page 27: ...ec mp4 mov MPEG1 2 Layer 3 AAC HEAAC AC3 EAC3 LPCM ADPCM H 264 1080Px2 25fps 1080P 50fps Other 1080P 30fps 50Mbit sec avi MPEG1 2 4 Xvid H 264 VC1 WMV3 Sorenson H 263 Motion JPEG MPEG1 2 Layer 1 2 3 AAC HEAAC AC3 EAC3 LPCM ADPCM WMA H 264 1080Px2 25fps 1080P 50fps Other 1080P 30fps 50Mbit sec flv H 264 Sorenson H 263 MPEG1 2 Layer 3 AAC HEAAC LPCM ADPCM H 264 1080Px2 25fps 1080P 50fps Other 1080P ...

Page 28: ...024 þ þ 1400x1050 þ þ 1440x900 þ þ 1600x1200 þ 1680x1050 þ 1920x1080 þ 1920x1200 þ The Sky Code is 0065 1 Turn your TV on 2 Press TV on your Sky remote control handset 3 Hold down SELECT and the RED button together for about two seconds until the red light on the Sky remote control blinks twice 4 Key in 0065 The light on the Sky remote control should blink twice 5 Press the STANDBY button on your ...

Page 29: ...80I 50Hz O 1080I 60Hz O HDMI1 HDMI2 HDMI3 480I 60Hz O 480P 60Hz O 576I 50Hz O 576P 50Hz O 720P 50Hz O 720P 60Hz O 1080I 50Hz O 1080I 60Hz O 1080P 24Hz 25Hz 30Hz 50Hz 60Hz O X Not Available O Available In some cases a signal on the LED TV may not be displayed properly The problem may be an inconsistency with standards from the source equipment DVD Set top box etc If you do experience such a problem...

Page 30: ...ed green or green and yellow The wire which is coloured blue or black must be connected to the terminal which is marked with the letter N or coloured Black The wire which is coloured brown or red must be connected to the terminal which is marked with the letter L or coloured Red For continued protection against risk of fire replace only with same type and rating of fuse ASTA approved 5A 250VAC fus...

Page 31: ...ME249S T E Energy efficiency class A F Visible screen size diagonal approx inch cm 42 inches 106 cm G On mode average power consumption Watt 52 H Annual energy consumption kWh annum 75 I Standby power consumption Watt 0 5 J Off mode power consumption Watt 0 K Display resolution px 1920x1080 ...

Page 32: ......

Reviews: