Finlux 42F8075-T Owner'S Manual Download Page 19

English

   - 18 -

Other Information

Configuration Status

:  Displays  Wi-Fi  status  as 

connected or not connected.

IP Address

: Displays the current IP address.

Network Name

: Connected networks’ name will be 

displayed.

Delete Saved WiFi Profiles

Saved profiles will be deleted if you press the Red 

button  while  the  wireless  device  selection  OSD  is 

on the screen.

Connecting to your mobile Phone via WiFi

If your mobile phone has WiFi feature, you can 

connect your mobile phone to your TV by using 

a WiFi connection via a router, in order to play 

content from your phone. For this, your cell phone 

must have appropriate sharing software.
• Connect to your router following the steps stated 

above in the Wireless Connection section.

• Afterwards, engage your cell phone with the router 

and then activate the sharing software on your cell 

phone. Then, select files that you would like to share 

with your TV.

• If the connection is established correctly, you should 

now be able to access the shared files from your cell 

phone via the Media Browser of your TV.

• Enter the Media Browser menu and the playback 

device selection OSD will be displayed. Select your 

mobile phone and press the 

OK

 button to continue.

Note:

 This feature may not be supported on all mobile 

phones.

Connectivity Troubleshooting

Wireless Network Not Available

• 

Ensure that any firewalls of your network allow 

the TV wireless connection.

• 

Ensure the USB WiFi dongle (Supplied) is 

plugged in fully.

• 

If the wireless network does not function properly, 

try using the wired network in your home. Refer 

to the Wired Connection section for more 

information on the process.

If the TV does not function using the wired connection, 

check the modem (router). If the router does not 

have a problem, check the internet connection of 

your modem.
Try searching for wireless networks again, using the 

Network Settings menu screen.

Connection is slow

See the instruction book of your wireless modem to get 

information on the internal service area, connection 

speed, signal quality and other settings. You need to 

have a high speed connection for your modem.

Distruption during playback or slow 

reactions

You could try the following in such a case:
Keep at least three meters distance from microwave 

ovens, mobile telephones, bluetooth devices or any 

other Wi-Fi compatible devices. Try changing the 

active channel on the WLAN router.

Using DLNA Network Service

DLNA (Digital Living Network Alliance) is a standard 

that eases the viewing process of digital electronics 

and makes them more convenient to use on a home 

network. For further information, visit www.dlna.org.
The  DLNA  standard  allows  you  to  view  and  play 

photos, music and videos stored in the DLNA media 

server connected to your home network.

1. Nero Media Home Installation

The  DLNA  function  cannot  be  used  if  the  server 

program is not installed on to your PC. Please 

prepare your PC with the provided Nero Media 

Home programme. 

For more information about the 

installation, please refer to appendix H.

2. Connect to a Wired or Wireless Network

See the chapter Network Settings for detailed 

configuration information. 

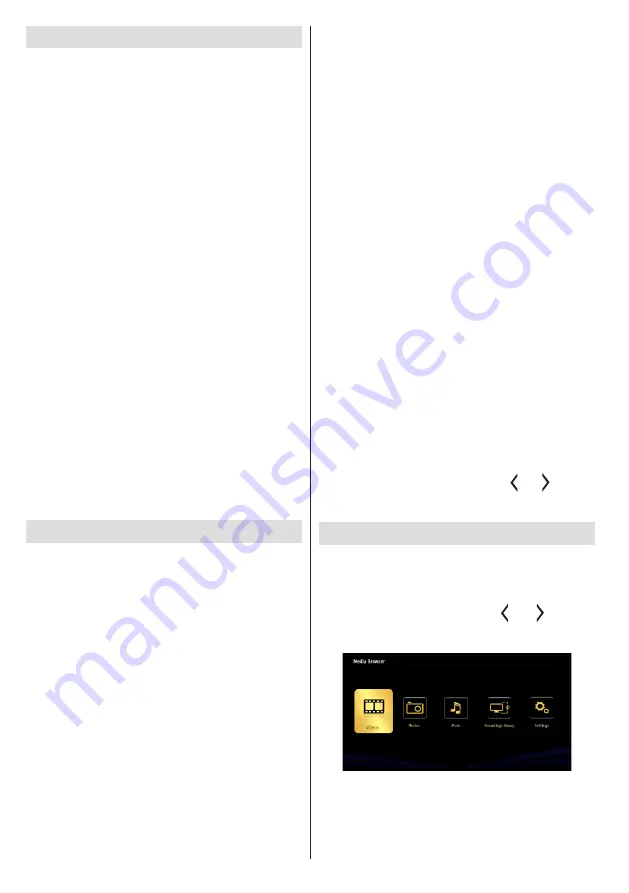
3. Play Shared Files via Media Browser

Select 

Media Browser

 by using the “ ” or “ ”  buttons  

from the main menu and press 

OK

. The Media 

browser will then be displayed.

DLNA 

DLNA support is only available in the Media Browser 

folder mode. To enable folder mode, go to the 

Settings

 tab in the main media browser screen and 

press 

OK

. In the settings options, highlight 

View Style


and change to 

Folder

 using the “ ” or “ ” buttons. 

Select the desired media type and press 

OK.

If sharing configurations are set properly, the following 

OSD message will be displayed after selecting the 

desired media type. Select 

OK

 to display the selected 

network or USB memory content. If you want to refresh 

Summary of Contents for 42F8075-T

Page 1: ......

Page 2: ...ration Status 16 IP Address 16 Configuring Wired Network Settings in Advanced Mode 16 Wireless Connectivity 16 Connecting to a Wireless Network 16 Other Information 18 Delete Saved WiFi Profiles 18 Co...

Page 3: ...ELECTRIC SHOCK DO NOT REMOVE COVER OR BACK NO USER SERVICEABLE PARTS INSIDE REFER SERVICING TO QUALIFIED SERVICE PERSONNEL RISK OF ELECTRIC SHOCK DO NOT OPEN CAUTION CAUTION TO REDUCE THE RISK OF ELEC...

Page 4: ...aners Only use a soft dry cloth Environmental Information This television is designed to consume less energy to help save environment You can not only help to save the environment but you can also sav...

Page 5: ...E 2000 XP Vista Windows 7 Game Mode optional Ethernet LAN for Internet connectivity 802 11n WiFi Support via USB dongle DLNA TV Control button Operation 1 Standby button 2 TV AV button 3 Programme Up...

Page 6: ...33 Stop in media browser mode 34 Pause in media browser mode Timeshift recording 35 Media browser 36 Launches Youtube 37 Standby button 38 Function LED NOTE The Remote Control range is approximately 7...

Page 7: ...before mounting on the wall Insert or remove the CI module only when the TV is SWITCHED OFF You should refer to the module instruction manual for details of the settings Obtain the Conditional Access...

Page 8: ...Connect the TV to the mains supply switch on and then wait for few moments until the card is activated 5 When no module is inserted No Common Interface module detected message appears on the screen Y...

Page 9: ...ched to standby mode standby LED can blink to indicate that features such as Standby Search Over Air Download or Timer is active The LED can also blink when you switch on the TV from standby mode Firs...

Page 10: ...e g MP3 Players or USB hard disk drives memory sticks may not be compatible with this TV The TV supports FAT32 and NTFS disk formatting but recording will not be available with NTFS formatted disks N...

Page 11: ...hannel List You can select which broadcasts will be listed in the channel list To display specific types of broadcast you should use the Active channel list setting Select the Active channel list from...

Page 12: ...Warm or Cool Picture Zoom Sets the picture size to Auto 16 9 Subtitle 14 9 14 9 Zoom 4 3 or Cinema HDMI True Black While watching from a HDMI source this feature will be visible in the Picture Setting...

Page 13: ...Dual I or Dual II mode only if the selected channel supports that mode AVL Automatic Volume Limiting AVL function sets the sound to obtain a fixed output level between programmes For instance volume l...

Page 14: ...ture only if the broadcaster supports the additional narration track Auto TV Off You can set the timeout value of the auto off feature After the timeout value is reached and the TV has not been operat...

Page 15: ...e Timer option The timer will be cancelled Note It is not possible to record two channels at the same time Recording a Programme IMPORTANT When using a new USB hard disk drive it is recommended that y...

Page 16: ...mes the slow forward feature will be available You can use button to slow forward Pressing button consecutively will change slow forwarding speed Recordings Library To view the list of recordings sele...

Page 17: ...ys the status of the connection Select Connected if you want to activate a connection Select as Not Connected to end an active connection IP Address If an active connection is available the IP address...

Page 18: ...ms It is highly recommended that you should use the IEEE 802 11n communication protocol in order to avoid any possible problems while watching videos Use the other USB input if you experience problems...

Page 19: ...hing for wireless networks again using the Network Settings menu screen Connection is slow See the instruction book of your wireless modem to get information on the internal service area connection sp...

Page 20: ...alled Internet Portal Ensure the TV is connected to a Wired Wireless Internet connection After the connection is established you can select or view portal options Note A Broadband Internet connection...

Page 21: ...are is found and downloaded successfully the next time the TV powers up it will have the new software version Note If theTV fails to come on after the upgrade unplug the TV for 2 minutes and plug in a...

Page 22: ...invalid this might cause problems while browsing files in DLNA mode Information for Users on Disposal of Old Equipment and Batteries European Union only These symbols indicate that equipment with thes...

Page 23: ...earch keywords by clicking the search button in the address dialog box or another way to navigate to pages is by clicking on links on web pages and these will take you to the appropriate pages When yo...

Page 24: ...st be connected to a network for Skype connection The Skype app will alert you when someone calls whilst you are watching your TV or operating the Skype application A Skype camera can be sold separate...

Page 25: ...name and password correctly Select Sign In and press OK If you have a Skype account and you forgot your password press the Red button to view the reset password screen After successfully logging in to...

Page 26: ...control or virtual keyboard to enter a keyword Your Skype history can be seen in this section To view recent history options use the p and p buttons To delete a conversation press the Red button When...

Page 27: ...our use If available you will see the thumbnail view of yours and the other person s camera feed Help bar Your contact list Press Ok to use video voice call Select a Menu by pressing the button Online...

Page 28: ...and when other users initiate a Skype call A small dialog box will appear in the lower right corner of the TV screen whether the user watches TV or is browsing through Skype Use the remote control but...

Page 29: ...t the installation process The Nero MediaHome installation wizard is displayed If necessary change installation language from the language selection menu before continuing 3 Click the Next button The...

Page 30: ...the installation process 10 Installation finishes The Help us to Enhance Nero Software screen is displayed In order to offer a better service Nero is collecting anonymous data to determine which feat...

Page 31: ...English 30 15 You can display all media types from the library Click Refresh icon to refresh Click STOP SERVER icon to stop server...

Page 32: ...Hz 28 1360x768 60Hz 29 1280x768 75Hz 30 1280x768 85Hz 31 1280x960 60Hz 32 1280x960 75Hz 33 1280x960 85Hz 34 1280x1024 60Hz 35 1280x1024 75Hz 36 1280x1024 85Hz 37 1400x1050 60Hz 38 1400x1050 75Hz 39 14...

Page 33: ...c mp4 mov MPEG1 2 Layer 3 AAC HEAAC AC3 EAC3 LPCM ADPCM H 264 1080Px2 25fps 1080P 50fps Other 1080P 30fps 50Mbit sec avi MPEG1 2 4 Xvid H 264 VC1 WMV3 Sorenson H 263 Motion JPEG MPEG1 2 Layer 1 2 3 AA...

Page 34: ...440x900 1600x1200 1680x1050 1920x1080 1920x1200 The Sky Code is 065 1 Turn your TV on 2 Press TV on your Sky remote control handset 3 Hold down SELECT and the RED button together for about two seconds...

Page 35: ...z O 720P 60Hz O 1080I 50Hz O 1080I 60Hz O HDMI1 HDMI2 HDMI3 480I 60Hz O 480P 60Hz O 576I 50Hz O 576P 50Hz O 720P 50Hz O 720P 60Hz O 1080I 50Hz O 1080I 60Hz O 1080P 24Hz 25Hz 30Hz 50Hz 60Hz O X Not Ava...

Page 36: ...reen or green and yellow The wire which is coloured blue or black must be connected to the terminal which is marked with the letter N or coloured Black The wire which is coloured brown or red must be...

Page 37: ...75 T E Energy efficiency class A F Visible screen size diagonal approx inch cm 42 inches 106 cm G On mode average power consumption Watt 69 H Annual energy consumption kWh annum 100 I Standby power co...

Page 38: ......

Reviews: