background image

- 15 -

Input Selection

Once you have connected external systems to 
your TV, you can switch to different input sources. 
Press 

“SOURCE”

 button on your remote control 

consecutively for directly changing sources.

You can operate your TV using both the remote control 
and onset buttons.

Operation with the Buttons on the TV
Volume Setting

Press “

• 

” button to decrease volume or 


button to increase volume, a volume level scale 
(slider) will be displayed on the screen.

Programme Selection

Press “

• 

P/CH +

” button to select the next programme or 

P/CH -

” button to select the previous programme.

Viewing Main Menu

Press the “

• 

”/“

” button at the same time 

to view main menu. In the Main menu select sub-
menu using “AV” button and set the sub-menu using 

” or “

” buttons. To learn the usage of 

the menus, refer to the menu system sections.

AV Mode

Press the “

• 

AV

” button in the control panel on the TV 

to switch between AV modes.

Operation with the Remote Control

The remote control of your TV is designed to control 

• 

all the functions of the model you selected. The 
functions will be described in accordance with the 
menu system of your TV.

Volume Setting

Press “

• 

V+

” button to increase the volume. Press “

V-

” 

button to decrease the volume. A volume level scale 
(slider) will be displayed on the screen.

Programme Selection (Previous or Next 
Programme)

Press “

• 

P-

” button to select the previous 

programme. 

Press “

• 

P+

” button to select the next programme.

Programme Selection (Direct Access)

Press the numeric buttons on the remote control to 

• 

select programmes between 0 and 9. The TV will 
switch to the selected programme.

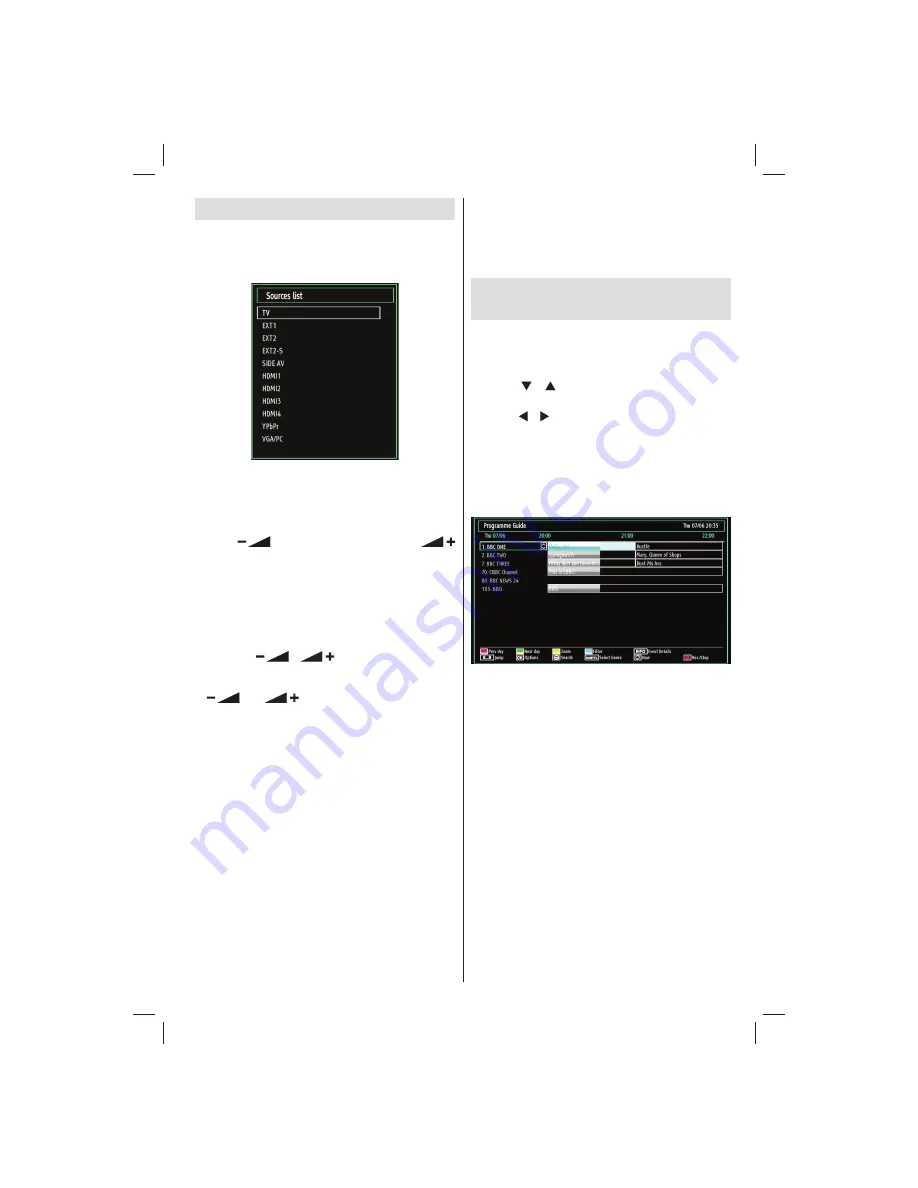
Viewing the Electronic 
Programme Guide (EPG)

You can view the electronic programme guide (EPG) 
to see information about available programmes.To 
view the 

EPG

 menu please press 

EPG

 button on the 

remote control.

Press “

• 

”/“ ”  buttons to navigate through 

channels.
Press “

• 

”/“ ” buttons to navigate through the 

programme list.
Please note that event information is updated 

• 

automatically. If there is no event information data 
available for channels, the 

EPG

 will be displayed 

with blanks.

EPG Timeline Schedule

Red button (Prev Day):

 Displays the programmes 

of previous day.

Green button (Next day):

 Displays the programmes 

of the next day.

Yellow button (Zoom):

 Expands programme 

information.

Blue button (Filter): 

Views 

fi

 ltering options.

Numeric buttons (Jump)

: Jumps to the preferred 

channel directly via numeric buttons.

INFO (Details): 

Displays the programmes in detail.

OK (Options):

 views/records or sets timer for future 

programs.

Text button (Search):

 Displays “

Guide Search

” 

menu.

SUBTTL: 

Press 

SUBTTL

 button to view Select 

Genre menu. Using this feature, you can search the 
programme guide database in accordance with the 
genre. Info available in the programme guide will 
be searched and results matching your criteria will 
be listed.


01_MB65_[GB]_[3D]_IDTV_PVR_GOLD14_5103UK_42930W_10078747_50217702.indd   15

01_MB65_[GB]_[3D]_IDTV_PVR_GOLD14_5103UK_42930W_10078747_50217702.indd   15

26.04.2012   13:51:52

26.04.2012   13:51:52

Summary of Contents for 42F7020-D

Page 1: ...42in Direct LED Passive 3D TV 42F7020 D Owner s manual happy Finnish...

Page 2: ...edia Playback Using Media Browser 19 Timeshift Recording 22 Instant Recording 22 Watching Recorded Programmes 23 Using the 3D Mode 23 3D Mode 23 Changing Image Size Picture Formats 24 Configuring Pict...

Page 3: ...digital TV DVB T MPEG2 HDMI connectors for digital video and audio This connection is also designed to accept high definition signals USB input Programme recording Programme timeshifting 1000 program...

Page 4: ...o be stepped on A damaged power cord can cause fire or give you an electric shock When it is damaged and needs to be replaced it should be done by qualified personnel Moisture and Water Do not use thi...

Page 5: ...you should have the children rest Do not use the 3D Glasses for other purposes such as sunglasses or general eyeglasses Do not use the 3D mode or wear 3D Glasses while you are moving around Using the...

Page 6: ...ch a case if you experience any of the following symptoms immediately stop watching the 3D TV and consult a doctor altered vision visual or facial instability such as eye or muscle twitching dizziness...

Page 7: ...dren cannot always recognise possible dangers Batteries accumulators can be life threatening when swallowed Store batteries out of the reach of for small children In case of swallowing a battery medic...

Page 8: ...l also reduce energy consumption Disconnect the TV from the mains socket when it will not be used for prolonged periods Note that annually using the TV set in Power Save Mode has more power efficiency...

Page 9: ...cture mode 19 in Media Browser video mode Exit USB menu 20 No function 21 Play in Media Browser mode 22 No function 23 No function 24 Rapid reverse in Media Browser mode 25 Image size 26 Mono Stereo D...

Page 10: ...as component output Connect the component video cables between the COMPONENT VIDEO INPUTS on the TV and the component video outputs of your device While connecting be sure that the letters on your TV...

Page 11: ...section USB Inputs 2 Note that programme recording feature is available via these USB inputs You can connect external hard disk drives to this input HDMI Input 3 Headphone jack is used for connecting...

Page 12: ...sage will be displayed on the next switch on First Time Installation IMPORTANT Ensure that the aerial is connected and a Common Interface module is not inserted before switching on the TV for the firs...

Page 13: ...ble to connect video input For enabling audio use a component audio cable as illustrated below When the connection is made switch to YPbPr source See Input selection section You may also connect throu...

Page 14: ...use physical damage to the USB player and especially the USB device itself Do not pull out USB module while playing or recording a file Programme Recording To record a programme you should first conne...

Page 15: ...t of the PC Monitor output of the PC Note If you connect a PC to the TV using HDMI connection radio interference may occur Therefore this type of connection is not recommended You should use VGA conne...

Page 16: ...next programme Programme Selection Direct Access Press the numeric buttons on the remote control to select programmes between 0 and 9 The TV will switch to the selected programme Viewing the Electron...

Page 17: ...d the selected progamme You can press again to stop the recording Note Switching to a different broadcast or source is not available during the recording Page left Page right Programme Options When in...

Page 18: ...lation process will start and the progress bar will move along Press MENU button to cancel process Located channels are not stored if the process is cancelled Manual Tuning HINT This feature can be us...

Page 19: ...ter the desired channel number by using the numeric buttons on the remote control If there is a previously stored channel on that number a warning screen will be displayed Select Yes if you want to mo...

Page 20: ...he name of the channel is displayed along with its channel list number Hint Not all channels broadcast the programme data If the name and time of the programme are not available then the information b...

Page 21: ...ton Goes forward Subtitle Audio LANG button Sets subtitle Audio Jump GREEN button Jumps to time Use numeric buttons to type the desired time and press GREEN button again to proceed Yellow Opens subtit...

Page 22: ...ideo file will be played in a shuffle If you start the playback with or OK button and activate symbols music or video file playback will continue randomly and the random playback will continue 0 9 Num...

Page 23: ...imeshifting recording s duration depends on your connected USB disk s file size and defined Max Timeshift in the Recordings Configuration menu See the section Recordings for more information on settin...

Page 24: ...Images precautions section on page 39 You must use 3D glasses parallel to your TV The picture may not be visible or may look dark if you do not stay within the viewing angle Use 3D glasses only when w...

Page 25: ...ing the picture in different zoom modes Press SCREEN button repeatedly to change the image size Available zoom modes are listed below Auto WhenAUTO is selected the aspect ratio of the screen is adjust...

Page 26: ...highlight a menu item Use or button to set an item Press MENU button to exit Picture Settings Menu Items Mode For your viewing requirements you can set the related mode option Picture mode can be set...

Page 27: ...Picture menu appears on the screen Contrast Brightness Colour Colour Temp and Picture Zoom Reset settings in this menu are identical to settings defined in TV picture settings menu Sound Settings and...

Page 28: ...e Sets date and time Sources Enables or disables selected source options Other Settings Displays other setting options of the TV set Using a Conditional Access Module not included IMPORTANT Insert or...

Page 29: ...e audio language for the current channel Subtitle Sets the subtitle language for the current channel Note If the Country option is set to Denmark Sweden Norway or Finland the Language Settings menu wi...

Page 30: ...ble Set PIN Defines a new PIN number Use numeric buttons to enter a new pin number You will need to enter your new pin a second time for verification purposes IMPORTANT The factory default pin number...

Page 31: ...uiring you to enter a pin number If you have not changed the pin number the factory default is 0000 After you enter the pin a pop up menu appears on the screen to ensure that the hard disk should be f...

Page 32: ...upgrade by setting Automatic Scanning option You can manually search for new software by selecting Scan for upgrade Application version Displays the current application version Hard of Hearing If the...

Page 33: ...idden information e g solutions of games OK Hold Holds a text page when convenient Press again to resume Subcode Pages Selects subcode pages if available when the teletext is activated P P and numbers...

Page 34: ...he aerial If you are in doubt consult your dealer No Picture means that your TV is not receiving a transmission Have you selected the correct button on the remote control Try once more Also make sure...

Page 35: ...P 60Hz O 1080I 50Hz O 1080I 60Hz O 1080P 50Hz O 1080P 60Hz O 1080P 24 HZ O X Not Available O Available In some cases a signal on the LED TV may not be displayed properly The problem may be an inconsis...

Page 36: ...12 1024x768 72Hz 13 1024x768 75Hz 14 1152x864 75Hz 15 1280x768 60Hz 16 1360x768 60Hz 17 1280x768 75Hz 18 1280x960 60Hz 19 1280x960 75Hz 20 1280x1024 60Hz 21 1280x1024 75Hz 22 1400x1050 60Hz 23 1600x12...

Page 37: ...0 Xvid 1 01 Xvid 1 02 Xvid 1 03 Xvid 1 10 beta1 2 PCM Music mp3 MPEG 1 Layer 1 2 MP3 32Kbps 320Kbps Bit rate 32KHz 48KHz Sampling rate Photo jpg jpeg Baseline JPEG max WxH 15360x8640 4147200bytes Prog...

Page 38: ...ion Note on reboot operation Reboot is the last step in software upgrade operation if download of new software is finished successfully During reboot TV makes final initializations In reboot sequence...

Page 39: ...tiples of 2 and the image s width is multiples of 16 and if the image width is equal to the panel width or wider in DTV Supported only when the image s height is between 1700 and 1900 and the image s...

Page 40: ...e ability to play both games and Blu ray 3D discs Using with SKY for UK only Select Sky 3D channel Press Menu on TV Select Picture Select 3D Menu Change setting to 3D side by side Once selected 3D cha...

Page 41: ...t Kg 18 50 DxLxH Without foot 99 x 1015 x 641 Weight Kg 16 50 Digital Reception MHEG 5 ENGINE compliant with ISO IEC 13522 5 UK engine Profile 1 for UK Object carousel support compliant with ISO IEC 1...

Page 42: ...nal which is marked with the letter N or coloured Black The wire which is coloured brown or red must be connected to the terminal which is marked with the letter L or coloured Red For continued protec...

Page 43: ...50221080 www finluxdirect com Customer helpline 0845 459 5282...

Reviews: