background image

- 28 -

Hard Disk Info 

To view the details about the USB disk, highlight Hard 

Disk Info by using “ ” or “ ” key and press 

OK

. USB 

disk information will be displayed:

Configuring Date/Time Settings

Select 

Date/Time

 in the Settings menu to configure 

Date/Time settings. Press 

OK 

button.

Use “

• 

” or “ ” buttons to highlight 

Date

/

Time.

Date,  Time,  Time  Settings  Mode  and  Time  Zone 

Setting  will be available.

Use “

” or “ ” buttons to highlight the Time Settings 

Mode. Time Settings Mode is set using “

” or “ ” 

buttons. It can be set to AUTO or MANUAL.
When AUTO is selected, Date/Time and Time Zone 

options  will  not  be  available  to  be  set.  If  MANUAL 

option is selected as the Time Zone can be altered:
• By pressing “ ” or “ ” buttons select Time Zone.

Use  “

”  or  “ ”  buttons  to  change  the Time  Zone 

between GMT-12 or GMT+12. Date/Time on the top 

of  the  menu  list  will  then  change  according  to  the 

selected Time Zone.

Changes are automatically stored. Press 

• 

“MENU” 

to exit.

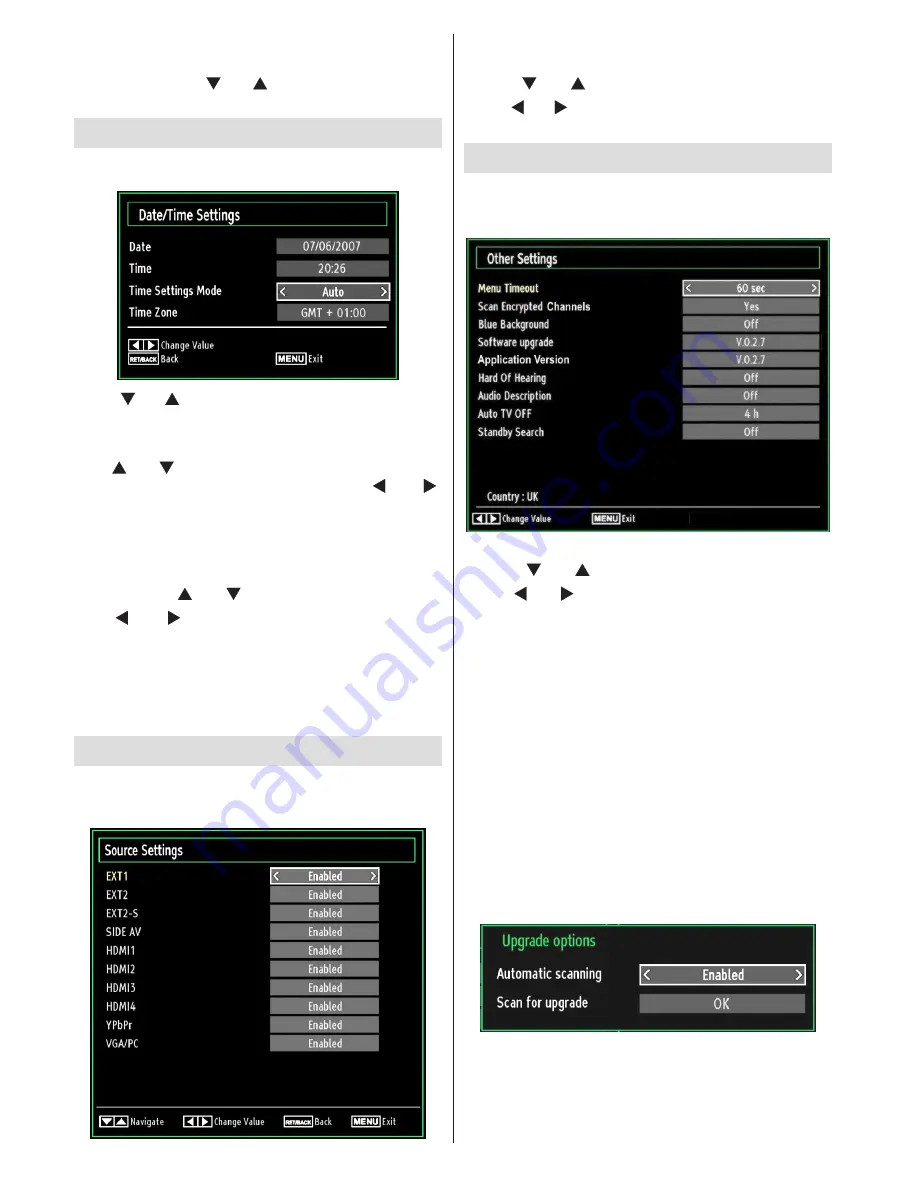
Configuring Source Settings

You can enables or disable selected source options. 

The TV will not switch to the disabled source options 

when 

“SOURCE”

 button is pressed.

Select 

• 

Sources

  in  the  Settings  menu  and  press 

OK

 button.

Press“

• 

” or “ ” buttons to select a source.

Use “

• 

” or “ ” button to enable or disable the selected 

source. Changes are automatically stored. 

Configuring Other Settings

To  view  general  configuration  preferences,  select 

Other Settings

 in the Settings menu and press 

OK 

button.

Operation

Press “

• 

” or “ ” buttons to select an item.

Use “

• 

” or “ ” button to set an option.

Press

• 

 OK

 button to view a sub-menu.

Menu Timeout

: Changes timeout duration for menu 

screens.

Scan Encrypted Channels

: When this setting is set 

as 

YES

,  search  process  will  locate  the  encrypted 

channels as well. If it is set as 

NO

, encrypted channels 

will  not  be  located  in  automatic  search  or  manual 

search.

Blue  Background

: Activates  or  deactivates  blue 

background  system  when  the  signal  is  weak  or 

absent.

Software Upgrade

: To ensure that your TV always 

has the most update information, you can use this 

setting.  In  order  for  the  proper  operation,  please 

ensure that the TV is set to standby mode.

You  can  enable  or  disable  automatic  upgrade  by 

setting 

Automatic Scanning

 option. 

You  can  manually  search  for  new  software  by 

selecting 

Scan for upgrade

Summary of Contents for 37F501

Page 1: ...37in LCD TV 37F501 Owner s manual happy Finnish ...

Page 2: ...nstallation 14 Manual Tuning 15 Digital Manual Search 15 Analogue Manual Search 15 Analogue Fine Tune 15 Managing Stations Channel List 15 Moving a Channel 16 Deleting a Channel 16 Renaming a Channel 16 Locking a Channel 16 Managing Stations Favourites 16 Button Functions 16 Managing Stations Sorting the Channel List 17 On Screen Information 17 Media Playback Using Media Browser 17 Viewing Photos ...

Page 3: ...ld lock Automatic sound mute when no transmission NTSC playback AVL Automatic Volume Limiting Auto power down PLL Frequency Search PC input Plug Play for Windows 98 ME 2000 XP Vista Windows 7 Game Mode SRS TruSurround HD Introduction Thank you for choosing this product This manual will guide you for the proper operation of your TV Before operating the TV please read this manual thoroughly Please k...

Page 4: ...the TV Batteries should not be exposed to excessive heat such as sunshine fire or the like Lightning In case of storm and lightning or when going on holiday disconnect the power cord from the wall outlet Replacement Parts When replacement parts are required make sure that the service technician has used replacement parts which are specified by the manufacturer or have the same specifications as th...

Page 5: ...e not in the hands of children Never let children use any electrical device unsupervised Children cannot always recognise possible dangers Batteries accumulators can be life threatening when swallowed Store batteries out of the reach of small children In case of swallowing a battery medical aid has to be sought immediately Also keep the packaging foils away from children as there is danger of suff...

Page 6: ...set in Power Save Mode has more power efficiency than disconnecting the TV from the mains plug instead of keeping stand by mode Therefore disconnect the TV from the mains plug to save energy when you do not use However it is highly recommended to activate Power Save Mode setting to reduce your annual power consumption Please helps us to save environment by following these steps Repair Information ...

Page 7: ...ges picture mode 20 in Media Browser video mode Electronic Programme Guide 21 Sleep timer 22 Menu on off 23 OK Select Hold in TXT mode Channel List 24 Volume up down 25 Navigation buttons 26 AV Source 27 Previous programme Now in EPG mode 28 Blue button 29 Yellow button Timeline Schedule in EPG t 30 No function 31 Subtitle on off TXT subtitle analogue TV 32 mode Subtitle in Media Browser mode No f...

Page 8: ...ng component video You can connect the component video and audio sockets with a device that has component output Connect the component video cables between the COMPONENT VIDEO INPUTS on the TV and the component video outputs of your device While connecting be sure that the letters on your TV Y Pb Pr correspond with your device s connectors PC YPbPr Audio Inputs 4 are used for connecting audio sign...

Page 9: ...Access section USB Inputs 2 Note that programme recording feature is available via these USB inputs You can connect external hard disk drives to this input Side HDMI Input is for connecting a device that has an HDMI socket 3 Headphone jack is used for connecting an external headphone to the system 4 Connect to the HEADPHONE jack to listen to the TV from headphones optional Audio Inputs are used fo...

Page 10: ...power down feature the following on screen message will be displayed on the next switch on First Time Installation IMPORTANT Ensure that the aerial is connected and a Common Interface module is not inserted before switching on the TV for the first time installation When the TV is operated for the first time the installation wizard will guide you through the process First the language selection scr...

Page 11: ...Pr can be used only when you connect a device that has a YPbPr output through the PC input with YPbPr to PC cable YPbPr cable is not supplied You may also connect through the SCART sockets Use a SCART cable as shown below Note These three methods of connection perform the same function but in different levels of quality It is not necessary to connect by all three methods Video Connection HDMI inpu...

Page 12: ...is may cause physical damage to the USB player and especially the USB device itself Do not pull out USB module while playing or recording a file Programme Recording To record a programme you should first connect a USB disk to your TV while the TV is switched off You should then switch on the TV to enable recording feature IMPORTANT When using a new USB hard disk drive it is recommended that you fi...

Page 13: ... your PC and the audio input of the TV to enable the playback of sound through your TV When the connection is made switch to PC source See the Input selection section Use a PC audio cable between the audio output of your PC and the audio input of the TV to enable the playback of sound through your TV Set the resolution that suits your viewing requirements Resolution information can be found in the...

Page 14: ... the EPG menu please press EPG button on the remote control Press buttons to navigate through channels Press buttons to navigate through the programme list Please note that event information is updated automatically If there is no event information data available for channels the EPG will be displayed with blanks EPG Timeline Schedule Red button Prev Day Displays the programmes of previous day Gre...

Page 15: ...r will be cancelled Note It is not possible to record or set timer for two or more individual events at the same time interval EPG Channel Schedule Red button Prev Time Slice Displays the programmes of previous time slice Green button Next Time Slice Displays the programmes of the next time slice Yellow button Prev Day Displays the programmes of previous day Blue button Next day Displays the progr...

Page 16: ...gital Manual Search In manual channel scan the number of the multiplex or frequency are entered manually and only that multiplex or frequency are searched for the channels After selecting search type as Digital you can enter the multiplex or frequency number using the numeric buttons and press OK button to search Analogue Manual Search After selecting search type as analogue you can use button to ...

Page 17: ...e channel that you want to rename and select Edit Name option Press OK button to continue Pressing or button moves to the previous next character Pressing or button toggles the current character i e b character becomes a by and c by Pressing the numeric buttons 0 9 replaces the highlighted character with the characters printed above the button one by one as the button is pressed When finished pres...

Page 18: ...ayback Using Media Browser If the USB stick is not recognized after power off on or First Time Installation unplug the USB device turn the TV off and on again and re insert the USB device To display Media Browser window press either MENU button on the remote control and then select Media Browser by pressing or button Press OK button to continue Media Browser menu options will be displayed Also whe...

Page 19: ... When you select Photos from the main options available image files will be filtered and listed on this screen Jump Numeric buttons Jump to selected file using the numeric buttons OK Views the selected picture in full screen Slideshow button Starts the slideshow using all images RED Sorts files by date GREEN Views images in thumbnails BLUE Switch between music photo video and all YELLOW Change vie...

Page 20: ...l continue randomly and the random playback will continue 0 9 Numeric buttons The TV will jump to the file starting with the letter you input via the numeric buttons on your remote control Play This OK button Plays the selected file Previous Next Left Right buttons Jumps to previous or next file to play YELLOW Toggles viewing style BLUE Changes media type Recordings Library IMPORTANT To view recor...

Page 21: ...watching normal broadcast Press STOP button to stop timeshifting mode Similtaneous timeshifting recording s duration depends on your connected USB disk s file size and defined Max Timeshift in the Recordings Configuration menu See the section Recordings for more information on setting Max Timeshift Note Switching to a different broadcast or source and viewing main menu are not available during the...

Page 22: ...ssing button consecutively will change slow forwarding speed Changing Image Size Picture Formats You can change the aspect ratio image size of the TV for viewing the picture in different zoom modes Press SCREEN button repeatedly to change the image size Available zoom modes are listed below Auto WhenAUTO is selected the aspect ratio of the screen is adjusted by the information provided by the sele...

Page 23: ...MENU button to exit Picture Settings Menu Items Mode For your viewing requirements you can set the related mode option Picture mode can be set to one of these options Cinema Game Dynamic and Natural Contrast Sets the lightness and darkness values of the screen Brightness Sets the brightness value for the screen Sharpness Sets the sharpness value for the objects displayed on the screen Colour Sets ...

Page 24: ...ion For adjusting PC picture items do the following Press or button to select Picture icon Picture menu appears on the screen Contrast Brightness Colour Colour Temp and Picture Zoom Reset settings in this menu are identical to settings defined in TV picture settings menu Sound Settings and Source settings are identical to the settings explained in the main menu system PC Position Select this to di...

Page 25: ...ound HD By pressing or select SRS TruSurround HD Press or button to set SRS TruSurround HD as on or off Note If you set SRS TruSurround HD as On some features in the Sound menu can be unavailable to be set Digital Out Sets digital out audio type Configuring Your TV s Settings Detailed settings can be configured to suit your personal preferences Press MENU button and select Settings ikon by using o...

Page 26: ...y change depending on the service provider Press MENU button and select the icon by using or button Press OK button to view Settings menu Use or button to highlight Conditional Access and press OK to view menu items Configuring Language Preferences You can operate the TV s language settings using this menu Press MENU button and select the fifth icon by using or button Press OK button to view Setti...

Page 27: ...ill be displayed Parental Settings Menu Operation Select an item by using or button Use or button to set an item Press OK button to view more options If you set Country option as UK at the point of first time installation Maturity Lock option will not be visible This setting is available only for EU countries Menu Lock Menu lock setting enables or disables the menu access You can disable access to...

Page 28: ...nfiguration Select Recording Configuration item in the Settings menu to configure recording settings The following menu is displayed for recording configuration The following options are available for adjustments Start Early You set recording timer s starting time to start earlier by using this setting Available only for EU country options End Late You set recording timer s end time to end later b...

Page 29: ...switch to the disabled source options when SOURCE button is pressed Select Sources in the Settings menu and press OK button Press or buttons to select a source Use or button to enable or disable the selected source Changes are automatically stored Configuring Other Settings To view general configuration preferences select Other Settings in the Settings menu and press OK button Operation Press or b...

Page 30: ...ing Subtitles You can enable subtitles by pressing the Subtitle button of the remote control Press Lang button to select subtitle language and press Subtitle button to display available subtitles If Subtitle is On pressing the button causes the following warning message display on the screen for UK only Teletext The Teletext system transmits information such as news sports and weather on your TV N...

Page 31: ...ne the channels The picture quality may degrade when two peripherals are connected to the TV at the same time In such a case disconnect one of the peripherals No Picture Is the aerial connected properly Are the plugs connected tightly to the aerial socket Is the aerial cable damaged Are suitable plugs used to connect the aerial If you are in doubt consult your dealer No Picture means that your TV ...

Page 32: ... 60Hz O HDMI1 HDMI2 HDMI3 HDMI4 480I 60Hz O 480P 60Hz O 576I 50Hz O 576P 50Hz O 720P 50Hz O 720P 60Hz O 1080I 50Hz O 1080I 60Hz O 1080P 50Hz O 1080P 60Hz O 1080P 24 HZ O X Not Available O Available In some cases a signal on the LCD TV may not be displayed properly The problem may be an inconsistency with standards from the source equipment DVD Set top box etc If you do experience such a problem pl...

Page 33: ... 6 800x600 60Hz 7 800x600 70Hz 8 800x600 72Hz 9 800x600 75Hz 10 1024x768 60Hz 11 1024x768 70Hz 12 1024x768 72Hz 13 1024x768 75Hz 14 1152x864 75Hz 15 1280x768 60Hz 16 1360x768 60Hz 17 1280x768 75Hz 18 1280x960 60Hz 19 1280x960 75Hz 20 1280x1024 60Hz 21 1280x1024 75Hz 22 1400x1050 60Hz 23 1600x1200 60Hz 24 1920x1080 60Hz 25 1920x1200 60Hz 26 480p 60Hz 27 576p 50Hz 28 720p 50Hz 29 720p 60Hz 30 1080i ...

Page 34: ...t sec dat MPEG1 2 MPEG2 vob MPEG2 avi MPEG2 MPEG4 PCM MP3 MAX 1920x1080 30P 20Mbit sec Xvid 1 00 Xvid 1 01 Xvid 1 02 Xvid 1 03 Xvid 1 10 beta1 2 H 264 PCM Music mp3 MPEG 1 Layer 1 2 MP3 32Kbps 320Kbps Bit rate 32KHz 48KHz Sampling rate Photo jpg jpeg Baseline JPEG max WxH 15360x8640 4147200bytes Progressive JPEG max WxH 1024x768 6291456bytes bmp max WxH 9600x6400 3840000bytes Subtitle sub srt ...

Page 35: ...are is found and downloaded successfully with next power up the TV opens with new software version Note on reboot operation Reboot is the last step in software upgrade operation if download of new software is finished successfully During reboot TV makes final initializations In reboot sequence panel power is closed and front led indicates the activity with blinking Around 5 minutes later TV restar...

Page 36: ... max PANEL 16 9 display 37 Screen Size DIMENSIONS mm DxLxH With foot 220 x 913 x 622 Weight Kg 14 40 DxLxH Without foot 98 5 x 913 x 587 Weight Kg 13 60 Digital Reception DVB T MHEG 5 ENGINE compliant with ISO IEC 13522 5 UK engine Profile 1 for UK Object carousel support compliant with ISO IEC 135818 6 and UK DTT profile Frequency range 474 850 MHz for UK models 170 862 MHz for EU models Transmis...

Page 37: ...een or green and yellow The wire which is coloured blue or black must be connected to the terminal which is marked with the letter N or coloured Black The wire which is coloured brown or red must be connected to the terminal which is marked with the letter L or coloured Red For continued protection against risk of fire replace only with same type and rating of fuse ASTA approved 5A 250VAC fuse CAU...

Page 38: ...50227276 www finluxdirect com Customer Helpline 0845 459 5282 ...

Reviews: