background image

English

   - 7 -

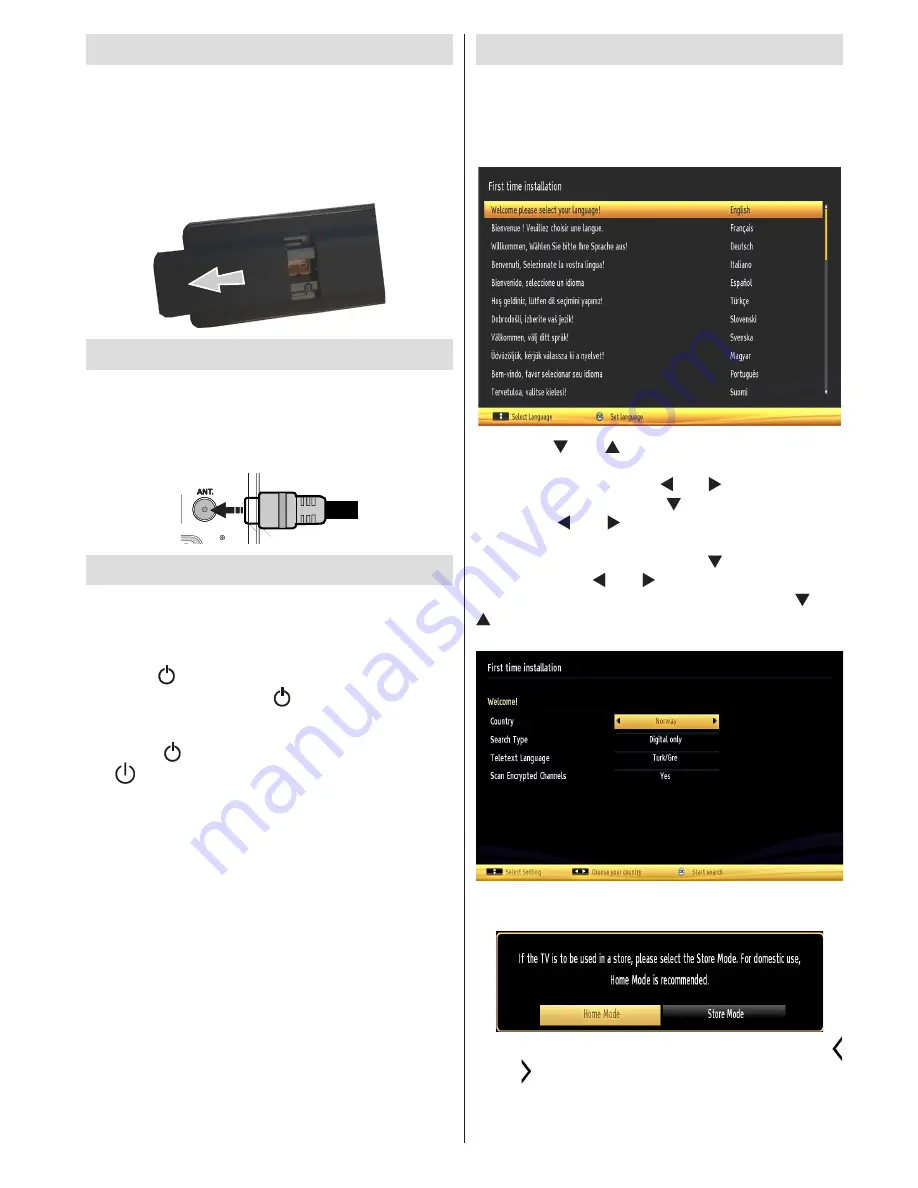
Inserting the Batteries into the Remote Control

1.

 Lift the cover on the back of the remote upward 

gently.

2.

 Install two AAA batteries. Make sure to match 

the + and - ends of the batteries in the battery 

compartment (observe the correct polarity).

3.

 Replace the cover.

Connect Power & Antenna

IMPORTANT:

 The TV set is designed to operate on 

220-240V AC, 50 Hz socket. After unpacking, allow the 

TV set to reach the ambient room temperature before 

you connect the set to the mains. Plug the aerial cable 

into the ANT socket on your TV.

H

D

M

I1 

H

D

M

I 2

SPDIF

Coax.OUT

H

D

M

I1 

H

D

M

I 2

SPDIF

Coax.OUT

Switching On/Off

To Switch the TV On

Connect the power cord to the 220-240V AC, 50 Hz. 
To switch on the TV from standby mode either:
Press the “ ” button, 

P+

 / 

P-

 or a numeric button on the 

remote control or press the “ ” touch button on the TV.

To Switch the TV Off

Press the “ ” button on the remote control or press 
the “ ” touch button on the TV. The TV will now switch 

to standby mode.

To power down the TV completely, unplug the power 

cord from the mains socket.

Note: When the TV is switched to standby mode, the standby 

LED can blink to indicate that features such as Standby 

Search, Over Air Download or Timer is active. The LED can 

also blink when you switch on the TV from standby mode.

First Time Installation

When  turned  on  for  the  first  time,  the  “language 

selection” menu appears. The message “

Welcome 

please select your language!

” is displayed and all 

language options are listed alphabetically. 

Press the “ ” or “ ” button to highlight the required 

language, press OK button to select. “First Time 

Installation” appears. Use “ ” or “ ” button to set the 

required country, and press “ ” button to select Search 

Type. Use “ ” or “ ” to set the desired search type. 

Available search types are digital and analog, digital only 

and analog only. When set, press “ ” to select Teletext 

Language. Use “ ” or “ ” button to set the “Teletext 

Language” and select “Scan Encrypted” using “ ” or “

” button. You can set 

Scan Encrypted

 as 

Yes

 if you 

want to scan coded stations. 

Press 

OK

 button on the remote control to continue and the 

following message will be displayed on the screen.

You can activate Store mode option by using “   
” or “   ” button. If Store Mode is selected, Store 

mode option will be available in other settings menu 

and your TV’s features will be illustrated on the 

top of the screen. A confirmation screen will be 

Summary of Contents for 32F7020-T

Page 1: ......

Page 2: ...0 Electronic Programme Guide EPG 13 Recording a Programme 13 Timeshift Recording 14 Instant Recording 14 Watching Recorded Programmes 14 Recording Configuration 14 Product Safety 14 Health Warning 3D...

Page 3: ...securely attached to the wall in accordance with the installation instructions Screen Occasionally a few non active pixels may appear on the screen as a fixed blue green or red point Please note that...

Page 4: ...ation humidity 5 C up to 45 C 85 humidity max Note Don t block ventilation holes Intended Use This device is used to receive and display TV programmmes The different connection options expand the rece...

Page 5: ...ions are available via the menu refer to the menu system section of this manual Press the TV AV button in the control panel on the TV to switch between AV modes Operation with the Remote Control Press...

Page 6: ...ia Browser 22 Electronic programme guide 23 Exit 24 Navigation buttons 25 Quick menu 26 Info Reveal in TXT mode 27 Programme up down 28 Mute 29 Previous programme Now in EPG mode 30 Numeric buttons 31...

Page 7: ...e scart socket When using the wall mounting kit optional we recommend that you plug all your cables into the back of the TV before mounting on the wall Insert or remove the CI module only when the TV...

Page 8: ...ed to standby mode the standby LED can blink to indicate that features such as Standby Search Over Air Download or Timer is active The LED can also blink when you switch on the TV from standby mode Fi...

Page 9: ...s It is possible that certain types of USB devices e g MP3 Players or USB hard disk drives memory sticks may not be compatible with this TV The TV supports FAT32 and NTFS disk formatting but recording...

Page 10: ...en up or down by using or buttons while in 14 9 Zoom Cinema or Subtitle Using the Channel List The TV sorts all stored stations in the Channel List You can edit this channel list set favourites or set...

Page 11: ...canbesettooneoftheseoptions Low Medium HighorOff Advanced Settings Dynamic Contrast You can change the contrast rate by using the dynamic contrast function Dynamic contrast can be set to one of these...

Page 12: ...nel supports that mode AVL Automatic Volume Limiting AVL function sets the sound to obtain a fixed output level between programmes For instance volume level of advertisements tend to be louder than pr...

Page 13: ...cription refers to an additional narration track for blind and visually impaired viewers of visual media including television and movies You can use this feature only if the broadcaster supports the a...

Page 14: ...TANT When using a new USB hard disk drive it is recommended that you first format the disk using your TV s Format Disk option To record a programme you should first connect a USB disk to your TV while...

Page 15: ...cordings Library and press the OK button The Recordings Library will then be displayed with available recordings All the recordings are kept in a list in the recordings library RED button Delete Erase...

Page 16: ...by the 3D glasses 60 Hz when watching the 3D screen when a magnetic fluorescent lamp 50 Hz is on Since the surface of the product is easily scratched make sure you clean the product with a soft cloth...

Page 17: ...ed Note You will need to unselect this mode when going back to 2D channels 3D Settings Press MENU button and select the Picture icon by using or buttons and press OK Use or to select 3D settings and p...

Page 18: ...the volume so as to avoid excessive levels since this may cause hearing damage Vertical Viewing Angle It is recommended to place the TV at the correct seated eye height of the viewer If the TV must b...

Page 19: ...o the Internet if new software is found it downloads the upgrades automatically when the TV next powers on from standby 3 00am search and upgrade mode While the TV is connected to an aerial signal If...

Page 20: ...smission Standards VHF BAND I III UHF BAND U HYPERBANDDVB T MPEG2 DVB T MPEG4 HD DVB T2Information for Users on Disposal of Old Equipment and Batteries European Union only These symbols indicate that...

Page 21: ...85Hz 36 1360x768 60Hz 37 1400x1050 60Hz 38 1400x1050 75Hz 39 1400x1050 85Hz 40 1440x900 60Hz 41 1440x900 75Hz 42 1600x1200 60Hz 43 1680x1050 60Hz 44 1920x1080 60Hz 45 1920x1200 60Hz Appendix C AV and...

Page 22: ...HEAAC AC3 EAC3 LPCM ADPCM H 264 1080Px2 25fps 1080P 50fpsOther 1080P 30fps50Mbit sec RMVB RM rv30 rv40 LBR cook AAC HEAAC 1080P 30fps 50Mbit sec avi MPEG1 2 4 Xvid H 264 VC1 WMV3 Sorenson H 263 Motion...

Page 23: ...n the Sky remote control blinks twice 4 Key in 065 The light on the Sky remote control should blink twice 5 Press the STANDBY button on your Sky remote control If your TV switches off press SELECT The...

Page 24: ...rte et jaune Le fil marqu en bleu ou en noir doit tre branch la borne marqu e de la lettre N ou de la couleur noire Le fil marqu en marron ou en rouge doit tre branch la borne marqu e de la lettre L o...

Page 25: ...ual provided The product must be used solely for domestic purposes The guarantee will be invalid if the product is re sold or has been damaged by inexpert repair notice On site service is limited to V...

Page 26: ...r and tear This includes but is not limited to parts D This Warranty does not cover any Finlux branded consumer product installed in a moveable dwelling Note that the performance of the product may be...

Page 27: ......

Reviews: