background image

- 11 -

• 

Multipartiton support is available. Maximum two 

different partitions are supported. If the disk have 

more than two partitions, crash may occur.  First 

partition of the usb disk is used for PVR ready 

features. It also must be formatted as primary 

partition to be used for PVR ready features.

• 

Some stream packets may not be recorded  because 

of signal problems, so sometimes video may freezes 

during playback. 

• 

Record, Play, Pause, Display (for PlayListDialog) 

keys could not be used when teletext is ON. If a 

recording starts from timer when teletext is ON, 

teletext is automatically turned off. Also teletext 

usage is disabled when there is ongoing recording 

or playback. 

• Radio record is not supported.
• The Tv can record programmes up to ten hours.

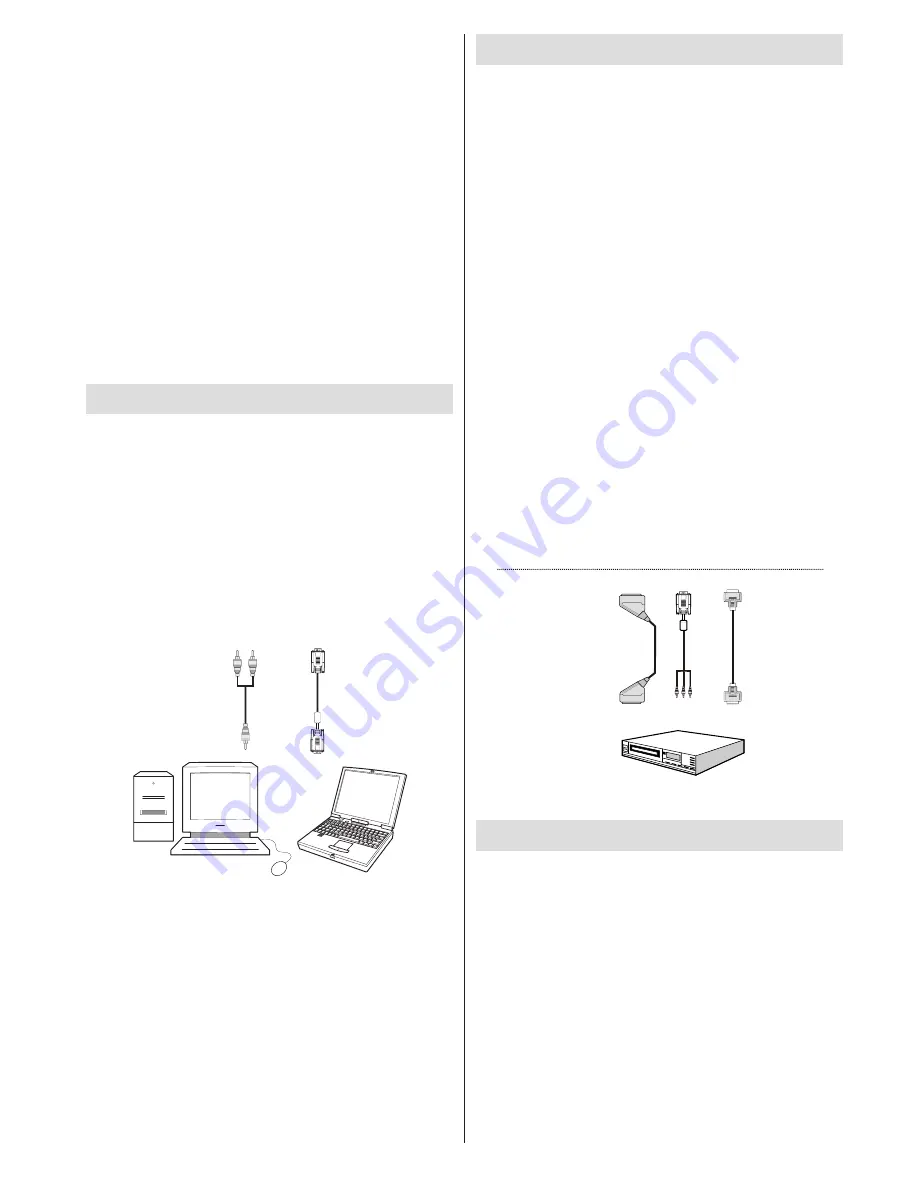
Connecting the TV to a PC

For displaying your computer’s screen image on your 

TV, you can connect your computer to the TV set. 

Power off both computer and display before making 

any connections. Use a 15-pin D-sub display cable 

to connect a PC to the TV. Use a PC audio cable 

between the audio output of your PC and the audio 

input of the TV to enable the playback of sound 

through your TV. When the connection is made, switch 

to PC source. See the 

Input selection 

section. Set 

the resolution that suits your viewing requirements. 

Resolution information can be found in the appendix.

PC audio cable

(not supplied)

PC VGA cable

(not supplied)

Audio inputs of the TV

PC input of the TV

Audio output of the PC

Monitor output of the PC

Note: If you connect a PC to the TV using HDMI 

connection, radio interference may occur. Therefore 

this type of connection is not recommended. You 

should use VGA connection instead.

Connecting to a DVD Player

If you want to connect a DVD player to your LCD 

TV, you can use connectors of the TV set. DVD 

players may have different connectors. Please refer 

to your DVD player’s instruction book for additional 

information. Power off both the TV and the device 

before making any connections.

Note

: Cables shown in the illustration are not 

supplied.

• 

If your DVD player has an HDMI socket, you can 

connect via HDMI. When you connect to DVD player 

as illustrated below, switch to HDMI source. See, 

“Input Selection” section.

• 

Most DVD players are connected through 

COMPONENT SOCKETS. Use a component video 

cable to connect  video input. For enabling audio, 

use a component audio cable as illustrated below. 

When  the  connection  is  made,  switch  to  YPbPr 

source. See, “Input selection” section.

• You may also connect through the SCART. Use a 

SCART cable as shown below.

Note

: These three methods of connection perform the 

same function but in different levels of quality. It is not 

necessary to connect by all three methods.

Video  Connection

HDMI

inputs

Scart  socket

DVD  player

YPbPr  to  PC 

cable  (optional) 

Using Side AV Connectors

You can connect a range of optional equipment to 

your LCD TV..

• 

For connecting a camcorder, connect to the VIDEO 

IN socket and the AUDIO SOCKETS. Do not connect 

the camcoder to VIDEO IN socket at the same time 

since it can cause noise in the picture. For selecting 

the related source, see the section “Input selection” 

in the following parts.

• 

To listen the TV sound from headphones, connect 

to the HEADPHONE jack of theTV.

Summary of Contents for 32F702

Page 1: ...32in Passive 3D TV 32F702 Owner s manual happy Finnish ...

Page 2: ...g Media Browser 18 Viewing Videos via USB 18 Viewing Photos via USB 19 Slideshow Options 19 Playing Music via USB 19 Recordings Library 20 Media Browser Settings 20 Using the 3D Mode 20 3D Mode 21 3D Settings 21 Mode 21 2D Only 21 Supported 3D Content Resolutions 21 Timeshift Recording 21 Instant Recording 22 Changing Image Size Picture Formats 23 Operating Picture Settings Menu Items 24 Picture S...

Page 3: ...adcast or via HDMI PC YPBPR source Remote controlLCD colour LCD TV Fully integrated Terrestrial digital TV DVB T MPEG2 HDMI connectors for digital video and audio USB input Programme recording Programme timeshifting 1000 programmes analogue digital On Screen Display OSD menu system Integrated tuner DVB T MPEG2 compatible Scart socket for external devices Stereo sound system Nicam Teletext fastext ...

Page 4: ...pped on A damaged power cord can cause fire or give you an electric shock When it is damaged and needs to be replaced it should be done by qualified personnel Moisture and Water Do not use this device in a humid and damp place avoid using the TV in the bathroom or near the Kitchen sink etc Do not expose this device to rain or water as this may be dangerous and do not place objects filled with liqu...

Page 5: ... with a soft cloth As the product may be scratched if there is any foreign Batteries including those which are heavy metal free should not be disposed of with household waste Please dispose of used batteries in an environmentally friendly manner Find out about the legal regulations which apply in your area Do not try to recharge batteries there is a danger of explosion Replace batteries only with ...

Page 6: ...psy when exposed to certain conditions including flashing lights or images in TV or video games Sometimes certain symptoms can occur in unspecified conditions even if you do not have any previous history In such a case if you experience any of the following symptoms immediately stop watching the 3D TV and consult a doctor altered vision visual or facial instability such as eye or muscle twitching ...

Page 7: ...e TV should be disconnected from the mains power supply TRADEMARK ACKNOWLEDGMENT Dolby and the double D symbol are trademarks of Dolby Laboratories Licence Notification Optional Manufactured under license from Dolby Laboratories Environmental Information This television is designed to consume less energy to save the environment You not only help to save the environment but you can also save money ...

Page 8: ... mode 13 Timeshift recording Pause in media browser mode 14 Programme recording 15 Play in media browser mode 16 Stop in media browser mode 17 Fast forward in media browser mode 18 Subtitle on off Subtitle in media browser mode 19 Image size 20 Teletext Mix 21 Media Browser 22 Electronic programme guide 23 Exit 24 Navigation buttons 25 Quick Menü 26 Info Reveal in TXT mode 27 Programme up down 28 ...

Page 9: ...ition Satellite Receiver or Blu ray Player Please see Appendix B for further details 3 RF Input connects to an aerial antenna system Note If you use a decoder or a media recorder you should connect the aerial cable through the device to the television with an appropriate antenna cable as shown in the illustration in the following pages 4 SCART input or output for external devices Connect the SCART...

Page 10: ...es Connect the video cable between the VIDEO IN socket on the TV and the VIDEO OUT jack on your device 4 Audio Inputs are used for connecting audio signals of external devices Connect the audio cable between the AUDIO INPUTS on the TV and the AUDIO OUTPUT jacks on your device Note If you connect a device to the TV via the VIDEO INPUT you should also connect your device with an audio cable to the A...

Page 11: ...tion Especially do not repeatedly quickly plug and unplug the drive This may cause physical damage to the USB player and especially the USB device itself Do not pull out USB module while playing or recording a file Programme Recording To record a programme you should first connect a USB disk to your TV while the TV is switched off You should then switch on the TV to enable recording feature IMPORT...

Page 12: ... PC to the TV using HDMI connection radio interference may occur Therefore this type of connection is not recommended You should use VGA connection instead Connecting to a DVD Player If you want to connect a DVD player to your LCD TV you can use connectors of the TV set DVD players may have different connectors Please refer to your DVD player s instruction book for additional information Power off...

Page 13: ... described in accordance with the menu system of your TV Remote Control Handset Inserting Batteries Remove the battery cover located on the back of the handset by gently pulling backwards from the indicated part Insert two AAA R3 or equivalent type batteries inside Observe the correct polarity when inserting batteries and replace the battery cover Note Remove the batteries from the remote control ...

Page 14: ...ect your language and press OK button to set the selected language and continue After selecting the language Welcome screen will be displayed requiring you to set Country Search Type Teletext Language and Scan Encrypted options By pressing or button select the country you want to set and press button to highlight Search Type option Use or to set the desired search type Available search types are d...

Page 15: ...on Prev Day Displays the programmes of previous day Green button Next day Displays the programmes of the next day Yellow button Zoom Expands programme information Blue button Filter Views filtering options Numeric buttons Jump Jumps to the preferred channel directly via numeric buttons INFO Details Displays the programmes in detail OK Options Views records or sets timer for future programmes Searc...

Page 16: ...tching to a different broadcast or source is not available during the recording Page left Page right Programme Options In EPG menu press the OK button to enter the Event Options menu Select Channel In EPG menu using this option you can switch to the selected channel Record Delete Record Timer IMPORTANT To record a programme you should first connect a USB disk to your TV while the TV is switched of...

Page 17: ...alogue stations Digital Analogue Searches and stores both analogue and aerial DVB stations Whenever you select an automatic search type and press OK button a confirmation screen will appear on the screen To start installation process select Yes to cancel select No by using or and OK button After the auto channel scan type is set and selected and confirmed the installation process will start and th...

Page 18: ...s channel list set favourites or set active stations to be listed by using the Channel List options Press MENU button to view main menu Select the Channel List item by using or button Press OK to view menu contents Select Edit Channel List to manage all stored channels Use or and OK buttons to select Edit Channel List Operating the Channel List Press or button to select the channel that will be pr...

Page 19: ...hannel The Lock symbol will be displayed next to the selected channel Managing Stations Favourites You can create a list of favourite programmes Press MENU button to view the main menu Select Channel List item by using or button Press OK to view menu contents Select Favourites to manage favourite list Use and OK buttons to select Favourites You can set various channels as favourites so that only t...

Page 20: ...r button to select Videos Photos Music Recordings library or Settings Viewing Videos via USB When you select Videos from the main options available video files will be filtered and listed on this screen You can use or button to select a video file and press OK button to play a video If you select a subtitle file and press OK button you can select or deselect that subtitle file The following menu w...

Page 21: ...down buttons RETURN Exit Back to file list INFO Displays help screen 3D Press to view 3D Settings Playing Music via USB When you select Music from the main options available audio files will be filtered and listed on this screen Navigate menu Play button Starts the playback Stop button Stops playback Pause button Pauses the selected playback RED button Sorts files by Title Artist or Album Loop Shu...

Page 22: ...y from offset Specifies a playing point Note Viewing main menu and menu items will not ve available during the playback Resume Recommences the recordings INFO Details Displays the short extended programmes in detail Media Browser Settings You can set your Media Browser preferences by using the Settings dialog Press or button to highlight an item and use or button to set View Style Sets default bro...

Page 23: ...D Note This item is available when TV is in 3D mode Note If you select 3D modes wear the supplied 3D glasses when this message is displayed on the screen Supported 3D Content Resolutions See Appendix F for supported 3D Content resolutions Timeshift Recording IMPORTANT To record a programme you should first connect a USB disk to your TV while the TV is switched off You should then switch on the TV ...

Page 24: ...grammes In the main menu use or buttons to select Media Browser Highlight Recordings Library item by using or button and press OK button to enter Recordings Library will then be displayed IMPORTANT To view recordings library you should first connect a USB disk to your TV while the TV is switched off You should then switch on the TV to enable recording feature Otherwise recording feature will not b...

Page 25: ... aspect ratio to fill the wide TV screen For 16 9 aspect ratio pictures that have been squeezed into a normal picture 4 3 aspect ratio use the 16 9 mode to restore the picture to its original shape Subtitle This zooms up the wide picture 16 9 aspect ratio with subtitles to the full screen Note You can shift to screen up or down by pressing buttons while picture zoom is selected as 14 9 Zoom Cinema...

Page 26: ...ons Low Medium High or Off Advanced Settings Colour Temp Sets the desired colour tone Setting Cool option gives white colours a slight blue stress For normal colours select Normal option Setting Warm option gives white colours a slight red stress Picture Zoom Sets the picture size to Auto 16 9 Subtitle 14 9 14 9 Zoom 4 3 or Cinema HDMI True Black While watching from HDMI source this feature will b...

Page 27: ...n item Press MENU button to exit Sound Settings Menu Items Volume Adjusts volume level Equalizer Press OK button to view equalizer sub menu In the equalizer menu the preset can be changed to Music Movie Speech Flat Classic and User Press the MENU button to return to the previous menu Note Equalizer menu settings can be changed manually only when the Equalizer Mode is in User Balance This setting i...

Page 28: ...ible to insert fully if reversed The CAM or the TV terminal may be damaged if the CAM is forcefully inserted Connect the TV to the mains supply switch on and then wait for few moments until the card is activated When no module is inserted No Common Interface module detected message appears on the screen Refer to the module instruction manual for details of the settings Viewing Conditional Access M...

Page 29: ...ton to view Settings menu Use or button to highlight Parental and press OK to continue To display parental lock menu options the PIN number should be entered The factory default PIN number is 0000 After coding the correct PIN number parental settings menu will be displayed Parental Settings Menu Operation Select an item by using or button Use or button to set an item Press OK button to view more o...

Page 30: ...ton Select YES by using or buttons to delete the timer Select NO to cancel Recording Configuration Select Recording Configuration item in the Settings menu to configure recording settings The following menu is displayed for recording configuration The following options are available for adjustments Start Early You set recording timer s starting time to start earlier by using this setting Available...

Page 31: ...Time Zone between GMT 12 or GMT 12 Date Time on the top of the menu list will then change according to the selected Time Zone Changes are automatically stored Press MENU to exit Configuring Source Settings You can enables or disable selected source options The TV will not switch to the disabled source options when SOURCE button is pressed Select Sources in the Settings menu and press OK button Pre...

Page 32: ... Standby Search to Off this function will be unavailable To use Standby search please make sure that you select Standby Search as On Other Features Displaying TV Information Programme Number Programme Name Sound Indicator time teletext channel type and resolution information is displayed on the screen when a new programme is entered or INFO button is pressed Mute Function Press button to disable s...

Page 33: ...aerial located too close to a non earthed audio equipment or neon lights etc Mountains or high buildings can cause double pictures or ghost images Sometimes you can improve the picture quality by changing the direction of the aerial Is the picture or teletext unrecognisable Check if you have entered the correct frequency Please retune the channels The picture quality may degrade when two periphera...

Page 34: ...6 1400x1050 75Hz 85Hz 17 1400x900 65Hz 75Hz 18 1600x1200 60 Hz 19 1680x1050 60 Hz 20 1920x1080 60 HzA 21 1920x1080 60 HzB 22 1920x1200 60HzA 23 1920x1200 60Hz Appendix B AV and HDMI Signal Compatibility Input Signal Types Source Supported Signals Available EXT SCART PAL 50 60 O NTSC 60 O RGB 50 O RGB 60 O Side AV PAL 50 60 O NTSC 60 O YPbPr 480I 60Hz O 480P 60Hz O 576I 50Hz O 576P 50Hz O 720P 50Hz...

Page 35: ...tions menu In Upgrade Options menu select Scan for upgrade and press OK button If a new upgrade is found it starts to download the upgrade A progress bar indicates the remaining download progress When the download completes successfully a message is displayed for reboot to activate new software Press OK to continue with the reboot operation 2 3 AM search and upgrade mode If Automatic scanning in U...

Page 36: ...Sampling rate Photo jpg jpeg Baseline JPEG max WxH 15360x8640 4147200bytes Progressive JPEG max WxH 1024x768 6291456bytes bmp max WxH 9600x6400 3840000bytes Subtitle sub srt Products Battery Information for Users on Disposal of old Equipment and Batteries European Union only These symbols indicate that equipment with these symbols should not be disposed of as general household waste If you want to...

Page 37: ...e note that if you apply 720p FC TB input the picture will be scaled smaller than the original size in the middle of the screen SBS Side By Side TB Top Bottom MBP Media Browser Picture MBV Media Browser Video FC Frame Compatible FP Frame Pack in MBP Supported only when the image s height is multiples of 2 and the image s width is multiples of 16 and if the image width is equal to the panel width o...

Page 38: ...ance Size inch 22 26 32 37 40 Viewing distance m 1 30 1 50 1 90 2 20 2 40 Size inch 42 46 47 55 Viewing distance m 2 50 2 75 2 80 3 25 Horizontal Viewing Angle 45 45 Vertical Viewing Angle It is always recommended to place a TV at the correct seated eye height of the viewer If the TV must be placed higher or lower it should be tilted accordingly in its stand or wall mount Eye Line Eye Line Eye Lin...

Page 39: ... max PANEL 16 9 display 32 Screen Size DIMENSIONS mm DxLxH With foot 187 x 783 x 556 Weight Kg 10 50 DxLxH Without foot 94 5 x 783 x 513 5 Weight Kg 9 50 Digital Reception DVB T MHEG 5 ENGINE compliant with ISO IEC 13522 5 UK engine Profile 1 for UK Object carousel support compliant with ISO IEC 135818 6 and UK DTT profile Frequency range 474 850 MHz for UK models 170 862 MHz for EU models Transmi...

Page 40: ...een or green and yellow The wire which is coloured blue or black must be connected to the terminal which is marked with the letter N or coloured Black The wire which is coloured brown or red must be connected to the terminal which is marked with the letter L or coloured Red For continued protection against risk of fire replace only with same type and rating of fuse ASTA approved 5A 250VAC fuse CAU...

Page 41: ...conds until the red light on the SKY remote blinks twice 5 Key in 065 on your SKY remote The light on the SKY remote should blink twice 6 Press the STANDBY button on your SKY remote control Your TV should now switch off 7 Press SELECT again The light on your SKY remote control should now blink twice You should now be able to control some basic functions on your TV from your SKY remote control e g ...

Page 42: ... returning back to 2D channels Requires subscription to SKY 3D channels and the appropriate hardware To Enable 3D Playback on PS3 Make sure your PS3 console is connected to your TV Turn your TV and PS3 console off Turn on the TV and wait for it to power up Hold down the power button on the console until you hear a beep The PS3 will then identify the 3DTV and ask for the screen resolution informati...

Page 43: ...www finluxdirect com Customer helpline 0845 459 5282 50234653 ...

Reviews: