


English
- 7 -
Turning On/Off the TV
Connect power
IMPORTANT
:
The TV set is designed to operate on
a 12 V DC supply.
For this, an adaptor is used which
gives
12 V
voltage.
After unpacking, allow the TV set to reach the ambient
room temperature before you connect the set to the
mains.
Connect the supplied adaptor to a system that
supplies
100-240V AC, 50/60Hz
. The TV will switch
on automatically.
In order to supply the power via the cigarette lighter
socket of your vehicle, plug one end of the cigarette
lighter adaptor cable (car plug - can be purchased
separately if not supplied with the TV) into the vehicle
socket and plug the other end of the adaptor cable
into the DC 12V terminal on the back side of the TV.
Be sure to ground the connection
properly
Connect the ground terminal of the AC
adaptor with the ground terminal provided at
the power outlet using the enclosed power
cord. If the provided plug does not fit your
outlet, consult an electrician for replacement
of the obsolete outlet.
Surely connect the ground wire.
To switch on the TV from standby
If the TV is in
standby mode the standby LED lights
up. To switch on the TV from standby mode either:
Press the
Standby
button on the remote control.
Press the control button on the TV.
The TV will then switch on.
To switch the TV into standby
The TV cannot be switched into standby mode via
control button. Press and hold the
Standby
button on
the remote control.
Power o
dialogue will appear on
the screen. Highlight
OK
and press the
OK
button. The
TV will switch into standby mode.
To switch o the TV
To power down the TV completely, unplug the power
adaptor from the mains socket.
Quick Standby Mode
In order to switch the TV into quick standby mode
either;
Press the
Standby
button on the remote.
Press again to go back to operating mode.
Press the control button on the TV.
Press the control button again to go back to operating
mode.
TV Control & Operation
The control button allows you to control the Quick
Standby-On functions of the TV.
Note:
7KHSRVLWLRQRIWKHFRQWUROEXWWRQPD\GL௺HUGHSHQGLQJ
on the model.
To turn the TV o (Quick Standby):
Press the control
button to turn the TV into quick standby mode.
To turn the TV o (Standby):
The TV cannot be
switched into standby mode via control button.
To turn on the TV:
Press the control button, the TV
will turn on.
Note:
Live TV settings menu OSD in Live TV mode cannot be
displayed via the control button.
Operation with the Remote Control
Press the
Menu
button on your remote control to
display Live TV settings menu when in Live TV mode.
Press
Home
button to display or return to the Home
Screen of the Android TV. Use the directional buttons
to move the focus, proceed, adjust some settings and
press
OK
to make selections in order to make changes,
set your preferences, enter a sub-menu, launch an
application etc. Press
Return/Back
to return to the
previous menu screen.
Input Selection
Once you have connected external systems to your
TV, you can switch to di erent input sources. Press the
Source
button on your remote control consecutively
or use the directional buttons and then press the
OK
button to switch to di erent sources when in Live TV
mode. Or enter the
Inputs
menu on the Home Screen,
select the desired source from the list and press
OK
.
Changing Channels and Volume
You can adjust the volume by using the
Volume
+/-
buttons and change the channel in Live TV mode
by using the
Programme
+/-
buttons on the remote.
English
- 8 -
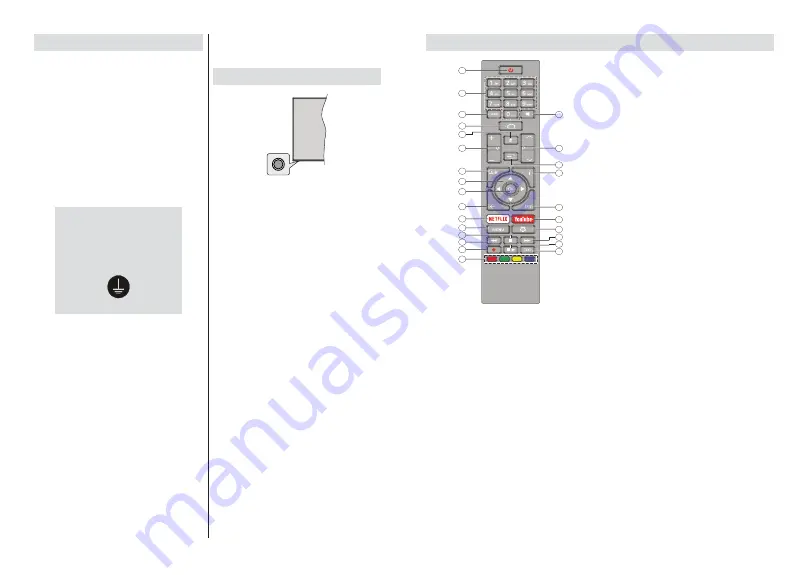
Remote Control
Inserting the Batteries into the Remote
Remove the screw that secures the battery compart-
ment cover on the back side of the remote control first.
Lift the cover gently. Insert two 1.5V - size
AAA
bat-
teries. Make sure the (+) and (-) signs match (observe
correct polarity). Do not mix old and new batteries.
Replace only with same or equivalent type. Place the
cover back on. Then screw the cover back on again.
Standby Button
Press and hold the
Standby
button on the remote
control.
Power o
dialogue will appear on the screen.
Highlight
OK
and press the
OK
button. The TV will
switch into standby mode. Press brie y and release
to switch the TV into quick standby mode or to switch
on the TV when in quick standby or standby mode.
1. Standby:
Quick Standby / Standby / On
2. Numeric buttons:
Switches the channel in Live TV
mode, enters a number or a letter in the text box on
the screen
3. Language:
Switches among sound modes (analogue
TV), displays and changes audio language (digital TV,
where available)
4. Home:
Opens the Home Screen
5. Mute:
Completely turns o the volume of the TV
6. /-
7. Guide:
Displays the electronic programme guide in
Live TV mode
8. Directional buttons:
Navigates menus, setting options,
moves the focus or cursor etc., sets record time and
displays the subpages in Live TV-Teletext mode when
pressed Right or Left. Follow the on-screen instructions.
9. OK:
Confirms selections, enters sub-menus, views
channel list (in Live TV mode)
10. Back/Return:
Returns to previous menu screen, goes
one step back, closes open windows, closes teletext (in
Live TV-Teletext mode)
11. Net ix:
Launches the Net ix application
12. Menu:
Displays Live TV Settings menu (in Live TV
mode), displays available setting options such as sound
and picture
13. Stop:
Stops the media being played
14. Rewind:
Moves frames backwards in media such as
movies
15. Record:
Records programmes in Live TV mode
16. Coloured Buttons:
Follow the on-screen instructions for
coloured button functions
17. Text:
Opens and closes teletext (where available in
Live TV mode)
18. Pause:
Pauses the media being played, starts timeshift
recording in Live TV mode
Play:
Starts to play selected media
19. Fast forward:
Moves frames forward in media such
as movies
20. MyButton1:
Opens the picture mode setting menu on
available sources
21. YouTube:
Launches the YouTube application
22. Exit:
Closes and exits from Live TV Settings menus,
closes the Home Screen, exits from any running
application or menu or OSD banner, switches to last
set source
23. Info:
Displays information about on-screen content
24. Source:
Shows all available broadcast and content
sources, closes the Home Screen and switches to last
set source
25. Pro/-:
Increases/Decreases channel number
in Live TV mode
26. Subtitles:
Turns subtitles on and o (where available)
Summary of Contents for 32-FMAF-9060
Page 1: ...farge tv colour television bruksanvisning owner s manual 32 FMAF 9060...
Page 2: ......
Page 38: ......
Page 39: ......
Page 40: ...50598525...


