Finlux 22F6020W Owner'S Manual Download Page 11

- 10 -

To select the “Yes” or “No” option, highlight the item by 
using “ ” or “ ” buttons and press 

OK

 button.

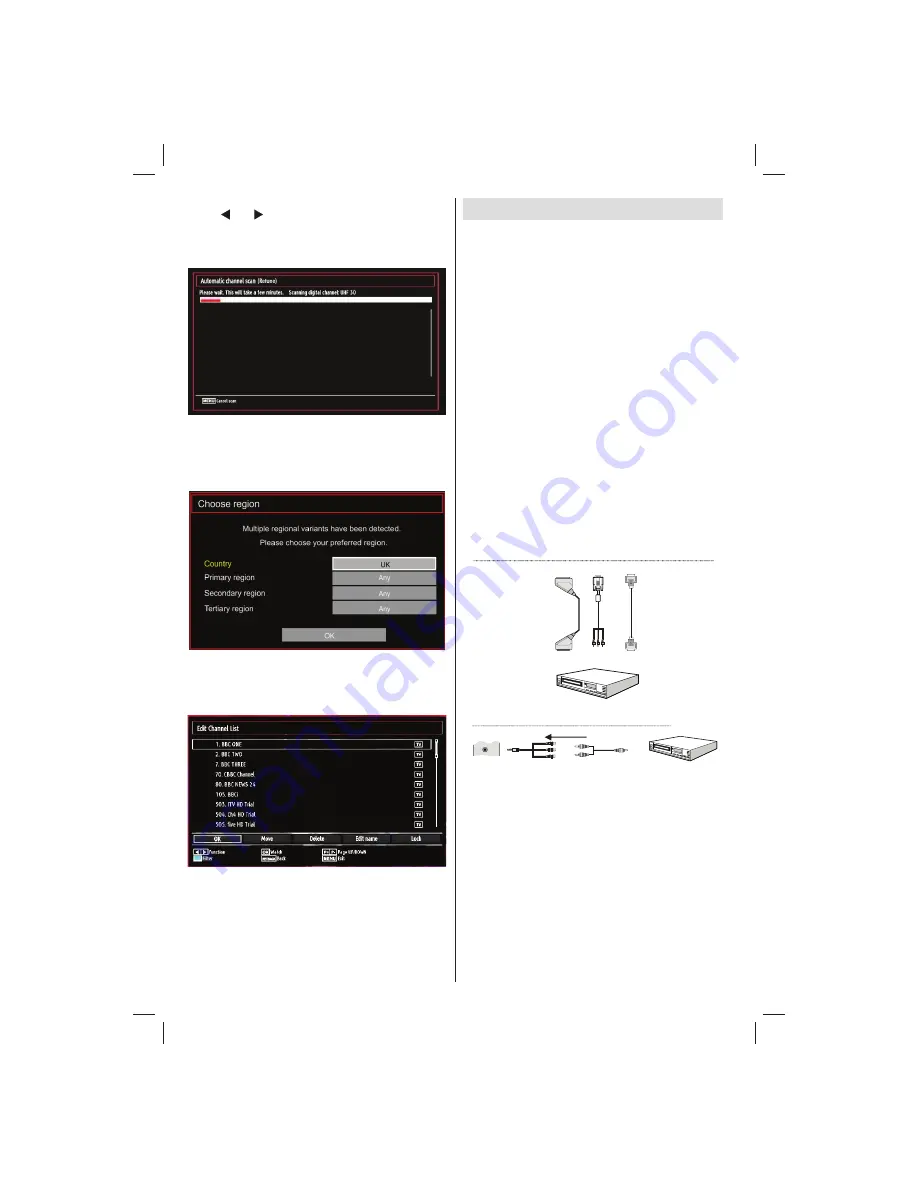
Afterwards the following OSD will be displayed on 
the screen and the TV will search for both digital and 
analogue TV broadcasts.

Note: You can press 

“MENU” 

button to cancel.

End of the search process, “Choose Region” osd will 
be displayed on the screen (if any multiple region 
variants are detected).Please select country and 
region choice then press OK to continue.

After all the available stations are stored, Channel 

• 

List will be displayed on the screen. If you like the 
sort channels, according to the LCN, please select 
“Yes” and than press “OK”.

Press 

• 

OK

 button to quit channel list and watch TV

Connecting to a DVD Player

If you want to connect a DVD player to your TV, you 
can use the connectors of the TV set.  DVD players 
may have different connectors. Please refer to your 
DVD player’s instruction book for additional information. 
Power off both the TV and the device before making 
any connections.

Note: Cables shown in the illustration are not 
supplied.

If your DVD player has an 

• 

HDMI

 socket, you can 

connect via 

HDMI

. When you connect to a DVD player 

as illustrated below, switch to the HDMI source. See 
“Input Selection” section.
DVD players can also be connected through 

• 

COMPONENT SOCKETS. YPbPr can be used only 
when you connect a device that has a YPbPr output 
through the PC input with YPbPr to PC cable (YPbPr 
cable is not supplied).
You may also connect through the SCART sockets.  

• 

Use a SCART cable as shown below.

Note: These three methods of connection perform the 
same function but in different levels of quality.  It is not 
necessary to connect by all three methods.

Video  Connection

HDMI

inputs

Scart  socket

DVD  player

YPbPr  to  PC 

cable  (optional) 


DVD  Player

Side  AV  Input

Audio  Cable

(Not  supplied)

Side  AV

Connection  cable

(supplied)

S

ide

 AV

To  RED  &  WHITE  inputs

Audio  Connection

MB62_[GB]_(01-TV)_woypbpr_IDTV_PVR_NICKEL17_1900UK_22930LED_10079371_50220325.indd   10

MB62_[GB]_(01-TV)_woypbpr_IDTV_PVR_NICKEL17_1900UK_22930LED_10079371_50220325.indd   10

08.05.2012   13:51:04

08.05.2012   13:51:04

Summary of Contents for 22F6020W

Page 1: ...22in LED TV 22F6020W Owner s manual happy Finnish...

Page 2: ...Channel List 17 On Screen Information 17 Media Playback Using Media Browser 17 Viewing Videos via USB 18 Viewing Photos via USB 18 Slideshow Options 18 Playing Music via USB 19 Recordings Library 19 M...

Page 3: ...B input Programme recording Programme timeshifting 1000 programmes analogue digital On Screen Display OSD menu system Integrated tuner DVB T MPEG2 compatible Scart socket for external devices Stereo s...

Page 4: ...eeds to be replaced it should be done by qualified personnel Moisture and Water Do not use this device in a humid and damp place avoid the bathroom the sink in the kitchen etc Do not expose this devic...

Page 5: ...n Optional Manufactured under license from Dolby Laboratories Batteries including those which are heavy metal free should not be disposed of with household waste Please dispose of used batteries in an...

Page 6: ...nded to activate Power Save Mode setting to reduce your annual power consumption And also it is recommended to disconnect the TV from the mains plug to save energy more when you do not use Please help...

Page 7: ...advance in Media Browser mode 19 Info Reveal in TXT mode 20 No function 21 Picture mode selecion Changes picture mode 22 in Media Browser video mode AV Source 23 Red button 24 Green button List Schedu...

Page 8: ...the Connections Back Connectors HDMI 1 DM H I 2 SPDIF Coax OUT HDMI 2 HDMI Input 1 HDMI 1 HDMI Input 2 HDMI Inputs are for connecting a device that has an HDMI socket Your LED TV is capable of display...

Page 9: ...ert your video cable s not supplied connector into the YELLOW input located on the plural side of the supplied AV connection cable The colours of the connected jacks should match To enable audio conne...

Page 10: ...ime Installation IMPORTANT Ensure that the aerial is connected and a Common Interface module is not inserted before switching on the TV for the first time installation When the TV is operated for the...

Page 11: ...V and the device before making any connections Note Cables shown in the illustration are not supplied If your DVD player has an HDMI socket you can connect via HDMI When you connect to a DVD player as...

Page 12: ...ordings of HD programmes can occupy bigger size on the USB disk depending on the broadcast s resolution For this reason it is recommended to use USB hard disk drives for recording HD programmes Using...

Page 13: ...ble not supplied Side Audio Video Connection Cable supplied or SIDE AV Note If you connect a PC to the TV using HDMI connection radio interference may occur Therefore this type of connection is not re...

Page 14: ...The TV will switch to the selected programme Viewing Electronic Programme Guide EPG You can view the electronic programme guide EPG to see information about available programmes To view the EPG menu p...

Page 15: ...e selected progamme You can press again to stop the recording Note Switching to a different broadcast or source is not available during the recording Page left Page right Programme Options In EPG menu...

Page 16: ...nu by using and OK buttons Manual Scan options screen will be displayed Select the desired Search Type using or button Manual search options will change accordingly Use button to highlight an item and...

Page 17: ...all channels YELLOW button to tag untag channel Select the channel that you want to delete and select Delete option Press the OK button to continue A warning screen will appear Select YES to delete se...

Page 18: ...nner The information banner gives information on the channel selected and the programmes on it The name of the channel is displayed along with its channel list number Hint Not all channels broadcast t...

Page 19: ...red time and press GREEN button again to proceed Yellow Opens subtitle time correction menu Ret Back Back to previous menu Press OK to confim Press button for clear Press button to switch back to prev...

Page 20: ...le playback will continue randomly and the random playback will continue 0 9 Numeric buttons The TV will jump to the file starting with the letter you input via the numeric buttons on your remote cont...

Page 21: ...broadcast Press STOP button to quit timeshifting mode Similtaneous timeshifting recording s duration depends on your connected USB disk s file size and defined Max Timeshift in the Recordings Configur...

Page 22: ...ly will change slow forwarding speed Changing Image Size Picture Formats You can change the aspect ratio image size of the TV for viewing the picture in different zoom modes Press the SCREEN button re...

Page 23: ...quirements you can set various screen modes The Picture mode can be set to one of these options Cinema Game Dynamic and Natural Contrast Sets the lightness and darkness values of the screen Brightness...

Page 24: ...icture items do the following Press or button to select Picture icon Picture menu appears on the screen Contrast Brightness Colour Colour Temp and Picture Zoom settings in this menu are identical to s...

Page 25: ...ct an item Press MENU button to exit Settings Menu Items Conditional Access Controls conditional access modules when available Language Configures language settings Parental Configures parental settin...

Page 26: ...ew Settings menu Use or button to highlight Language and press OK to continue Use or button to set an item Settings are stored automatically Menu displays the system language Preferred These settings...

Page 27: ...o view Settings menu Use or button to highlight Timers and press OK to continue Setting Sleep Timer This setting is used for setting the TV to turn off after a certain time Highlight Sleep Timer by us...

Page 28: ...t Disk option is highlighted A menu will appear on the screen requiring you to enter a pin number If you have not changed the pin number the factory default is 0000 After you enter the pin a pop up me...

Page 29: ...is set to standby mode You can enable or disable automatic upgrade by setting Automatic Scanning option You can manually search for new software by selecting Scan for upgrade Application version Disp...

Page 30: ...our coded and can be selected by pressing the coloured buttons Press a coloured button that corresponds to with your needs The coloured writings will appear showing you which coloured buttons to use w...

Page 31: ...20x1080 60 HzB 22 1920x1200 60HzA 23 1920x1200 60Hz Appendix B AV and HDMI Signal Compatibility Input Signal Types Source Supported Signals Available EXT SCART PAL 50 60 O NTSC 60 O RGB 50 O RGB 60 O...

Page 32: ...and press OK button If a new upgrade is found it starts to download the upgrade A progress bar indicates the remaining download progress When the download completes successfully a message is displaye...

Page 33: ...d Batteries European Union only These symbols indicate that equipment with these symbols should not be disposed of as general household waste If you want to dispose of the product or battery please co...

Page 34: ...H Without foot 34 x 529 x 340 Weight Kg 4 10 Digital Reception DVB T MHEG 5 ENGINE compliant with ISO IEC 13522 5 UK engine Profile 1 for UK Object carousel support compliant with ISO IEC 135818 6 and...

Page 35: ...marked with the letter N or coloured Black The wire which is coloured brown or red must be connected to the terminal which is marked with the letter L or coloured Red For continued protection against...

Page 36: ...50220325...

Reviews: