


- 19 -
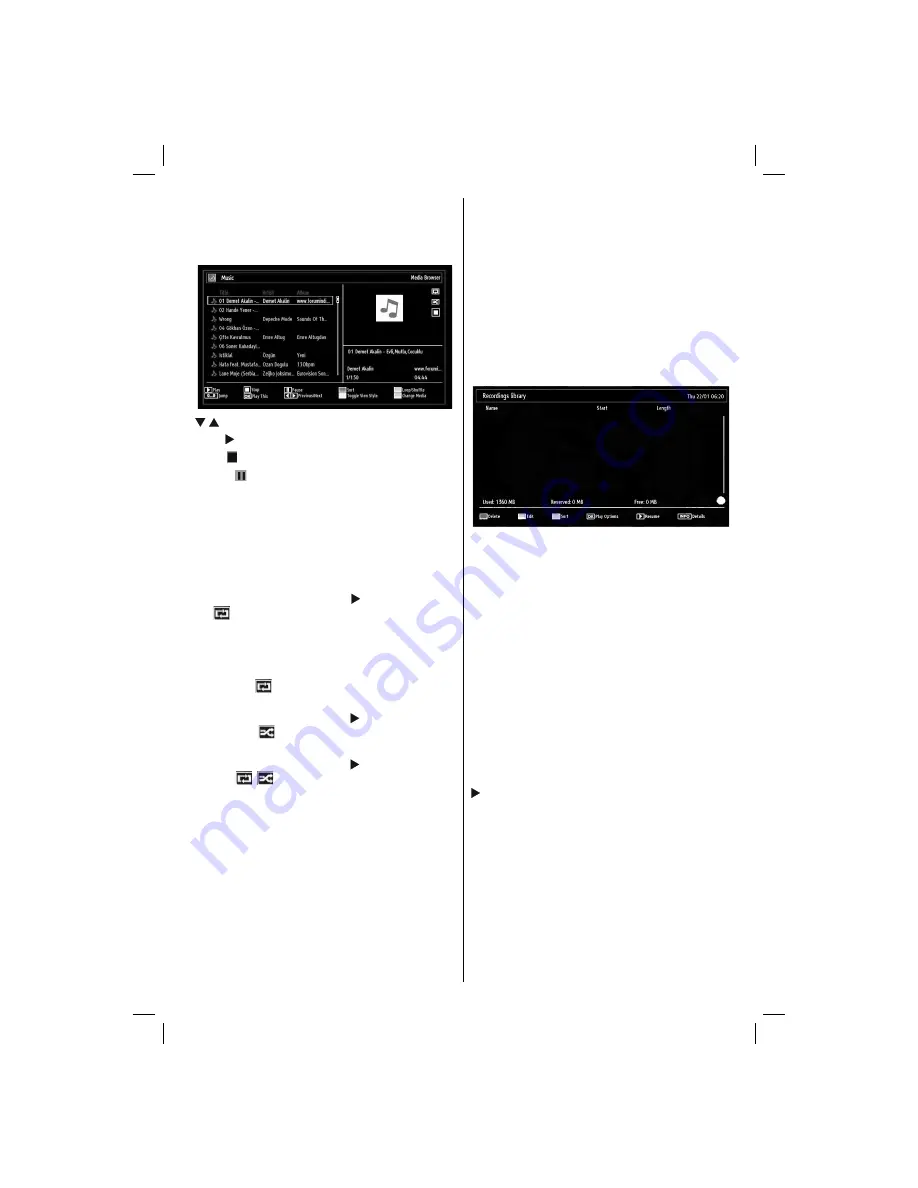
Playing Music via USB
When you select Music from the main options,
available audio
fi
les will be
fi
ltered and listed on this
screen.
/
: Navigate menu
Play ( button)
:
Starts the playback.
Stop ( button)
: Stops playback.
Pause ( button)
: Pauses the selected playback.
RED button
: Sorts
fi
les by Title,Artist or Album.
Loop/Shuf
fl
e (GREEN button)
: Press once to disable
Loop. Press again to disable both Loop and Shuf
fl
e.
Press once more to enable only Shuf
fl
e. Press again
to enable all. You can follow the disabled functions
with the change of the icons.
Note:
If you start the playback with the button and activate
the
symbol, the TV will play the next music/video
fi
le. The playback will proceed accordingly and when
the end of the list is reached, it will be played again
from the beginning (loop function).
If you start the playback with the OK button and
activate the
symbol, the same music or video
fi
le
will be played in a loop (repeat function).
If you start the playback with or OK button and
activate the
symbol, music or video
fi
le will be
played in a shuf
fl
e.
If you start the playback with or OK button and
activate
,
symbols, music or video
fi
le playback
will continue randomly and the random playback will
continue.
0..9 (Numeric buttons)
: The TV will jump to the
fi
le starting with the letter you input via the numeric
buttons on your remote control.
Play This (OK button)
: Plays the selected
fi
le.
Previous/Next (Left/Right buttons)
: Jumps to
previous or next
fi
le to play.
Yellow Button
: Change viewing style
BLUE
: Changes media options.
Note: If the Viewing Style is set to Folder in Media
Browser Settings, Music folder will be displayed as
sorted and there is no need to sort
fi
les again by
pressing the FAV button.
INFO
: Changes
fi
lter options.
Recordings Library
IMPORTANT: To view recordings library, you should
fi
rst connect a USB disk to your TV while the TV is
switched off. You should then switch on the TV to
enable recording feature. Otherwise, recording feature
will not be available.
To view the list of recordings, select “
Recordings
Library
” and press the
OK
button. Recordings Library
will then be displayed with available recordings.
All the recordings are kept in a list in the recordings
library.
RED button (Delete)
: Erases the selected
recording.
GREEN button (Edit)
: Makes changes on the
selected recording.
BLUE button (Sort)
: Changes the order of the
recordings. You can select from a wide range of
sorting options.
OK button
: Activates play options menu:
• Play from start: Plays the recording from the
beginning.
• Resume: Recommences the recordings.
• Play from offset: Speci
fi
es a playing point.
Note: Viewing main menu and menu items will not ve
available during the playback.
(Resume)
: Recommences the recordings.
INFO (Details)
: Displays the short extended
programmes in detail.
MB62_[GB]_(01-TV)_woypbpr_IDTV_PVR_NICKEL17_5110UK_19965LED_10073978_50192728.indd 19
MB62_[GB]_(01-TV)_woypbpr_IDTV_PVR_NICKEL17_5110UK_19965LED_10073978_50192728.indd 19
07.09.2011 11:52:34
07.09.2011 11:52:34


