background image

EN

12

6.4  Verify Internet connectivity to Aurora Vision servers

1. Verify that the Ethernet cable is connected between the data logger’s 

Eth0 (Internet)

 and your network.

2.  The data logger acts as a router. From your laptop connected to 

Eth1 (Local)

, verify internet connectivity by opening up an Internet 

browser window and connecting to www.auroravision.net.

3.  The remaining steps for commissioning are performed via the Internet to check end-to-end communications. Proceed with one of the 

following steps: 

• If you are not responsible for these remaining steps, be sure to pass on the MAC address (Logger ID) information to the  responsible 

party. Remove the cable from 

Eth1

. Installation is complete. 

• If asset registration is already complete, proceed to the section on 

End-to-End Data Check

• If asset registration is not complete, proceed to the next section on 

Asset Registration

.

6.5  Asset registration

Asset registration is performed via the Administration tool in Aurora Vision. Asset registration assigns the MAC address of your logger to a 

specific plant in Aurora Vision. Asset Registration can be performed before or after the on-site installation is complete. When you register 

the data logger, all the assets (inverters and other devices) reporting to the data logger are also registered. A Plant must be created on 

Aurora Vision using the Administration tool before the data logger can be assigned and registered to it. Note that access to Administration 

tool requires an Aurora Vision User ID and password with Administrator privileges.

From the data logger’s user interface in the Logger ID drop-down menu, click the 

Register

 button to go to Asset Registration on the 

Administration page of the Plant Portfolio Manager. If you are not using the data logger’s web-based user interface, go to https://admin.

auroravision.net/customeradmin. Select 

Administration > Register Logger

 and type in the MAC address of the data logger. Follow the 

steps on the Asset Registration page to select the plant that the data logger will be associated with. 

See the Plant Portfolio Manager Users Guide for help in using the Administration tool for asset registration. Go to https://docs.auroravision.

net for all the latest product documentation.

6.6  End-to-end data check

The last check is to make sure that data is actually being reported and is visible on the Aurora Vision portal. Wait 15 minutes and log on to 

www.auroravision.net using a web browser on an Internet connected device. Within Aurora Vision, go to the 

Plants > Dashboard

 page 

for the plant and open the 

Device Status

 panel. Verify that the energy readings agree with the inverter(s) and that all of the monitored 

devices are communicating, as indicated by the 

Last Reported

 time.

6.7  Plant Viewer access for end users

The installer must supply the user with their unique Plant Viewer URL so they can monitor their system. To find the URL for a specific user’s 

plant within Aurora Vision, follow these steps: 

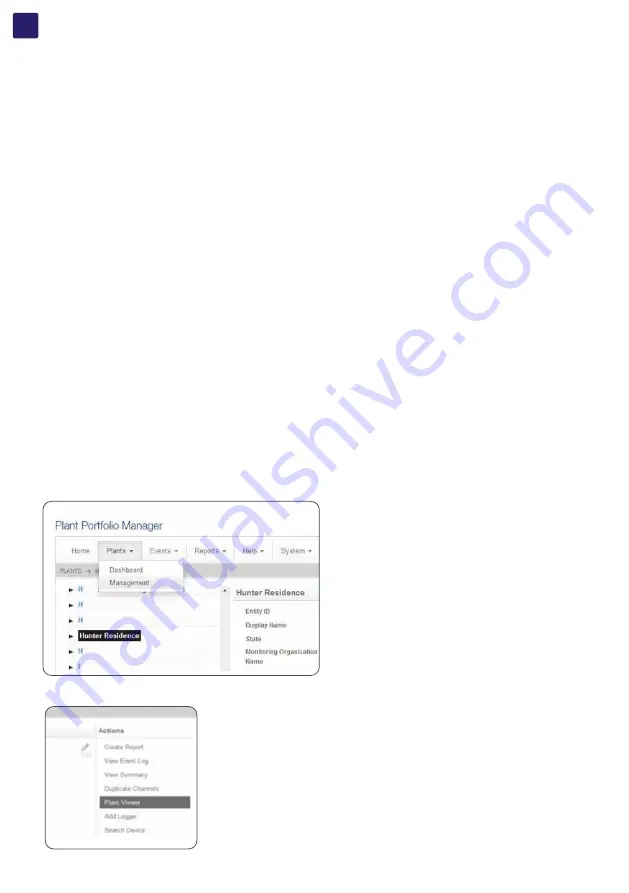
1. Log on to Plant Portfolio Manager at www.auroravision.net and go to 

Plants > Management

2. Select the Plant from the asset list in the screen area to the left.

3. Once the correct Plant is displayed, select 

Plant Viewer

 from the 

Actions

 menu.


Summary of Contents for VSN700

Page 1: ...Solar Monitoring VSN700 Data Logger Product manual ...

Page 2: ...nstallation information provided in the product manual must be read and followed For more detailed information regarding proper installation and use of this product refer to the product manual located at www fimer com ATTENTION A The product must be used in the manner described in the document If this is not the case the safety devices guaranteed by the inverter might be ineffective ATTENTION A Al...

Page 3: ...rials and Test Equipment 7 6 Commissioning 10 6 3 1 Set a static IP address 11 7 Adding an FIMER weather station 14 8 Interfacing VSN700 05 with SCADA systems 17 8 3 1 Set a Static IP Address for the data logger 17 8 3 2 Configure the serial interfaces 17 8 3 3 Communication with devices by SCADA or monitoring system 19 9 Troubleshooting 21 10 Data logger specifications 23 ...

Page 4: ... and will not be held responsible for systems upstream or downstream the equipment it has supplied It is absolutely forbidden to modify the equipment Any modification manipulation or alteration not expressly agreed with the manufacturer concerning either hardware or software shall result in the immediate cancellation of the warranty The Customer is fully liable for any modifications made to the sy...

Page 5: ...er and ensures that the logger is correctly passing information to the servers The installer provides a URL to the end user for access to Aurora Vision Plant Viewer The installer can also monitor all of their sites through a web browser using Aurora Vision Plant Portfolio Manager The VSN700 in conjunction with the Aurora Vision solution brings the following benefits Safeguard Your Investment and M...

Page 6: ...bscriber Line DSL or Cable modem through a router to get access to the Internet In summary any kind of Internet connection will work 4 2 VSN700 Data Logger models The data logger comes in three models The feature differences are provided in the table below Model Supported Devices and Features VSN700 01 XX Residential Monitor up to 5 x FIMER or legacy Power One single phase and or small three phase...

Page 7: ...ation 1 Check packaging for all components Data Logger Power Supply Adapter not included with VSN700 05 00 model DIN rail mounting kit for 35mm DIN rails VSN700 05 00 model only 2 Determine the indoor location of the VSN700 For reliable operation it is required that the data logger be located within 100m 330 ft of an Ethernet connection and within 1200m 4000 ft of the inverter s 3 Mount the data l...

Page 8: ... 7 VSN700 models come packaged with an AC DC power adapter The DC output wires are pre stripped and tinned for connecting to the screw terminal of the data logger Attach the conductor with the white label which is positive 12 volts DC to Port 6 of the data logger s screw terminal Attach the other solid black DC ground conductor to Port 5 of the data logger s screw terminal See the figure below VSN...

Page 9: ...dary RS 485 port on the data logger FIMER PRO inverter models use Modbus RTU protocol and must be attached to the Primary RS 485 port VSN700 03 Commercial Data Logger model Modbus devices are not supported by the VSN700 01 Residential The RS 485 ports on the VSN700 05 Max version are configurable for either protocol Specific FIMER and legacy Power One inverters support both protocols and will have...

Page 10: ...work traffic Eth0 LED GREEN Link Eth0 LED GREEN BLINK Traffic Eth0 LED OFF No network link NOTE D If no activity is seen on the LEDs double check all connections FIMER recommends a wired Internet connection because it is more reliable and requires less setup If it is necessary to connect to a wireless network a wireless network bridge with an Ethernet port is required Purchase and configure the wi...

Page 11: ...all inverters that use Aurora protocol are attached as an RS 485 daisy chain to the Secondary RS 485 port Optional weather stations and supported inverters that use Modbus RTU are connected to the Primary RS 485 port See Section 4 if you are adding a VSN800 Weather Station See Section 5 for advanced configuration options if you are using VSN700 05 Max For the Secondary RS 485 connection once inver...

Page 12: ...D and password with Administrator privileges From the data logger s user interface in the Logger ID drop down menu click the Register button to go to Asset Registration on the Administration page of the Plant Portfolio Manager If you are not using the data logger s web based user interface go to https admin auroravision net customeradmin Select Administration Register Logger and type in the MAC ad...

Page 13: ...oll down to the Published View section The URL to provide to the customer is in the Share URL field NOTE D For detailed information about plant sharing options see the Plant Portfolio Manager User Guide Go to https docs auroravision net for all the latest product documentation ...

Page 14: ...erter RS 485 Pin Label Example VSN800 XX RS 485 Pin Label RS 485 Negative 1 T R RS 485 Positive 2 T R RS 485 Negative 3 RS 485 A RS 485 Positive 4 RS 485 B DC Ground 5 RTN RS 485 GND and GND VDC Power Only 6 24VDC 3 The VSN800 Weather Station can tap the power terminals on the data logger for its power source Tapping off the data logger s power source is optional any appropriate DC power source th...

Page 15: ...It may be necessary to use a wire nut to attach the multiple wires to the GND terminal on the data logger Wire the weather station to the data logger as shown in the figure below 12VDC Power Supply Example Inverter Terminal Block To Network via Switch or Router Screw Terminal Block on Data Logger Example Weather Station Terminal Block ...

Page 16: ...figure the Primary RS 485 port using the following procedure Bring up the data logger s web interface in the same manner as for configuring inverters connect an Ethernet cable from the data logger s Eth1 Local port to a laptop and go to http 172 17 17 1 To add the VSN800 weather station go to the Home tab and push the Find button for the Primary RS 485 port Click on Start in the window that pops u...

Page 17: ...on response will be sent back to the Modbus TCP client There is no confirmation that a write command is successful and that the inverter has performed the control action so write commands should always be followed up shortly after with read commands to confirm the change s 8 3 Data logger configuration for SCADA or other monitoring systems 8 3 1 Set a Static IP Address for the data logger Connect ...

Page 18: ...one interface is configured for Modbus RTU and the other interface for Aurora Protocol to SunSpec Adapter Save the changes by pressing the floppy disk icon The logger needs to be rebooted for the configuration changes to take effect In the drop down menu by Logger ID click on Reboot and wait about a minute for the logger to fully reboot Now that the data logger has been configured devices can be a...

Page 19: ...s RTU device at RS 485 address 26 connected to the Secondary RS 485 port which has been configured for Modbus RTU the Modbus TCP command would be pointed to Eth0_IP_address 503 26 8 4 Adding 3rd party devices If you are adding supported 3rd party devices to VSN700 05 Max version follow the steps below to manually add the device Alternatively certain Modbus RTU devices can be auto discovered using ...

Page 20: ...terface The Modbus TCP device must be on or be routed to from the same LAN that the data logger s Ethernet interfaces Eth0 and or Eth1 are connected to The Modbus TCP interface must also be enabled by clicking the pencil icon and then using the dropdown menu to enable it Save this change using the Apply icon and then the logger must be rebooted Once rebooted manually add devices to the Modbus TCP ...

Page 21: ...fy that the undetected inverter is included in the list of supported inverters 2 After 3 minutes select Refresh on the web browser 3 Close and reopen the web browser then go to the Home page of the Data Logger http 172 17 17 1 4 If the Data Logger restarts it means that it has received a new configuration which should now have all devices defined Wait three minutes then check the changes 5 If all ...

Page 22: ...t must also be contacted to have the Aurora Vision credentials reset for that data logger The table below shows the meaning of LED indicators during the start up process and normal operation Boot Operation Stage LED Indicators Powered Off Both LEDs off First Stage Bootloader Orange LED lit solid Second Stage Bootloader Orange and Green LEDs lit solid Kernel loading No LEDs lit Resetting to Factory...

Page 23: ...ase or three phase VSN700 05 Max All FIMER or legacy Power One solar inverters 3rd Party devices and other FIMER devices are also supported consult the latest supported devices list for an up to date list USB 2 0 Ports The USB Ports are currently not used Hardware CPU Atmel AT91SAM9260 400MHz DRAM 64 Mbytes Flash memory 256 Mbytes Power Supply Power 9 24 VDC 10 Power consumption is typically betwe...

Page 24: ...services NTP preferred Network Hosts The logger will connect to the following hosts Some servers owned by FIMER and others are customer or ISP servers Servers listed as owned by Customer IT ISP must be configured in the logger using either DHCP or as static network information Host Purpose Port Owner Manager platform auroravision net Data configuration TCP 443 FIMER gw1 auroravision net and or apt...

Page 25: ...EN 25 ...

Page 26: ...EN 26 ...

Page 27: ...ise au rebut appropriée de ce produit vous contribuez à sa réutilisation et à son recyclage tout en protégeant notre environnement PORTUGUÊS NEDERLASNDS SVENSKA DANSK SUOMI O símbolo do contentor com uma cruz sobreposta identifica equipamentos elétricos e eletrónicos EEE colocados no mercado após 13 de agosto de 2005 que devem ser recolhidos separadamente de acordo com a Diretiva 2012 19 UE do Par...

Page 28: ... škoduje okolju in zdravju ljudi Z ustreznim odlaganjem tega izdelka prispevate k njegovi ponovni uporabi recikliranju in zaščiti okolja LIETUVIŲ EESTI LATVIEŠU BOSANSKI MAGYAR Perbrauktos šiukšlių dėžės su ratukais simbolis reiškia kad vadovaujantis Europos parlamento direktyva 2012 19 ES ir Tarybos direktyva dėl elektros ir elektroninės įrangos atliekų WEEE elektrinė ir elektroninė įranga EEE pa...

Page 29: ...IMER does not accept any responsibility whatsoever for potential errors or possible lack of information in this document We reserve all rights in this document and in the subject matter and illustrations contained the rein Any reproduction disclosure to third parties or utilization of its contents in whole or in parts is forbidden without prior written consent of FIMER Copyright 2021 FIMER All rig...

Reviews: