


Page 5
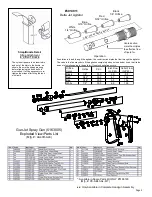
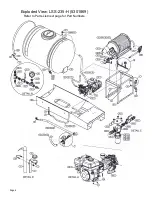
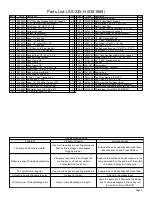
Parts List: LSS-235-H (5301869)
Ref. #
Part #
Description
Qty.
Ref. #
Part #
Description
Qty.
1
5006306 1/4"-20nc Hex Flanged Whiz Nut, Grade 5
6
31
5274195 Reel Mount Weldment
1
2
5006307 5/16"-18nc Hex Flanged Whiz Nut, Grade 5
12
32
5274309 Electric Hose Reel Assembly
1
3
5006337 1/2-13 Hex Whiz (Flange) Locknut
4
32.1
5157063 Ring Terminal Lug, 3/8" (10-12 Ga.)
1
4
5010207 Poly Elbow, 3/4" MPT x 1/2" HB
1
32.2
5272183 Electric Hose Reel
1
5
5010215 Poly Elbow, 1-1/4" MPT x 1" HB
1
32.3
5157065 1/4" Female Push-On Terminal (10-12 Ga.)
1
6
5014011 Delta Jet Agitator
1
32.4
5275416 Electric Components Assembly
1
7
5016066 Garden Hose Washer
1
33
5275335 Hose Reel/Agitator Plumbing Assembly
1
8
5020076 Hose, 3/4"-2 Brd. x 38"
1
33.1
5011046 1/2" Galvanized Close Nipple
3
9
5020314 Hose, 1"-2 Brd. x 60"
1
33.2
5010086 1/2" NPT Galvanized Tee
1
10
5020315 Hose, 1"-2 Brd. x 24"
1
33.3
5143197 1/2" "T-800" Brass Ball Valve
1
11
5020372 Hose, 1/2" Yellow PVC x 36"
1
33.4
5067131 Poly Fitting, 1/2" MPT x 1/2" HB
1
12
5020498 Hose, 1"-2 Brd. x 64"
1
33.5
5010230 Poly Tee, 1/2" FPT
1
13
5117323 5/16"-18nc x 3/4" Flng Hex Bolt
8
33.6
5041073 Poly Reducing Bushing, 1/2" MPT x 1/4" FPT
1
14
5034638 5/16-18 x 1-1/2" Flng Hex Bolt
4
33.7
5067052 Steel Fitting, 1/2" MPT x 1/2" HB
1
15
5034111 1/2" x 6" J-Hook Bolt
4
34
5275463 Strainer Assembly
1
16
5034197 Round U-Bolt, 1/4"-20 x 1" x 3/4"
2
34.1
5006307 5/16"-18nc Hex Flanged Whiz Nut, Grade 5
4
17
5038637 Handgun Holder Bracket
1
34.2
5034065 Round U-Bolt, 5/16"-18 x 1-1/2" x 2-3/16"
2
18
5051024 Hose Clamp, 3/4"
2
34.3
5143190 3/4" "T-800" Brass Ball Valve
1
19
5051025 Hose Clamp, 1"
4
34.4
5116213 Strainer
1
20
5051114 Hose Clamp, 1/2"
6
34.4.1 3351-0039 Strainer Bowl
1
21
5056097 Poly Elbow, 11/16" MPS x 3/4" HB
1
34.4.2 5116131 Strainer Screen (40 Mesh)
1
22
5067052 Steel Fitting, 1/2" MPT x 1/2" HB
2
34.4.3 5072299 Strainer EPDM Gasket
1
23
5075014 Rubber Grommet (Black)
2
34.4.4 3351-0038 Strainer Cap
1
24
5108041 Tank Strap Buckle, Bent
4
34.5
5038258 Strainer Bracket
1
25
5117301 1/4-20 x 1" Hex Flange Screw
2
34.6
5011140 Poly Close Nipple, 3/4" MNPT
1
26
5133103 Nylon Strap, 2" x 96"
2
34.7
5067128 Poly Fitting, 3/4" MPT x 1" HB
2
27
5153097 Hose, 1/2" PVC 600# (Yellow) x 300'
1
35
5272229 200 Gallon Skid Weldment (Red)
1
28
5163005 GunJet Spray Gun (AA43H-AL6)
1
36
5275905 Diaphragm Pump/Honda Engine Assembly
1
29
5167034 Gauge, 0-400 PSI (Liquid Filled)
1
36.1
5152058 160cc Honda Engine w/Recoil Start (3/4" Shaft)
1
30
5169004 200 Gallon Tank (38" x 50" x 42")
1
36.2
5274358 3-Diaphragm Pump (9910-D403GRGI)
1
30.1
63480
8" Lid w/Blue Snap-In Vent
1
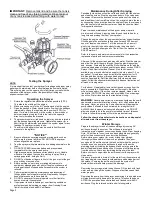
Symptom
Probable Cause(s)
Corrective Action
The pump does not draw water
One or more valves are seating improperly.
Suction line is plugged or collapsed.
Clogged strainer.
Examine the valve seatings and clean them.
Examine suction line. Clean Strainer.
Pressure gauge fluctuates excessively
The pump is sucking in air through the
suction line or air has not entirely
evacuated from the pump.
Examine the suction hose and make sure it is
firmly secured. Run the pump with the outlet
line open to purge air from pump.
The liquid flow is irregular
One or more valves are seating improperly.
Examine the valve seatings and clean them.
Output drops and the pump is noisy
Oil level is too low.
Add oil to the proper level.
Oil comes out of the discharge port
One or more diaphragms are split.
Drain the pump of oil. Dismantle the heads
and fit new diaphragms. Fill to correct oil
level with motor oil (SAE 30)
Troubleshooting Guide