

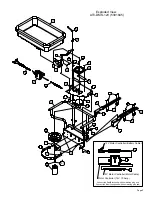


B
See Note (**)
Opening
Pattern Adjutment Ring
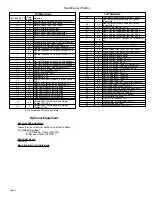
Page 2
Installation
1. Determine which mounting holes on the mounting
bracket weldmenmt need to be used that will fit best on
the vehicle rack. Use the widest mount holes possible on
the spreader's frame.
2. Attach the spreader's mounting brackets to the
vehicle's rear rack using the hardware provided.
3. Use 12V motor controller (battery cable) clip to
connect directly to the battery. Connect the red clip and
red wire directly to the positive (+) terminal. Connect the
black clip and black wire directly to the negative (-)
terminal.
Route 12V motor controller battery cable and 12V motor
controller (motor cable) securely and carefully to prevent
damage from moving parts and exhaust heat.
Turn the Motor Controller switch to the OFF position,
before connecting to the motor cable.
Set the Motor controller to the number “5”, and switch the
fan motor on. The fan should run at ½ speed. Rotate to
number “10” for full fan speed, and then rotate to number
“1” for slowest fan speed.
This should be done without material in the Hopper and
gate slide closed.
Replace or repair loose or missing components
Operate controls and switches to make sure they respond
correctly
Conditions of Weather and terrain must be considered
when setting spreader. Do not spread on windy days, with
light weight materials such as grass seed or powders.
Protective clothing must be worn in some cases.
1. Determine vehicle speed:
If vehicle does not have a speedometer, determining
speed can be accomplished by marking off 100, 200, or
300 feet.
The speed chart indicates the number of seconds it takes
to travel the distances.
Using a watch or stop watch for time, travel into and out of
marked distance for a more accurate application speed.
See the recommended speeds/settings later in this
manual.
Operation
2. Set Electronic Speed Control:
Adjust speed control to set the spread width. The highest
fan speed will spread the widest pattern.
After adjusting the speed control to the desired width for
the material you are using. Leave the dial on this setting
and use the power switch to turn the fan on and off.
3. Set Opening Gauge Control:
Refer to the settings chart for the proper settings.
Loosen wing nut and move gate slide gauge to the
desired setting. Tighten wing nut.
4. Adjust Pattern Adjust Ring Position to Center
Spread Pattern:
If the spread pattern is off-center, adjust by rotating the
pattern adjusting ring. This adjustment is only required if
the material density has dramatically changed.
Pattern adjust ring has been set at the factory for UREA.
______________________________________
Caution: Making adjustments with spinner running is
unsafe. Never adjust pattern ring with spinner powered.
Disconnect power at the battery or speed control or
motor before doing any pattern adjusting.
- Loosen worm gear clamp only enough to allow pattern
adjust ring to be removed with slight force.
- Adjust pattern ring to re-center spread pattern. If pattern
is too heavy to the driver's right, rotate the pattern adjust
ring clockwise (as viewed from the top) until the pattern is
even. If the pattern is heavy on the driver's left, rotate the
pattern adjust ring counter-clockwise (as viewed from the
top) until the pattern is even.
- Retighten the worm gear clamp to a snug fit.
DO NOT
OVER-TIGHTEN!
- To return the pattern adjust ring to the factory setting,
simply align the pattern adjust ring to the center of the
mounting plate
, as pictured below (**)
5. Do not fill and transport over long distances. This will
result in material packing and caking. Remove and clean
all material at the end of your spreading day.
Cleaning/Storing
1. Remove and clean all material from the hopper.
2. Rinse inside and outside of hopper and dry before
storing.
3. Motor and Motor Controller are water resistant. Do not
submerge into water, or use high pressure sprayers to
clean.
4. The spreader should be stored in a dry area.
SPEED (MPH) = Distance (Ft.) x 60 / Time (seconds) x 88
Time Required in Seconds to
Travel a Distance of:
Speed in M.P.H.
(Miles per Hour)
100 Ft.
200 Ft.
300 Ft.
1.0
68
136
205
2.0
34
68
102
3.0
23
45
68
4.0
17
34
51
5.0
14
27
41
6.0
11
23
34
7.0
9.7
19
29
8.0
8.5
17
26
9.0
7.6
15
23
10.0
6.8
14
20


