


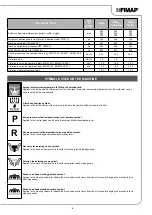


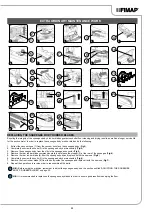


USER SEAT ADJUSTMENT
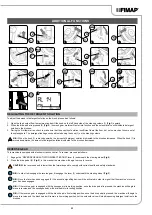
The careful adjustment of the driver's seat ensures a greater sense of comfort when using the machine; the seat should always be positioned
using the pedals as a point of reference, in order to adjust the seat, use the lever located under the seat.
N.B.:
The distance should be adjusted so that with the pedals fully pressed to the floor the knees are slightly bent (about 120°).
N.B.:
Adjust the distance of the seat so that when pressing the brake pedal it goes as far as it can. This operation should be done with the
machine running so as to pressurise the braking system.
N.B.:
If the knee is not bent enough, it is too far from the steering wheel, if however the knee is bent almost 90°then it is too close to the
steering wheel.
N.B.:
The feet should be positioned keeping the heels on the footrest, the sole of the foot directly below the fingers should push the
pedals.
N.B.:
The ideal driving position is that which allows you to grip the steering wheel correctly with the palms slightly lower than the
shoulders. With a good grip on the steering wheel, the elbows should be bent by about 120°. They should be at least 30 cm or 11.81 in
between the middle of the steering wheel and our breastbone. In any case, this distance should be no more than 45 cm or 17.72 in.
PREPARING TO WORK
Before beginning to work, it is necessary to:
1. Make sure the recovery tank is empty. If this is not the case, empty it (read “DRAINING THE RECOVERY TANK” on page 29).
2.
Check that the amount of detergent solution present in the solution tank is sufficient for the type of work to be performed. If this is not the
BODY RUBBER BLADES” on page 33).
THE SIDE SQUEEGEE SPLASHGUARD RUBBER BLADES” on page 34).
5. For scrubbing and sweeping versions, check that the brush head brushes are in good working condition. If they are worn, replace them (see
6. For scrubbing and sweeping versions, check that the side brushes are in good working condition. If they are worn, replace them (see
“FITTING THE SIDE BRUSH (SCRUBBING VERSION)” on page 18 or “REPLACING THE SIDE BRUSH (SWEEPING VERSION)” on
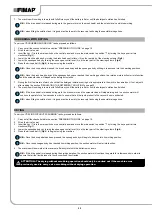
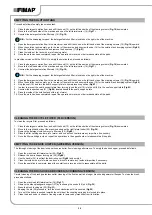
6. With the brush head raised, release the pad support retainers (33) - (
Fig.32
) shows the rotation direction for releasing the front retainer.
7. Use the handle (34) to remove the pad support (35) (
Fig.33
).
8. Place the required pad in the lower part of the support (
Fig.34
).
9. Once the work is complete, repeat the operations in reverse order to reassemble all the parts.
19
1
2
1
2
3
4
3
5
4
6
11
5
11
7
12
6
12
8
7
9
9
8
10
10