


DRAINING THE RECOVERY TANK
Proceed as follows to empty the recovery tank:
1. Remove the drainage hose of the recovery tank (1) from the clamps; it is located at the rear of the machine (
Fig.1
).
2. Bend the end of the drainage tube in order to create a choke and prevent the content from coming out (
Fig.2
), then position the tube on the
discharge surface, unscrew the cap, and gradually release the tube.
3. Rinse the inside of the recovery tank with a jet of water. If necessary, use a spatula to remove any sludge that may have accumulated at the
bottom of the tank.
WARNING:
Take care to also clean the electro-mechanical float inside the tank.
4. Repeat the operations in reverse order to reassemble all the parts.
CLEANING THE RECOVERY TANK FILTERS
In order to clean the filters present inside the recovery tank, do the following:
1. Grip the moulded handles (2) on the recovery tank cover (
Fig.3
).
2. Rotate the recovery tank cover as far as it will go.
3.
Remove the dirty water basket/filter from the support (3) (
Fig.4
).
4.
Remove the basket cover (4) from the basket/filter (3) (
Fig.5
).
5.
Clean the basket/filter and the basket cover under a jet of water.
N.B.:
Use a spatula or brush to eliminate any dirt that is particularly difficult to remove.
6.
Use a cloth to dry the basket/filter and basket cover, and place them back inside the recovery tank.
7. Remove the anti-wave tray from the support (5) (
Fig.6
).
8. Clean the basin under a jet of water.
N.B.:
Use a jet of water to eliminate any remaining dirt, and use a spatula or a brush with soft bristles to eliminate any dirt that is
particularly hard to remove.
9.
Remove the suction motor's duct filter from its support (6) (
Fig.7
).
10.
Clean the suction motor duct filter under a jet of water.
N.B.:
Use a spatula to eliminate any dirt that is particularly difficult to remove.
11.
Dry the suction motor duct filter with a dry cloth and place it back on its support.
12.
Clean the lower part of the vacuum cover with a damp cloth, and carefully clean the filter gaskets (
Fig.8
).
13. Repeat the operations in reverse order to reassemble all the parts.
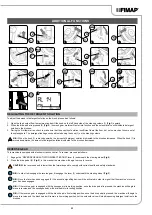
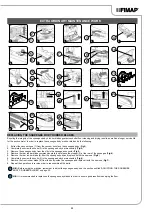
CLEANING THE SQUEEGEE BODY
The careful cleaning of the whole vacuum unit ensures better drying and cleaning of the floor as well as a longer suction motor life. To carry out
the cleaning of the squeegee body, proceed as follows:
1. Extract the vacuum hose (7) from the vacuum nozzle on the squeegee body (
Fig.9
).
2. Completely unscrew the knobs (8) on the squeegee body pre-assembly (
Fig.10
).
3. Remove the squeegee body from the slits in the squeegee connector (
Fig.11
).
4. Thoroughly clean the squeegee body vacuum chamber (9) with a jet of water, and then with a damp cloth (
Fig.12
).
N.B.:
Use a spatula to eliminate any particularly stubborn dirt.
5. Thoroughly clean the squeegee body's rear rubber blade (10) with a jet of water, and then with a damp cloth (
Fig.13
).
6. Thoroughly clean the squeegee body front rubber blade (11) with a jet of water, and then with a damp cloth (
Fig.14
).
7. Use a jet of water and then a damp cloth to thoroughly clean inside the vacuum nozzle (12) (
Fig.15
).
N.B.:
Use a spatula to eliminate any particularly stubborn dirt.
8. Repeat the operations in reverse order to reassemble all the parts.
29