background image

Filmcity  SHOULDER RIG KIT 


                                                                      8


 

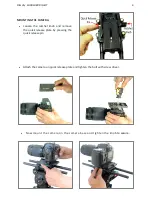
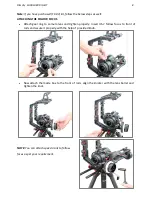
Attach  gear  ring  to  camera  lens  and  tighten  properly.  Insert  HS-2  follow  focus  to  front  of 
rods and secure it properly with the help of  provided knob.   

 

Now attach the matte box to the front of rods, align the knicker with the lens barrel and 
tighten the knot. 

Note: 

If you have purchased (FC-03) kit, follow the below steps as well: 

ATTACHING THE FOLLOW FOCUS 

NOTE: 

You can attach speed crank to follow 

focus as per your requirement. 

Summary of Contents for FC-02

Page 1: ...rieval system or transmitted by any form or by any means electronic mechanical photocopying recording or otherwise except as may be expressly permitted by the applicable copyright statutes or in writing by the Publisher DSLR Camera Cage Shoulder Rig Kit I NSTR UCTI ON M A N U A L ...

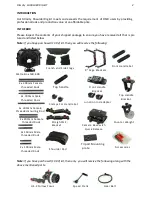
Page 2: ...Side Flags Front Handle Set Camera Base with Quick Release Counter Weight 2x 150mm Male threaded Rods Top handle 2x 200mm Female threaded Rods 3x 300mm Female threaded Rods 9 Cage Brackets 2x 300mm male threaded Rods Accessories Tripod Mounting plate Note If you have purchased FC 03 kit then only you will receive the following along with the above mentioned parts Note If you have purchased FC 02 k...

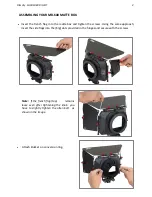
Page 3: ...d tighten the screws Using the same approach insert the side flags into the big slots provided in the hinges and secure with the screws Note If the french flag top remains loose even after tightening the knob you have to slightly tighten the allen bolt as shown in the image Attach knicker on conversion ring ...

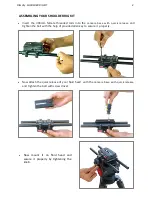
Page 4: ...camera base with quick release and tighten the bolt with the help of provided allen key to secure it properly Now attach the quick release of your fluid head with the camera base with quick release and tighten the bolt with screw driver Now mount it on fluid head and secure it properly by tightening the knob ...

Page 5: ...RA Loosen the ratchet knob and remove the quick release plate by pressing the quick release pin Attach the camera on quick release plate and tighten the bolt with screw driver Now mount the camera on the camera base and tighten the knob to secure ...

Page 6: ...s to secure it properly Insert the 2x200mm female threaded rods into cage brackets on the top Then attach the top handle with 200mm rods and tighten the knobs to secure it properly Attach the straight bracket to the end of the rods and secure it properly with the help of provided knob ...

Page 7: ... into the straight bracket and tighten the knob to secure properly Attach the shoulder pad and counterweight into the rods and secure it properly with the help of provided knob Attach the 150mm male rods at the front to extend it for mounting your matte box and handles ...

Page 8: ...nd secure it properly with the help of provided knob Now attach the matte box to the front of rods align the knicker with the lens barrel and tighten the knot Note If you have purchased FC 03 kit follow the below steps as well ATTACHING THE FOLLOW FOCUS NOTE You can attach speed crank to follow focus as per your requirement ...

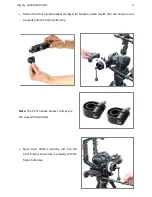
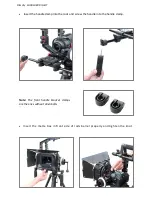
Page 9: ...mps are the ones with allen bolts Attach the front handle bracket clamps with bracket attach it with the rods and secure it properly with the help of allen key Now insert 300mm knurling rod into the front bracket and secure it properly with the help of allen key ...

Page 10: ...ote The front handle bracket clamps are the ones without allen bolts Insert the handle clamp into the rods and screw the handle into the handle clamp Insert the matte box in front side of rods barrel properly and tighten the knot ...

Page 11: ...ident misuse neglect lack of care of the product or service by anyone other than our company We are not liable for incidental or consequential damages resulting from the use of the unit or occurring due to any breach of this warranty Replacement parts of the product will be provided at nominal cost covering the cost price of the replacement parts only to the customers after the Warranty Period has...

Reviews: