background image

EN

ELECTRIC LAWNMOWER

USER'S MANUAL

15

Maintenance

8. MAINTENANCE

ATTENTION!

 Before proceeding to remove the grass catcher, always turn off the lawnmower and pull the 

plug on the extension cord out of the power socket.

Note:

 We recommend that you regularly perform the maintenance described below, this will increase the 

lifetime of the machine and increase its reliability.

  Regularly visually inspect the machine for the timely identification of defects such as a loose blade, blade 

installed upside down, blade damage or damaged or excessively worn out parts.

  Likewise, regularly check that the protective covers or protective elements are not damaged and that they are 

in their place.

  Before every use of the machine, perform all necessary repairs and maintenance.
  In the event that despite regular maintenance, the machine does not work, please contact our customer 

service, the potential repair should be carried out by our contractual partner in one of the specialised 
workshops of the Fieldmann brand.

8.1 BLADE REPLACEMENT

For this task, we recommend that you contact an authorised service centre.
Always use original spare parts.

Before inspecting the blade, always disconnect the lawnmower from the electricity grid 

and check that the motor is turned off.

ATTENTION

: Remember that the blade still rotates several seconds after the motor is turned off. Never 

attempt to stop the blade. In regular intervals, check that the blade is securely fastened, in good condition 
and sharp. If necessary, sharpen or replace it.

In the event that the blade hits an object while mowing, turn the lawnmower off and wait until the blade comes to 
a stop. Then check the condition of the blade and its fastening bolts. 
If these are damaged or if they have been lost then they must be replaced without delay.
Important: While working use protective gloves.
Loosen the two bolts that hold the blade (6 mm Allen key) by turning anticlockwise, remove the blade and 
replace it with a new one. Check that the new blade is installed in the correct direction. Tighten the plastic nut of 
the fastening bolt turning clockwise.

  Turn the lawnmower upside down 
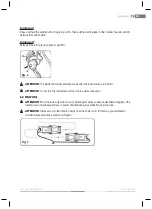
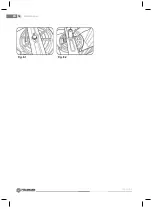
  Secure the blade against movement using a screwdriver. Figure 8.1
  Loosen the blade bolt and remove the blade. Then retighten firmly. Figure 8.2

Summary of Contents for FZR 2025-E

Page 1: ...FZR 2025 E ...

Page 2: ...2 FZR 2025 E English 1 18 Čeština 19 34 Slovenština 35 50 Magyarul 51 66 Polski 67 84 ...

Page 3: ...FIG 1 6 4 FUNDAMENTALS OF WORK SAFETY 7 Other risks 7 Before you start using the lawnmower 8 Preparing for operation 8 Operation 8 Maintenance and storage 9 5 ASSEMBLY 10 5 1 Installation of the start unit to the top part of the handle 10 5 2 Installing the handle 10 5 3 Installing the grass catcher attaching the wheel cover 11 6 OPERATION 12 6 1 Setting the mowing height 12 6 2 Connecting to the ...

Page 4: ...elf with the operating elements and the correct use of the machine Keep the user s manual in a safe place where it can be easily retrieved for future use Save the original packaging including the internal packing material warranty card and proof of purchase receipt at least for the duration of the warranty If you need to ship this machine pack it in the original cardboard box to ensure maximum pro...

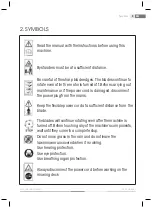
Page 5: ... cord is damaged disconnect the power plug from the mains Keep the flexible power cord at a sufficient distance from the blade The blades will continue rotating even after the machine is turned off Before touching any of the machine s components wait until they come to a complete stop Do not mow grass in the rain and do not leave the lawnmower uncovered when it is raining Use hearing protection Us...

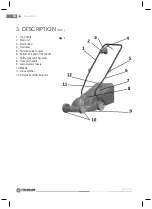
Page 6: ...1 1 Top Handle 2 Start unit 3 Start button 4 Start lever 5 Nut with quick coupler 6 Bottom part part of the handle 7 Safety grass catcher cover 8 Transport handle 9 Lawnmower chassis 10 Wheels 11 Grass catcher 12 Full grass catcher indicator Fig 1 ...

Page 7: ...his machine must not be operated by persons with limited physical sensory or mental abilities including children Furthermore it must not be used by inexperienced persons whose technical knowledge for the operation of this machine is insufficient These persons may operate the machine under the supervision of a competent person or after being duly instructed about the fundamentals of work safety If ...

Page 8: ...provided in this user s manual Thoroughly acquaint yourself with the machine s control elements and the fundamentals for correct use Never permit children or persons of whom you are not certain that they are acquainted with the control elements and the work safety rules for this machine to work with the machine on their own National legislation may likewise stipulate a minimum age limit from which...

Page 9: ...ch a case turn the side of the lawnmower upwards that is farther away from you Never insert your hands or feet under the lawnmower in particular near to moving parts Never cover the grass ejection chute Never transport the machine if the motor is still running Always first stop the motor and pull the plug of the power cord out of the socket only then is it possible to start troubleshooting or to e...

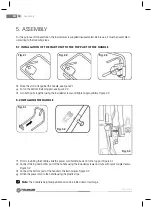
Page 10: ...igure 2 2 Join both parts together using the included screws and tighten appropriately Figure 2 3 5 2 INSTALLING THE HANDLE Fig 3 3 Fig 3 2 Fig 3 1 Prior to installing the handle slide the power cord holding hook on to the top part Figure 3 1 Connect the top and bottom part of the handle using the included screws and nuts with quick coupler levers Figure 3 2 Connect the bottom part of the handle t...

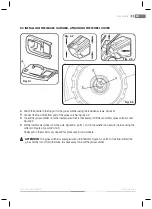
Page 11: ...rass catcher on to the lawnmower it is first necessary to lift the rear safety grass catcher cover Figure 4 3 Put the lawnmower wheel on to the axle Figure 4 4 point 1 Put on the washer and secure in place using the cotter pin Figure 4 4 point 2 and 3 Finally put on the wheel cover Repeat this procedure for all 4 wheels ATTENTION The grass catcher is equipped with a full indicator Figure 4 1 point...

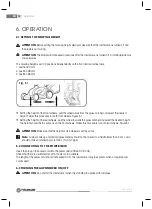
Page 12: ...ng the height of the rear wheels pull the wheel towards the grass catcher and select the desired height The height should be the same as on the front wheels Follow this procedure for both rear wheels Figure 5 1 ATTENTION Make sure that the height of all 4 wheels is set the same Note Lawns made up of standard grass blends should not be mowed to a height lower than 4 cm Lawn should not be shortened ...

Page 13: ... The blade will rotate several seconds after the lawnmower is turned off ATTENTION Do not turn the lawnmower off and on in quick succession 6 4 MOWING ATTENTION Mow the lawn only when it is dry Mowing wet grass causes undesirable clogging of the lawnmower and subsequent loss in power and reduced grass collection performance ATTENTION Always mow in the direction away from the power cord In this way...

Page 14: ...W Idling speed 3 400 min 1 Coverage width blade length 320 mm Mowing heights 20 38 56 mm 3 positions Grass catcher volume 30 l Weight when empty 7 25 Kg Noise level according to norm EN ISO 3744 Guaranteed emission level of acoustic power LWA max in accordance with the Noise Level Directive 2000 14 LwA MAX 96 dB A Vibrations 30 m s ...

Page 15: ...his task we recommend that you contact an authorised service centre Always use original spare parts Before inspecting the blade always disconnect the lawnmower from the electricity grid and check that the motor is turned off ATTENTION Remember that the blade still rotates several seconds after the motor is turned off Never attempt to stop the blade In regular intervals check that the blade is secu...

Page 16: ...EN 16 FZR 2025 E Fig 8 1 Fig 8 2 Maintenance ...

Page 17: ... natural resources and prevents damage to the environment caused by improper waste disposal Ask your local authorities or collection facility for more details In accordance with national regulations penalties may be imposed for the incorrect disposal of this type of waste For business entities in European Union states If you want to dispose of electric or electronic appliances ask your retailer or...

Page 18: ...EN 18 FZR 2025 E ...

Page 19: ......

Page 20: ...talácie použitievýrobkuvrozporesnávodomna použitie s platnými právnymi predpismi a všeobecne známymiaobvyklýmispósobmipoužívania vdosled ku použitia výrobku za iným účelom než na ktorý je určený poškodenie výrobku v dósledku zanedbanej alebo nesprávnej údržby poškodenie výrobku spó sobené jehoznečistením nehodou a zásahom vyššej moci živelnáudalosť požiar vniknutievody chy by funkčnostivýrobkuspós...

Page 21: ...elárat nyolc napon belül kell a fogyasztó részére visszaté ríteni Ha a termék kijavítására a kijavítási igény közlésétől számított 30 napig nem kerül sor a fogyasztó eltérő rendelkezése hiányában a terméket a 30 napos határidő eredménytelen el teltét követő nyolc napon belül cserélni kell Ha a termék cseréjére nincs lehetőség a fogyasztó által bemutatott a termék ellenértékének meg fizetését igazo...

Page 22: ...ény bejelentésének időpontja Javításra átvétel időpontja Hiba oka Javítás módja A termék fogyasztó részére való visszaadásának időpontja A jótállás kijavítás időtartamával meghosszabbított új határideje Szerviz pecsétje Kereskedő pecsétje Kicserélés esetén alkalmazandó A jótállási igény kicseréléssel került rendezésre A csere időpontja Kereskedő bélyegzője Tisztelt Fogyasztó Köszönjük hogy termékü...

Page 23: ......

Page 24: ......

Reviews: