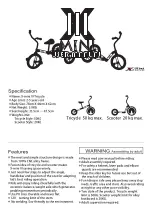
background image

- Simbi Limited Warranty 


30


6.


SIMBI LIMITED WARRANTY 

A.


Warranty Information 

SIMBI BICYCLE LIMITED LIFETIME WARRANTY 

 
Simbi warrants the frame and rigid fork of each new 
Simbi brand bicycle and Simbi brand frameset to be 
free from defects in material and workmanship for as 
long as the original purchaser owns the bicycle. Paint 
finish and all other original components, and all Simbi 
brand repair parts, replacement parts, and 
accessories, are warranted to be free from defects in 
material or workmanship for a period of one year from 
the original date of purchase. 
 

LIMITED REMEDY 

 
Unless otherwise provided, the sole remedy under the 
above warranty, or any implied warranty, is limited to 
the replacement of defective parts with those of equal 
or greater value at the sole discretion of Simbi. You 
will be responsible for labor costs associated with 
warranty replacements. IN NO EVENT SHALL SIMBI BE 
RESPONSIBLE FOR DIRECT, INCIDENTAL OR 
CONSEQUENTIAL DAMAGES, INCLUDING, WITHOUT 
LIMITATION, DAMAGES FOR PERSONAL INJURY, 
PROPERTY DAMAGE, OR ECONOMIC LOSSES, 
WHETHER BASED ON CONTRACT, WARRANTY, 

NEGLIGENCE, PRODUCT LIABILITY, OR ANY OTHER 
THEORY. 
 

EXCLUSIONS 

 
THE ABOVE WARRANTY, OR ANY IMPLIED WARRANTY, 
DOES NOT COVER NORMAL WEAR AND TEAR. ALL 
WARRANTIES ARE VOID IF THE BICYCLE IS MODIFIED 
FROM ITS ORIGINAL CONDITION OR THE BICYCLE IS 
USED FOR OTHER THAN NORMAL ACTIVITIES, 
INCLUDING, BUT NOT LIMITED TO, FAILING TO 
FOLLOW THE OWNER’S MANUAL OR USING THE 
BICYCLE FOR COMMERCIAL ACTIVITIES OR IN 
COMPETITIVE EVENTS, INCLUDING BUT NOT LIMITED 
TO BICYCLE RACING, BICYCLE MOTOCROSS RACING, 
STUNT RIDING, RAMP JUMPING OR SIMILAR 
ACTIVITIES, AND TRAINING FOR SUCH ACTIVITIES OR 
EVENTS. SIMBI MAKES NO OTHER WARRANTIES, 
EXPRESS OR IMPLIED. ALL IMPLIED WARRANTIES, 
INCLUDING THE WARRANTIES OF MERCHANTABILITY 
AND FITNESS FOR A PARTICULAR PURPOSE, ARE 
LIMITED IN DURATION TO THAT OF THE EXPRESS 
WARRANTIES STATED ABOVE. 
 

WHAT YOU SHOULD DO 

 
Contact Simbi Customer Support at 

www.SimbiBicycles.com

Summary of Contents for Simbi

Page 1: ...Warning Please read this entire manual before riding your Simbi Failure to do so could result in serious injury or even death...

Page 2: ...EMBLY 9 A Quick Assembly Overview 9 B Step 1 Attach Front Wheel 10 C Step 2 Attach Handlebar 12 D Step 3 Attach Pedals 14 E Step 4 Inflate Tires 16 F Step 5 Attach Seat 17 G Step 6 Attach Additional R...

Page 3: ...your Simbi 28 6 SIMBI LIMITED WARRANTY 29 A Warranty Information 29 7 TORQUE MEASUREMENT TABLES 30 A Technical Torque Measurements 30 8 SUPPORT 32 A Simbi Contact Information 32 9 INDEX 33 10 TABLE OF...

Page 4: ...eral Warning In order to use and enjoy your Simbi bicycle safely and to get the best durability and performance please read this manual carefully before riding The information contained in this manual...

Page 5: ...death or serious injury The Caution sign indicates a potentially hazardous situation that if not avoided could result in minor or moderate injury The Note sign indicates text that provides helpful or...

Page 6: ...es and seatpost 15mm Wrench for attaching pedals o Component manuals o Extra parts B Initial Inspection All major parts are identified in Figure 1 Please familiarize yourself with these parts prior to...

Page 7: ...2 Unpacking 6 Figure 1 Names and Locations of Parts...

Page 8: ...2 Unpacking 7 For your information Figure 2 references commonly used terms for the frame parts of your Simbi Figure 2 Names of Frame Parts...

Page 9: ...racket shell see Figure 2 and Error Reference source not found This information is required for you to register your bike We must have this registration before we can process a warranty claim Please f...

Page 10: ...elative to riding position on the bicycle Your Simbi comes with tools needed for assembly Assembly is generally a 5 or 6 step process note you don t necessarily need to do these in this order Step 1 A...

Page 11: ...3 Assembly 10 Step 6 Attach Additional Reflectors If you have any problems or questions with assembly Call 888 833 9927 or visit www SimbiBicycles com...

Page 12: ...4 With the steering fork facing forward angling away from bike insert the wheel between the fork blades so that it firmly touches the inside of the fork ends Make sure that the washers are next to the...

Page 13: ...tion Spin the wheel to make sure that it is centered in the frame Pick up the bike and sharply hit the top of the tire with the heel of your hand The wheel must not come off be loose or move from side...

Page 14: ...Allen wrench See Figure 6 Figure 6 Attach Handlebars to Frame The stem s Minimum Insertion Mark must not be visible above the top of the headset If the stem is extended beyond the Minimum Insertion Ma...

Page 15: ...i Customer Support Team see page 32 An insufficiently tightened stem bolt or handlebar binder bolt may compromise steering action which could cause you to lose control and fall Place the front wheel o...

Page 16: ...for Right Left and right are relative to riding position on your bike An easy way to remember how to tighten your pedals is to tighten both pedals towards the front of your bike 1 Align the pedal axle...

Page 17: ...s 16 Sometimes noises coming from your pedals are because you have not sufficiently tightened the pedal onto the crank Riding with a pedal not sufficiently tightened can damage your crank and pedals a...

Page 18: ...what is indicated on the sidewall Inflate tires only to the pressure indicated on the tire sidewalls Do not over inflate 1 Presta Valve Tire Inflation See Figure 9 Figure 9 Presta Valve Tire Inflation...

Page 19: ...t tube To adjust the seat height 1 Insert Seatpost into Seat Tube see Figure 11 Make sure you insert the seatpost past the Seatpost Minimum Insertion Mark and Tighten securely Figure 11 Seatpost Insta...

Page 20: ...olt or quick release iv Place your heel on the pedal and extend the seatpost until your leg is straight For proper riding position when wearing shoes and with the ball of your foot on the pedal you sh...

Page 21: ...Make sure to tighten completely When properly tightened the seat post cannot be rotated in the frame Figure 13 Saddle Adjustment Extended riding with a poorly adjusted saddle or one that does not prop...

Page 22: ...ur Simbi with the appropriate safety devices according to the laws of where you are riding Consult your local community for bicycle riding laws including lights helmets reflectors where you can and ca...

Page 23: ...ended on the tire sidewall Check for any wear or tear Replace damaged tires before riding Note tire pressure can decrease as much as 5 to 10 psi per week Check tire pressure regularly Ensure that the...

Page 24: ...brakes need adjustment See page 23 Brake Adjustments Gears Check Shifting if gears don t shift smoothly or make clicking noises they may need to be adjusted See page 24 Gears To understand how to shi...

Page 25: ...brake and shift lever bolts Check spoke tension look for loose spokes Tighten pedal screws Tighten bolts that hold accessories water bottle holders B Brake Adjustments i Common Brake Adjustments Over...

Page 26: ...You ll need to turn the barrel adjusters all the way in clockwise and replace the brake pads If the cable has stretched too far you need to loosen the clamp bolt and tighten the cable For more informa...

Page 27: ...pedal is reverse threaded counter clockwise and the right pedal is threaded clockwise If your pedals develop squeaks apply lubricant in the moving parts and wipe off any excess and make sure that the...

Page 28: ...loose spokes which can cause a wheel to go out of true To adjust spokes and wheels take your bicycle to a certified bicycle mechanic You can also go to www SimbiBicycles com for more information Loose...

Page 29: ...erwards Make sure to re lubricate parts afterwards otherwise they may rust if left with water You can use any liquid car wax on your Simbi H Storage Always store your Simbi indoors The indoor environm...

Page 30: ...ighly durable You can ride hard but ride smart Learn to ride with a light technique as some of the best bikers do and your Simbi s usable life will be extended This will save you time in maintenance g...

Page 31: ...HALL SIMBI BE RESPONSIBLE FOR DIRECT INCIDENTAL OR CONSEQUENTIAL DAMAGES INCLUDING WITHOUT LIMITATION DAMAGES FOR PERSONAL INJURY PROPERTY DAMAGE OR ECONOMIC LOSSES WHETHER BASED ON CONTRACT WARRANTY...

Page 32: ...orque wrench Table 1 Maximum Torque Levels for Parts Component Screw connection Torque Nm Disk Brake Caliper bolt fixed to frame or fork 6 Brake lever clamp screw 4 Disk rotor fixation bolt 4 Reservoi...

Page 33: ...ewdriver 2 5 3 Limit stop mounting bolt frame screwdriver 1 5 2 Shifter fastening bolt 5 Hub Locknut for adjusting quick release hub bearing 10 25 35 49 35 44 40 Bottom bracket Sealed cartridge in hou...

Page 34: ...8 Support 33 8 SUPPORT A Simbi Contact Information For all current contact information please visit us at www SimbiBicycles com Questions Problems For Customer Support Call 801 471 0440...

Page 35: ...ck Grips 21 Inspecting 23 Inspection Before Riding 21 Initial 5 Lubricant 25 26 Lubrication 26 Maintenance 23 Operation 21 Pedals 14 25 Saddle Adjustment 19 Safety Helmets 22 Reflectors 20 Safety chec...

Page 36: ...n Wheel Securely in Fork 11 Figure 12 Attach Handlebars to Frame 12 Figure 13 Handlebar Adjustment 12 Figure 19 Pedal Installation 14 Figure 20 Presta Valve Tire Inflation 16 Figure 21 Schrader Valve...

Page 37: ...11 Index of tables 36 11 INDEX OF TABLES Table 1 Maximum Torque Levels for Parts 30 Table 2 Recommended Torque Levels for Other Screwed Connections 31...

Reviews: