The T-mode is recommended when using self-
tapping drill screws.
► Press the gear switch
[1-5]
as many times
as necessary to select the desired gear/
mode.
One speed LED is lit
= 1st gear
Two speed LEDs are lit
= 2nd gear
Three speed LEDs are lit
= 3rd gear
T-mode LED is lit
= T-mode
Drive in some test screws first to check the
correct gear setting.
9.3
T-mode
Operating mode for driving small self-tapping
drill screws (< 3/16" x 12/16" (5 x 20 mm)) into
sheet metal with wooden substructures. After
drilling through the sheet metal, the speed is
automatically reduced to enable safe screw
driving.
10 Tool holder, attachments
WARNING
Risk of injury
► Remove the battery pack from the power
tool before performing any work on the
power tool.
10.1 Compatible accessories
This power tool is compatible with commercial
ly available tools with 1/4" hex shank, as per
DIN 3126 type E 6.3.
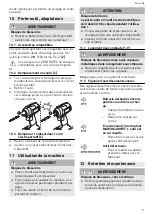
[2]
CENTROTEC accessories are not com
patible with this power tool.
10.2 Changing tools [6]
► Pull the sleeve of the bit locking system for
ward to release the insertion tool.
► Remove insertion tool.
► Push the new insertion tool into the locking
sleeve until it audibly clicks into place.
2
klick
1
6
10.3 Changing the bit in the insertion tool [6]
► Remove the bit from the insertion tool.
► Insert a new bit into the insertion tool.
11 Working with the machine
WARNING
Risk of injury
► Only attach the power tool to the screw
when it is switched off.
► Always secure the workpiece in such a
manner that it cannot move.
► Keep hands away from the rotating inser
tion tools.
CAUTION
Risk of burns
Tool holder and tools can become very hot
during operation!
► Wear protective gloves when changing the
tools!
► Allow to cool before attaching to belt clip.
11.1 Bit store [1-9]
WARNING
Risk of injury from metal cuttings in the bit
store.
► Clean the bit store regularly and clear out
metal cuttings.
Magnetic, to pick up bits.
11.2 Acoustic warning signal
Acoustic warning signals sound and the tool
switches off in the following operating states:
English
8


