HARDWARE
Page 8 of 13
4 COMMISSIONING
1. Remove the air inlet cap, then screw the nozzle into hole:
1/4" NPT Male Quick-Release
Coupling
2. Put a few drops of lubricating oil (without resin acid) in the air inlet nozzle.
3. Check the flexible air supply hose.
If it is damaged, broken, torn or deformed it must not be connected to the tool.
4. Check the state of the quick-release couplings (both on the tool and the hose). If signs of
damage are detected, it is broken or excessively corroded, the tool or the flexible hose
cannot be used.
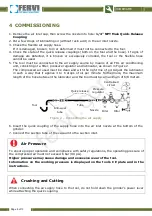
5. The tool must be connected to the air supply source by means of an FRL air conditioning
unit, consisting of a filter, pressure regulator and lubricator, as shown in Figure 2.
The compressed air used must be clean and with the right mix of oil. Adjust the lubricator
in such a way that it applies 3 to 6 drops of oil per minute. Furthermore, the maximum
length of the hose between the lubricator and the tool must be a maximum of 6/8 meters.
Figure 2 – Connecting the air supply
6. Insert the quick coupling of the supply hose into the air inlet nozzle at the bottom of the
grinder.
7. Connect the suction tube of the vacuum to the suction inlet.
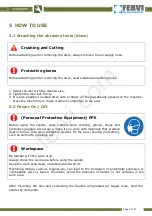
Air Pressure
To ensure proper operation and compliance with safety regulations, the operating pressure of
the compressed air must not exceed 6 bar (90 psi).
Higher pressures may cause damage and excessive wear of the tool.
Information on the working pressure is displayed on the tool's CE plate and in the
instructions.
Crushing and Cutting
When connecting the air supply hose to the tool, do not hold down the grinder's power lever
while attaching the quick coupling.
Anti-wear
tube
Tool
Tube
Quick release
connector
Nozzle
Pressure
regulator
Filter
Oiler
Centralised
circuit
fervi.com


