Ferroli F 30
30
7.05 Air pressure switch
(fig. 28)
• Isolate electricity
• Remove outer case (two screws bottom rear corners)
• Open room sealed department
• Remove the two screw "A" fixing air pressure switch
• Disconnect electrical leads "B"
• Remove pressure sensing tubes (white=D; Red=C)
• Note relevant positions of all connections and
replace in reverse order.
Fig. 28
Fig. 29
A
B
C
D
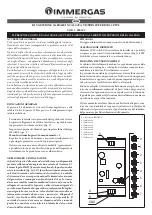
7.06 D.H.W. temperature sensor or Central Heating Temperature Sensor
(fig. 29)
•, Isolate electricity and water supplies
•, Remove outer case (two screws bottom rear corners)
•, Remove the two securing screws and lower control panel
•, Identify the sensor from figure 29
•, Disconnect electrical connection to the sensor
•, Drain the affected service either D.H.W. or C.H.
•, Unscrew the sensor
•, Replace in reverse order
7.07 Water Pressure Switch
(fig. 29)
• Isolate electricity and water supplies
• Remove outer case (two screws bottom rear corners)
• Remove the two securing screws and lower control panel
• Identify the switch from figure 29
• Disconnect electrical conne note positions to the switch
• Drain the boiler
• Unscrew water pressure switch
• Replace in reverse order
7.08 Safety Valve
(fig. 29)
• Isolate electricity and water supplies
• Remove outer case (two screws bottom rear corners)
• Remove the two securing screws and lower control panel
• Identify valve from fig. 29
• Drain the boiler
• Release the outlet union to the valve and
undo the valve
union connection
• Remove the valve outlet fitting
• Replace in reverse order
C.H. sensor
Water pressure switch
D.H.W.
sensor
Safety valve