background image

5.1. CAM module and subscriber's card

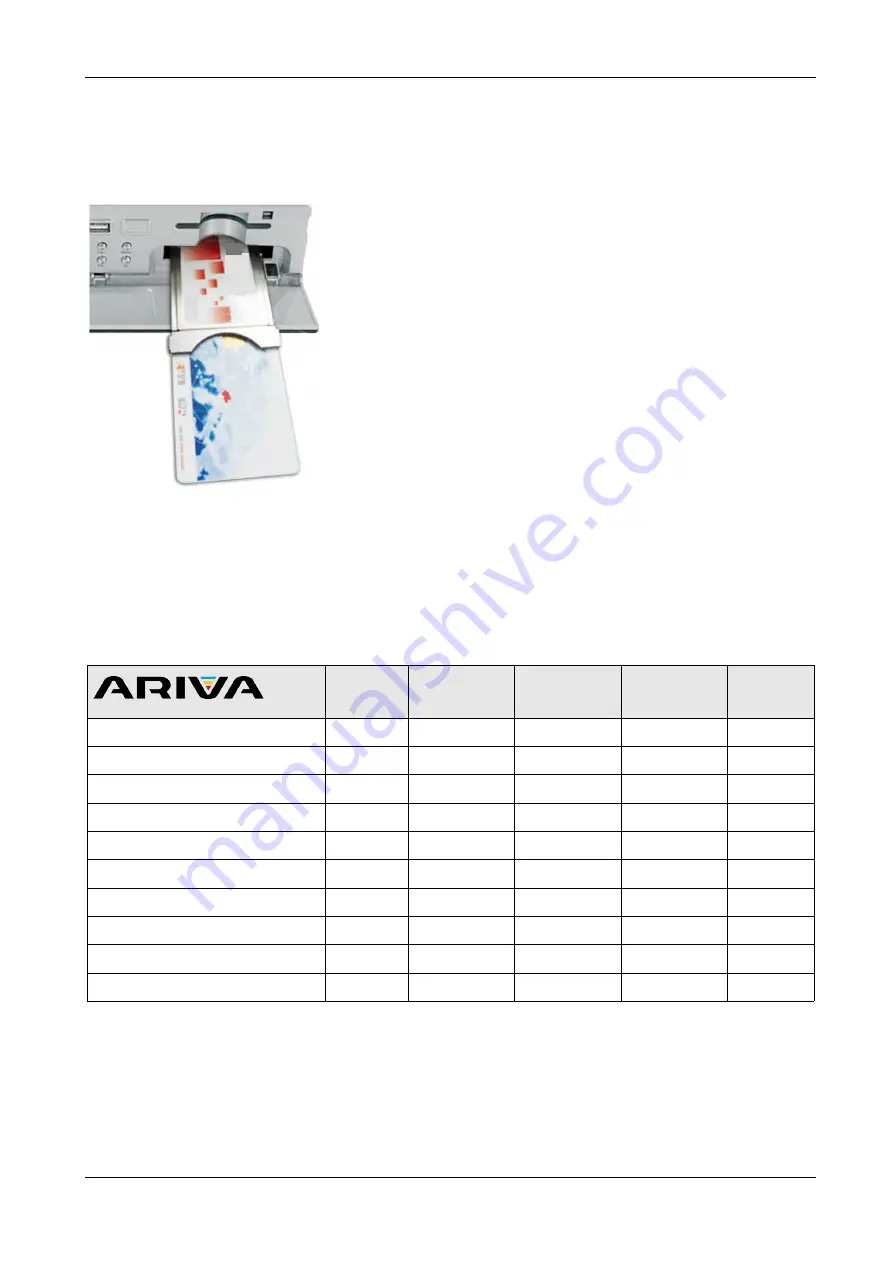
Inserting the module and subscriber's card
The conditional access module resembles a PC card (known as the PCMCIA) for laptop 

computers. There are different types of CI modules,  suitable for various encoding systems.

1. First,  turn off the receiver.
2. Insert the subscriber's card into the conditional access 
module. 
3. Open the tab on the front panel and insert the CI CAM 
module,  forcing it home into the socket on the right side of the 

front panel. If you want to remove the CAM module,  press the 
black button next to the CAM socket. 
4. After correctly inserting the module,  turn on the receiver. 
From now on you will be able to watch coded television channels

available through this module and card. 

Note:

 Check whether the subscriber's card has been correctly 

inserted into the module. Incorrect insertion of the card may 

cause damage to the conditional access module.

    Warning:

 Do not attempt to remove or insert the module 

and/or card when the receiver is turned on!!!

6. Rear panel

Depending on your receiver has inputs / outputs as shown below:

54

104

154Combo

204

254Combo

LNB IN

LNB-OUT

-

-

ANT IN

-

-

-

LOOP-OUT

-

-

-

HDMI

LAN

-

USB

2

2

2

2

2

SCART

-

SPDIF

RS232

-

-

8

Summary of Contents for Ariva 104

Page 1: ...User manual 54 104 154Combo 204 254Combo 255Combo English ...

Page 2: ...ic NTFS or FAT32 partition we recommend using the NTFS format will function properly If you do not have such a format prepare the disk on your computer before connecting it to the receiver 3 Highly fragmented or used memories may also not operate smoothly or correctly 4 External hard disk drives should be autonomously powered since the built in USB port is unable to provide sufficient power 5 Only...

Page 3: ...vases bottles aquariums and other water containers in order to avoid damage Do not touch the mains plug with your bare hands Do not place any objects on the housing of the device This may cause overheating and reception problems Before commencing maintenance or installation work disconnect the receiver from the mains Do not clean the receiver with alcohol or liquids containing ammonia If necessary...

Page 4: ...duct is covered by the European Directive 2002 96 EC Please inform yourself about the local separate collection system for electrical and electronic products Please act according to your local rules and do not dispose of your old products with your normal household waste Correct disposal of your old product helps to prevent potential negative consequences for the environment and human health RED H...

Page 5: ... functions are displayed on the screen and may be controlled by means of a small number of keys Common functions have been connected in one MENU The selected function is coloured Depending on the selected option various function keys are displayed red yellow green blue and white in the form of graphics and descriptions The colours represent various functions in individual Menus The selected functi...

Page 6: ...olution of 576i Allows the user to restore proper functioning of the receiver following the selection of a resolution not supported by the television F4 Returns to the previously displayed channel pvr Displays the USB menu if a USB memory device has been connected fav Displays a selection of favorite channel lists Used to change the volume level lower higher Switches to the next or previous channe...

Page 7: ...teries into the compartment observing the indicated polarity Do not mix old and new batteries or batteries of different types Replace the battery compartment cover Slide it upwards until it locks in place 5 Front panel illustrative photo 54 104 154Combo 204 254Combo POWER OK MENU BACK CA 1 1 1 1 CI 1 1 CA Socket for a subscriber s card always insert with the chip facing down 7 ...

Page 8: ...ou want to remove the CAM module press the black button next to the CAM socket 4 After correctly inserting the module turn on the receiver From now on you will be able to watch coded television channels available through this module and card Note Check whether the subscriber s card has been correctly inserted into the module Incorrect insertion of the card may cause damage to the conditional acces...

Page 9: ...to turn the bowl in such a way as to ensure that it is directed to various satellite positions The USALS function considerably simplifies configuration of the antenna The Ferguson receiver requires that you enter the geographical coordinates of the antenna in order to automatically calculate the angle of revolution of the motor for individual satellites The receiver activates the positioner automa...

Page 10: ... receiver model Not all of the connections are applicable for your receiver 9 1 Connection by means of an HDMI cable recommended 1 Connect the antenna to the LNB IN socket of the receiver 2 Connect the HDMI to the receiver out and the television in Connection by means of an HDMI cable allows you to obtain the highest image quality If you have an amplifier with an HDMI out and in which supports sou...

Page 11: ... that are equipped with an independent power supply The sole condition is that the hard disk has to have a single basic partition that is formatted in the NTSF recommended or FAT32 system 2 We recommend that you regularly archive data on your PC computer A large number of files with recordings may slow down cooperation with the receiver slow loading of the file list WiFi is supported only when plu...

Page 12: ...imultaneously NOTE LOOP OUT in all Combo receivers is the only signal loop through This is not a modulator so the receiver will not let go of the image decoding DVB T and USB in the form of an analog signal on this connector 9 5 Connection to the LAN local network In order to connect the receiver to a local network use an RJ45 cable We recommend that you restart the receiver whenever the network s...

Page 13: ...ions Some buttons on the remote control unit enable direct access to functions of the device Certain of these buttons have been described for example Guide MENU OK or coloured for ease of usage Other buttons are multi functional and their operation depends on the type of device selected by the user Hereunder we have presented a brief description of how to use certain device functions available thr...

Page 14: ...depending on your system Two options are available a fixed antenna a typical system with a single converter and an antenna with a positioner If you have a Combo model is also possible to change the settings on the other head It can work in terrestrial mode default or digital cable The possibility have only models 154Combo and 254Combo 11 2 Satellite list In this menu select the satellites that you...

Page 15: ...vate these two options simultaneously The correct setting of the antenna is indicated by bars presenting the strength and quality of the signal Both should indicate more than 80 for channel reception to be free of interference In order to check the strength and quality settings use the transponder option in order to alter the frequency and verify whether each V and H polarization is operative Conf...

Page 16: ...iver searches through only frequency by frequency in accordance with a list recorded for the selected satellite This list may be edited in a separate menu 3 FastScan receiver scans the channels of the selected provider bucket You can add channels to an existing list or replace an existing list Please note that the search result and working of this function depends solely on the provider 11 5 Multi...

Page 17: ...annel parameter i e the frequency on which it is broadcast This parameter may be obtained from the broadcaster on the internet in the press etc Next proceed to the list of transponders select a satellite and choose the desired frequency if it is not on the list use the function add green button on the remote control unit Now click OK for the selected frequency or the blue button on the remote cont...

Page 18: ...manually Choose the right depending on whether we know the channel or frequency with which it is assigned a channel search 11 9 Aerial Adjustment Combo models only In this menu set the detailed parameters of the terrestrial antenna By setting or fixing the antenna you should remember that the signal bars appear with a delay The correct setting of the antenna is indicated by bars presenting the str...

Page 19: ...standards Automatically search Cable TV In this menu you can search for channels automatically the receiver searches only frequency by frequency in accordance with the DVB C standard Frequency list can not be edited in a separate menu Manual search Cable TV There are two search options manually Choose the right depending on whether we know the channel if we know the frequency with which it is assi...

Page 20: ...llowing resolutions are available 480i 480p 576i 576p 720p 50Hz 720p 60Hz 1080i 50Hz 1080i 60Hz 1080p 50Hz 1080p 60Hz If you select an unsupported resolution your image will be lost or become illegible you can always use the F3 key to return to the basic resolution i e 576i If you are using a component cable connection then for the majority of television sets we recommend a resolution of 720p 50Hz...

Page 21: ... menu is used to set the time and date The receiver can automatically download the time and date from the satellite recommended or you may set the time and date manually If you are using GMT you should select the correct time shift value for example 1 hour for Poland and turn on or off the summer time depending on the time of year The manual editing of the time and date is effected by means of the...

Page 22: ...turned on the receiver will display them for channels that transmit such subtitles By default they are displayed in the language specified in the language selection menu for the subtitles Another option determines the time for which information bars will be displayed the default setting is 5 seconds In addition you can specify the transparency of the menu to suit your preference 12 7 Startup chann...

Page 23: ...nnels Clock In Standby enables or disables the clock on the front panel display in standby mode Note only if the clock in standby mode is off the receiver draws less than 1W of energy Radio Equalizer enables or disables the audio graphic equalizer display while listening to radio stations Auto Standby run this option will automatically turn off the receiver after 3 hours of inactivity 23 ...

Page 24: ...t settings of the receiver Note Restoration of default settings results in the removal of all user settings and the recall of a default channel list in some cases no channel list will be available All changes introduced by the user including the channel list and configuration of satellite antenna settings will be removed 13 3 Updating by RS232 This menu allows you to send software settings or chan...

Page 25: ...e the receiver The latest software is available on the manufacturer s website The downloaded file needs to be unpacked and recorded to an external USB memory device Next select it by means of the LEFT RIGHT buttons and press start in order to commence the update 13 6 Local network settings This menu serves to configure addresses and DNS servers These options concern the Ethernet port which enables...

Page 26: ...bout current connection parameters can be found on the manufacturer s website 13 8 Network DDNS Setting A popular application of dynamic DNS is to provide a residential user s Internet gateway that has a variable often changing IP address with a well known hostname resolvable through standard DNS queries 26 ...

Page 27: ...lity of these services depends on their suppliers The manufacturer is not responsible for any lack of access to additional functionality 15 PVR recording configuration 15 1 Storage info This menu displays basic information about the connected USB memory device An additional option allows you to format the memory device Press the yellow button in order to select the file system in which the device ...

Page 28: ... can also determine the type of recorded files All data are recorded in TS transport stream format or in an abbreviated version with only the default sound and video in PS program stream format We recommend using the TS format which records the audio soundtracks video subtitles and teletext The Jump option concerns the playback of recordings It defines the time of rapid movement by means of they f...

Page 29: ... is available through a menu option or directly by pressing the PVR button Music In this tab you can support a number of popular formats of music files such as MP3 FLAC or OGG There are a few additional functions that can be operated by means of the functional keys described in the lower part of the screen Photos In this tab you can view photographs in JPEG BMP format There are a few additional fu...

Page 30: ...4 up to 8 RF audio codec supported in containers MP3 AC3 C A U T I O N Playback of some files may fail or be incorrect Copy protected content is not playable Playback may suffer temporary interruptions image freeze faster slower playback etc when the audio language audio track is changed A damaged movie file may not be played correctly Videos with resolution higher than 1920x1080 25 30P or 1280x72...

Page 31: ...wing from a selected moment 3 Another method consists in moving by means of the keys Scrolling is effected by the number of minutes defined in the DVR configuration menu Keep in mind that this function is available only when the time of the recording exceeds the selected scroll time 4 Another option of quick scrolling a recording is based on usage of the numerical keys This results in scrolling in...

Page 32: ... a small window Press the yellow button in order to turn on the channel movement function and then once again press OK on the selected channel you can select multiple channels A symbol comprising two arrows will appear next to the channel name Press Yellow button and use the up down arrows move the cursor to the desired position Press OK to confirm the move Next press the yellow button again in or...

Page 33: ...eleted How do I add to the group of favourites Proceed to the editing of channel lists Select a channel and press OK in order to see a preview in a small window Press the FAV button in order to switch on the add to favourite groups function A window will appear with a list of favourite groups names of favourite groups are changed in a separate menu Use the up down arrows to select the group to whi...

Page 34: ...witch on the channel name change function Use the numerical keyboard in order to change the channel name Confirm the new name by pressing the yellow button Next press the green button again to switch off the channel name change function In this way you can change the name of one or more channels Once you are finished press BACK A message will appear asking you to confirm the changes made If you fa...

Page 35: ...te all This option allows you to remove all channels from the channel list Note This operation cannot be reversed Make sure that you are certain that you want to remove all of the channels Having selected this option you should wait a while for all of the options available for the channel list to be highlighted as unavailable 16 4 Favorite The receiver allows you to define up to 32 different group...

Page 36: ...se the timer function green button to automatically plan the viewing or recording of a given programme Select the desired programme and press info in order to view detailed information about the programme Keep in mind that the availability of the said information depends on what a given television station is broadcasting 17 2 FIND The FIND button calls up the quick channel search function Enter su...

Page 37: ...aterial was recorded in TS format Audio soundtracks other than those recorded by default will be available during playback only if they are not scrambled or scrambled in the same way as the default recorded soundtrack Option level can adjust the volume of the channel This option works independently for each channel 17 5 SUBTITLE The yellow button displays a window with available on screen captions...

Page 38: ...sor by means of the LEFT RIGHT buttons and confirm with OK in order to start viewing from a selected moment 4 Another method consists in moving by means of the keys Scrolling is effected by the number of minutes defined in the DVR configuration menu Keep in mind that this function is available only when the time of the recording exceeds the selected scroll time 5 Another option of quick scrolling ...

Page 39: ...reviously broadcast programme Keep in mind that during buffer playback the information bar may be hidden by means of the BACK button In order to restore the bar press PAUSE PLAY again Scrolling the contents of the time shift buffer playback of an earlier television broadcast 1 Switch on the time shift mode by pressing PAUSE 2 The contents of the time shift buffer can now be scrolled through 3 Use ...

Page 40: ...s used to temporarily pause the image i e freeze frame 17 8 INFO Pressing the INFO button will call up the information bar for the current channel This contains information about the current and next programmes if such information is made available by the broadcaster If you press it twice the receiver will display detailed information about the current and next programme provided that such informa...

Page 41: ...y transponder All of these channels comprise a single data stream which is transmitted on one frequency following modulation Monoblock a device that comprises two converters and a DiSEqC switch in a single housing which receives signals from two satellites on similar orbits Pay TV Pay per view digital television to which only subscribers have access The service is provided by satellite cable over ...

Page 42: ...S Demod standard DVB S DVB S2 DVB S DVB S2 DVB T T2 C DVBS Demodulation QPSK 8PSK 16APSK 32APSK DVBS Symbol Rate 2 90MSPS Code Rate 1 2 4 TS Demux Demultiplexer MPEG2 ISO IEC 13818 1 Input Bit Rate Max 100Mbit s 5 Video Decode Video Decode H 264 MPEG4 part 10 main and high profile level 4 1 MPEG 2 MP HL MPEG 2 ISO IEC 13818 2 MP ML H 265 HEVC MPEG4 part 10 main and high profile level 4 1 MPEG 2 MP...

Reviews: