


10
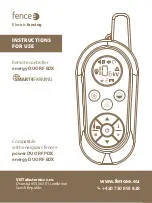
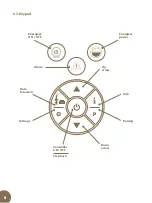
7. CONTROL
7.1. Pairing
The energizer is controlled from the main screen.
Use the
UP
and
DOWN
arrows
to select the desired energizer.
When the
Energizer ON / OFF
or
Energizer Power
button is pressed
the controller
immediately sends the command to the energizer.
Pulse voltage, or battery voltage can be monitored on the display.
To switch battery or pulse information, press the
Data Selection
button.
To connect the energizer to the controller, it is necessary to perform “pairing “.
•
Turn on the energizer, and then turn it off with one short press of the button. Then press the
button for longer time (> 5 seconds) until the status LED starts flashing fast. Now the energizer
is in pairing mode.
•
Press the pairing button
on the controller for a longer time.
The letter
P
appears on the display. Now the controller is in pairing mode.
•
Use the
UP
and
DOWN
arrows
to select the desired position number on which
you want to pair.
•
Move the controller close to the energizer (up to 20 cm) and press the
Pairing
button
.
•
If everything went well, the controller is now paired with the energizer. The controller switches
back to the main screen and the energizer switches back to the OFF RF state.
•
If the pairing process did not go through, perform it again.
•
If you want to delete a position on the controller, perform pairing without an energizer.
•
If the controller does not find any energizer, it deletes the paired position.
•
If you want to exit the pairing mode, press the red button
ON.
•
It is possible to pair up to
6 energizers
to one controller — you can control 6 energizers
with one controller.
•
It is possible to pair up to
3 controllers
to one energizer — you can control one energizer
with 3 controllers.


