

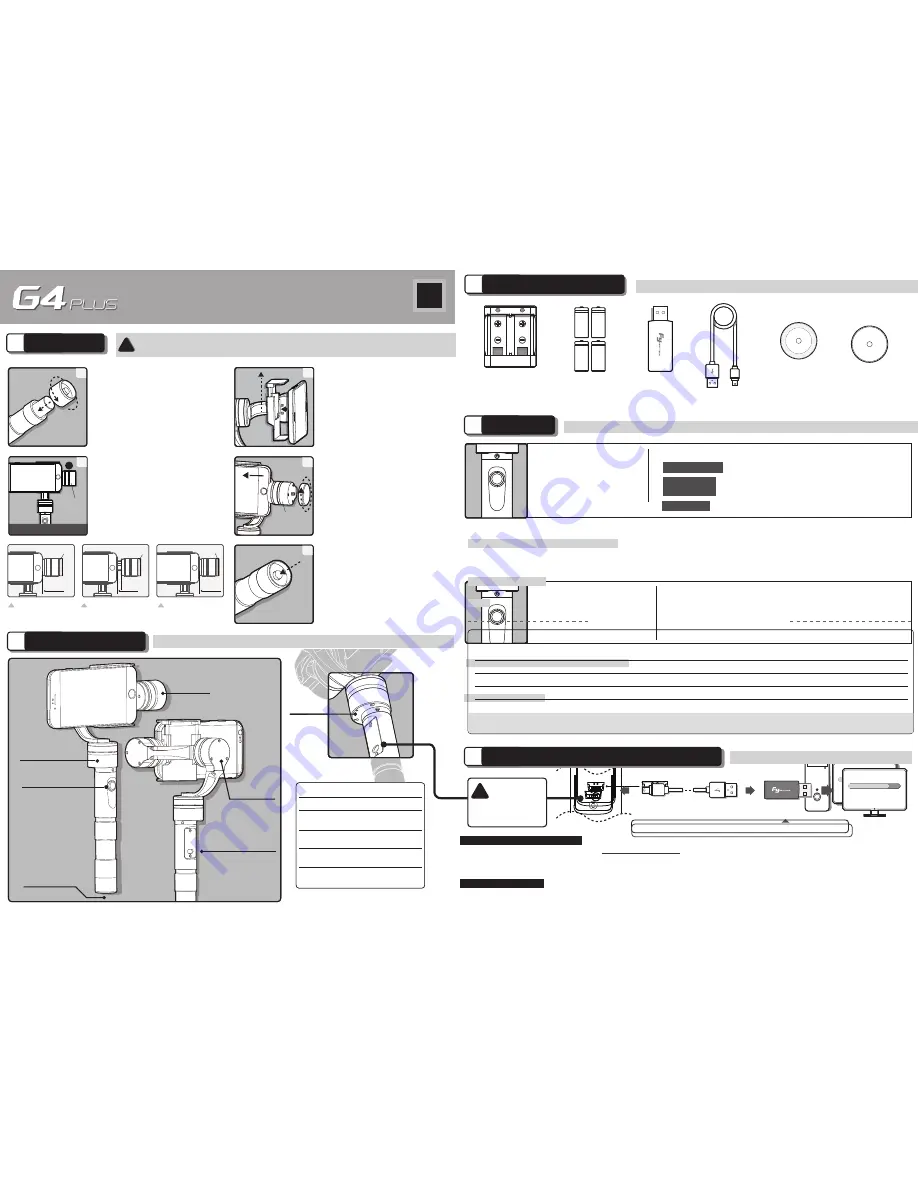
Remove the power
switch cap, insert two
batteries into the handle.
Insert The Batteries
Install the Smart phone
by the quick-release
adapter. And make
sure it is fixed well.
Install The smartphone
Indicator
Pitch Axis
Heading Axis
Function Interface
Power Switch
Roll Axis
Function Button
Use for switching working modes.
Function Button
Identify the working mode via
switch to different status of the
indicator light.
Heading Follow Mode:Camera Pitch and Roll Angles
remain constant, heading follows the handheld position.
Heading And Pitch Follow Mode:Camera Roll Angle remains
constant. Heading and Pitch follow the handheld position.
Working Mode Instructions
1.
2.
Upgrade........
Please visit the official website of Feiyu Tech: www.feiyu-tech.com to download the USB driver, firmware upgrade software and the latest
firmware then unzip the RAR file.Remove the batteries and refer to the connection diagram to connect the gimbal with the computer.
Please refer to the manual of update operation to upgrading,otherwise the Gimbal will be abnormal.
The Gimbal attitude can be calibrate through parameter setting software. User can adjust the pitch and roll in a small angle to achieve more
accuracy filming scene. Please insert the batteries then refer to the connection diagram to connect the gimbal with the computer for caliration.
Firmware Upgrade Instruction
Gimbal Calibration
PC
Function
Interface
USB Cable
USB Connector
Attention : Please be sure to connect the computer with the USB connector.
Attention : Please be sure to connect the computer with the USB connector.
Attention: Be sure to connect the computer with the USB connector
Special Working Condition (Inversion Mode)
Hand Pulling Locking
The pitching can be adjust by hand pulling after start the gimbal 8 seconds. During the Heading Follow Mode
pulling the pitching to the desired angle and stay 0.5 second it will lock in the current angle.
When the red LED indicator light flashes
in use, it means the gimbal is out-of-order
Indicator Explanation
LED Status
Explain
Blue light flashes
three times
Full Power
Blue light flashes
twice
Enough Power
Blue light flashes
once
Low Power
Blue light keeps
flashing
No Power
Function Button Operation Instructions
Remove the power
switch cap, insert two
batteries into the handle.
Insert The Batteries
Install the Smart phone
by the quick-release
adapter. And make
sure it is fixed well.
Install The smartphone
Indicator
Tilting Axis
Panning Axis
Power Switch
Rolling Axis
Function Button
Use for switching working modes.
Function Button
Identify the working mode
via switch to different status
of the indicator light.
Upgrade........
Please visit the official website of Feiyu Tech: www.feiyu-tech.com to download the USB driver, firmware upgrade software and the latest
firmware then unzip the RAR file.Remove the batteries and refer to the connection diagram to connect the gimbal with the computer.
Please refer to the manual of update operation to upgrading,otherwise the Gimbal will be abnormal.
The Gimbal attitude can be calibrate through parameter setting software. User can adjust the pitch and roll in a small angle to achieve more
accuracy filming scene. Please insert the batteries then refer to the connection diagram to connect the gimbal with the computer for caliration.
Firmware Upgrade Instruction
Gimbal Calibration
PC
Function Interface
USB Cable
USB Connector
Attention : Please be sure to connect the computer with the USB connector.
Attention : Please be sure to connect the computer with the USB connector.
Attention:
Be sure to connect the computer with the USB connector
When the red LED indicator light flashes
in use, it means the gimbal is out-of-order
Indicator Explanation
LED Status
Explain
Blue light flashes
three times
Full Power
Blue light flashes
twice
Enough Power
Blue light flashes
once
Low Power
Blue light keeps
flashing
No Power
2
Product Overview
Operating
4
3
Optional Accessories
Charger
Rechargeable
Battery
Input: DC 5V
Output: DC 4.2V
Type: 18350
Weight: 6 g
Weight: 52 g
USB Connector
Heavy
Counter Weight
Light
Counter Weight
Use Heavy Counter Weight
Use Light Counter Weight
Use Light Counter Weight
Version 1.0
EN
G4 Plus 3-Axis Handheld Gimbal For Smartphone
5
Firmware Upgrade And Other Settings
Please
Remove The
Batteries Before
Upgrading
!
1
User Guide
(1) Please install the suitable smartphone first before power on the gimbal.
(2) Please turn off the power when not in use.
Attention !
!
G4 Plus compatible with iPhone 6s Plus/ 6s / 6 Plus / 6 / 5s / 5c / 5 / 4s /4
and other smartphones with similar dimensions
Adjust the Center of Gravity
If the smart phone inclines towards
the tilting axis, pull it towards the left
to be in place, and let the center of
gravity keep balance or slightly incline
to the smart phone. If the smart phone
still inclines towards the pitch axis,
install the clump weight.
R
Standard Installation Method
Tilting
Axis
3
2
1
Power On/Off
Check whether the phone is installed
well, and long press the function
button for two seconds to turn on
the gimbal. Long press the function
button for three seconds to turn off
the gimbal.
Choose The Suitable Counter Weight
If the smartphone still leans to the
tilting axis direction, after adjust
the center of gravity, please replace
the counter weight cover with the
counter weight module. Please refer
to the left showing photo. Try to keep
the center of gravity balance after
mounting the counter weight module.
Tilting
Axis
4
5
Function Interface
USB Cable
Basic Working Modes
Panning Mode
The smart phone is allowed to pan left or right.
Vertical tilts or rolls are restricted.
Panning and
Tilting Mode
The smart phone is allowed to pan left or right
and tilt up and down. Rolls are restricted.
Other Functions
Special Working Condition
(
Inversion Mode
)
Under any working mode, consecutively press the function button for three times, the gimbal
enters into the inversion mode and automatically switches to the Panning mode. Invert the gimbal, put the camera face down, and combine with
the three working modes of handheld gimbal to capture the wonderful moments. The gimbal can restore to the boot-up state by consecutively
pressing the function button for three times under inversion mode.
Manual Pulling Locking
After the gimbal has been powered on for eight seconds, the tilt angle can be adjusted manually in the panning
mode and lock mode. Adjust the tilt angle to the desired position and wait for 0.5 second until the gimbal registers the new angle.
Reset
Consecutively press the function button for four times to restore to the boot-up state.
The smart phone stays in its current orientation.
All panning, tilting and rolls are restricted.
Lock Mode
LED Status
Double tap
Single tap
Single Flashes /
On Constantly
Double Flashes
Function
Panning Mode /
Lock Mode*
Panning and Tilting Mode
Triple tap
Single Flashes
Inversion Mode
Quadruple tap
Single Flashes
【 Lock Mode 】
Under any working mode, single tap the function button, the indicator LED is always on, the Gimbal can be
enter the 【
Lock Mode 】
. During the LOCK MODE other operation is arbitrary.
Operation
Single Flashes
Standby
Long Press For 3 Second
Can switch in other mode, or trip again to exit and reset
Under panning and tilting mode, single tap to switch to lock mode
Single tap to switch between panning mode and lock mode.
Single tap again to activate
Reset the tilting axis of the gimbal to initial orientation and initial mode
Reset
Remark
*
9 mm
iPhone 5
iPhone 4
0 mm
iPhone 6
iPhone 6s
0 mm
iPhone 6 Plus
Light
Light
Heavy
iPhone 6s / 6 Installation
iPhone 5s / 5C / 5 / 4s / 4
Installation
iPhone 6s Plus / 6 Plus
Installation
*
*
*
*
*
*


