

5
WARNING
Make sure that the
connection to the
computer is done by the
!
PC
!
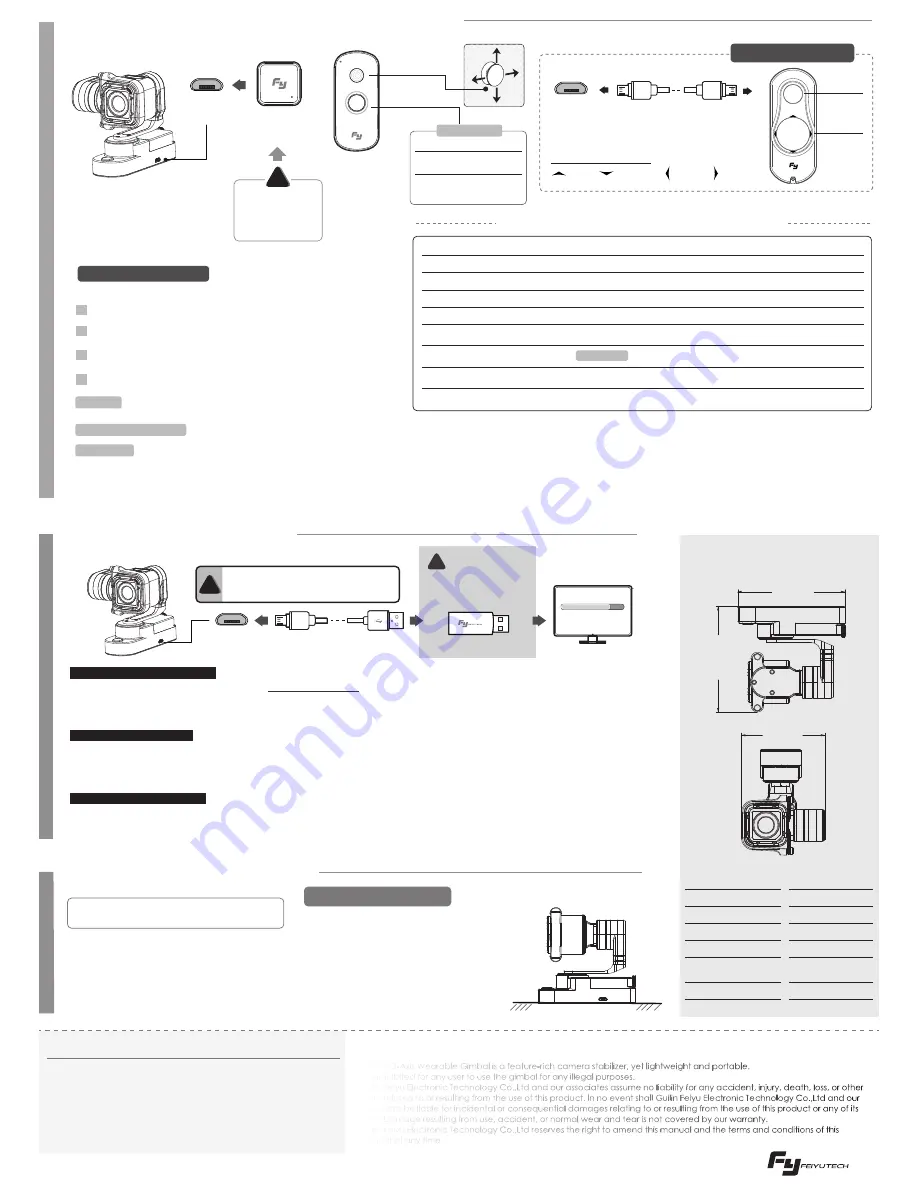
Initialization Instructions
FY WGS needs to be initialized whenever the
following situations are observed after power on
UP
LEFT
RIGHT
DOWN
Turn Off The Gimbal
6
Firmware Upgrade
8
Initialize The Gimbal
FY Remote Control (Optional Item)
Motionless Flat Surface
185.5g (Without
Batteries & Camera)
3°/S ~ 150°/S
Usage Time
3 ~ 4 Hours
2°/S ~ 75°/S
320°
320°
100°
Parameters
Upgrade........
Mode #3 Lock Mode
USB Cable
Function
Interface
USB Data Cable for RC
Function
Button
Direction
Button
Function
Interface
Function
Interface
Operation
Explanation
Remark
Tap Button
Seven Times
Double Tap
Single Tap
Mode #1 Panning Mode
Mode #2 Panning and Tilting Mode
Triple Tap
Triple tap again
Inversion Mode
,exit inversion mode into original status
Quadruple Tap
Reset
Long Press
For 1 Second
Long Press
For 3 Second
Direction Button
The function button on the Gimbal will be disabled after connect the Remote Control
Please visit the official website of Feiyu Tech: www.feiyu-tech.com to download the USB driver, firmware upgrade software and the latest
firmware. Unzip the compressed file locally to your computer. Refer to the connection diagram on how to connect the gimbal with the computer.
Please follow the instructions inside the firmware upgrade package carefully, or there will be a risk of rendering the gimbal inoperable.
The tilt and level settings can be calibrated through the use of the configuration software. User can adjust the tilt and diagonal rotation in small
intervals to better adapt to his/her filming scene. Before any calibration, please insert the batteries into the gimbal and refer to the connection
diagram to connect the gimbal with the computer.
The panning speed can be adjusted through the use of the configuration software. User can adjust to the desired panning speed to better
adapt to his/her filming scene. There are three settings available: “SLOW”, “NORMAL” and “FAST”. Default setting is “FAST”.
Firmware Upgrade Instruction
Tilt and Level Calibration
Panning Speed Adjustment
Be sure to insert the
batteries before upgrading
USB Connector
Attention : Please make sure that the connection to the computer is done by the USB connector.
Attention : Please make sure that the connection to the computer is done by the USB connector.
Attention : Please make sure that the connection to the computer is done by the USB connector.
FY WGS 3-Axis Wearable Gimbal is a feature-rich camera stabilizer, yet lightweight and portable.
It is prohibited for any user to use the gimbal for any illegal purposes.
Guilin Feiyu Electronic Technology Co.,Ltd and our associates assume no liability for any accident, injury, death, loss, or other
claim related to or resulting from the use of this product. In no event shall Guilin Feiyu Electronic Technology Co.,Ltd and our
associates be liable for incidental or consequential damages relating to or resulting from the use of this product or any of its
parts. Damage resulting from use, accident, or normal wear and tear is not covered by our warranty.
Guilin Feiyu Electronic Technology Co.,Ltd reserves the right to amend this manual and the terms and conditions of this
product at any time.
D I S C L A I M E R
AT T E N T I O N
1. Ensure gimbal is fully assembled and camera
is installed properly.
2. Place the gimbal on a flat surface and keep it
stationary.
3. Power on the Gimbal.
4. Wait for the gimbal to finish its initialization
before resuming the use of the gimbal.
1. The tilt angle is not leveled with the horizontal
surface.
2. The roll angle is not parallel to the horizontal
surface.
3. When the gimbal is stationary, the camera
does not stay stationary.
When initialization is completed,
the LED light will quickly flash.
Note:
Vertical Tilting Angle
Rolls Angle
Horizontal Panning Angle
Tilting Increments
Panning Increments
Weight
73.4mm
94.4mm
93.0mm
Steps to connect wireless remote control:
Tap the function button for seven times,match code complete. You can control the gimbal with wireless remote control in normal after finish match code.
▲ RC needs to be match code whenever the following situations:
(1)Connecting properly but still control in fail. (2)Change the receiver or wireless remote control.
Match Code
Install the receiver for wireless remote control: Insert the receiver for
wireless remote control into the function port of gimbal .
Open the wireless remote control.
Open the gimbal: Long press the function button on gimbal for two
seconds to turn on the gimbal.
1
2
3
Use the wireless remote control to control the gimbal.
4
15 meters in an open environment.
Connect the Micro interface of wireless remote control with
5V charger by USB cable.
Charging
Remote Control Distance
Wireless
remote control
Receiver
for wireless
remote control
Joystick
Wireless Remote Control
Power
OFF
ON
Function
Button
Operation
Long press for
0.5 second
Long press for
3 second
after single tap
Power on / off
Please install
the receiver
properly before
power on
!
Tip:The Remote Control will be
automatically powered off to
save battery if there is no operation
within three minutes.
▲ Please assemble the gimbal in accordance to the diagram provided.
▲ Please upgrade the firmware and configuration settings with the
provided USB data cable and USB cannector.
▲ Please charge the battery with the provided battery charger.
▲ Please install the camera securely before powering on the gimbal.
Remote Control Operation Instructions
Note:
Wired remote control
Calibration Using Remote Control
Single tap ,exit calibration and enter standby. Wake the
gimbal by pressing the function button once again
Tap Button
Six Times
Match Code Mode
Match code when connecting properly but still control
in fail or change the receiver/wireless remote control.
Wireless RC
Tip:Please complete the match code within 5 seconds after powering the gimbal on.
With the remote control, you can switch the gimbal mode or adjust the angle from a distance.


