48
fr
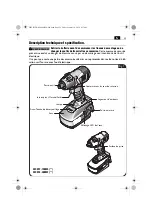
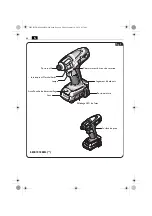
Montage de l’outil de travail (figure 9).ASCD12-150W8 (**)ASCD18-300W2 (**)ASCD18-1000W34 (**)
Montez l’embout complètement sur le carré d’entraînement.
Fig. 9
OBJ_BUCH-0000000394-001.book Page 48 Friday, January 10, 2020 9:27 AM
Page 1: ...EIN Power Tools Inc 2735 Hickory Grove Road Davenport IA 52804 Phone 800 441 9878 magdrillrepair feinus com ASCD12 100W4 7 115 ASCD12 150W4 7 115 ASCD12 150W8 7 115 ASCD18 200W4 7 115 ASCD18 300W2 7 1...
Page 2: ...2 Instruction Manual Mode d emploi Instrucciones de uso en 3 fr 29 es 56 OBJ_BUCH 0000000394 001 book Page 2 Friday January 10 2020 9 27 AM...
Page 3: ...ns can cause you to lose control 2 Electrical safety a Power tool plugs must match the outlet Never modify the plug in any way Do not use any adapter plugs with earthed grounded power tools Unmodified...
Page 4: ...source and or remove the battery pack if detachable from the power tool before making any adjustments chang ing accessories or storing power tools Such preventive safety measures reduce the risk of st...
Page 5: ...re will also make exposed metal parts of the power tool live and shock the operator Beware of any concealed electric cables gas or water conduits Check the working area before commencing work e g with...
Page 6: ...d can escape in case of dam age and improper use of the battery The vapours can irritate the respiratory system Liquid ejected from the battery may cause skin irritations or burns When battery fluid f...
Page 7: ...eel dust metal dust and non ferrous metal dust To minimize the unwanted intake of these materials Use dust extraction matched appropriately for the developing dust Use personal protective equipment su...
Page 8: ...f the level of exposure to vibration should also take into account the times when the tool is switched off or when it is running but not actually doing the job This may significantly reduce the vibrat...
Page 9: ...42 3 16 1 52 8 12 9 42 3 Measuring uncer tainty K in m s2 ft s2 1 5 4 9 1 5 4 9 1 5 4 9 1 5 4 9 1 5 4 9 1 5 4 9 REMARK The sum of the measured emission value and respective measuring inaccuracy repres...
Page 10: ...he battery against heat e g against continuous intense sunlight Observe the notes in the text aside Switching on Switching off This symbol confirms the certification of this product for the USA and Ca...
Page 11: ...oltage classes may contain numbers and letters Partially in delivery scope Ax Zx Marking for internal purposes Symbol character Explanation Character Unit of measurement national Explanation n0 rpm mi...
Page 12: ...idental starting of the power tool Not all accessories described or shown in this instruction manual will be included with your power tool WARNING Gripping surface Battery LED indication on battery Ro...
Page 13: ...Gripping surface Battery LED indication on battery Rotational direction switch Battery Unlocking button Light Tool holder On Off switch Belt hook Bit garage OBJ_BUCH 0000000394 001 book Page 13 Friday...
Page 14: ...200W4 Gripping surface Battery LED indication on battery Rotational direction switch Battery Unlocking button Light Tool holder On Off switch Belt hook Bit garage OBJ_BUCH 0000000394 001 book Page 14...
Page 15: ...ED indication on battery Rotational direction switch Battery Unlocking button Light Tool holder On Off switch ASCD18 1000W34 Fig 4 Gripping surface OBJ_BUCH 0000000394 001 book Page 15 Friday January...
Page 16: ...100 ft lbs 135 Nm 155 ft lbs 210 Nm 214 ft lbs 290 Nm 780 ft lbs 1050 Nm Hexagon socket tool holder External square tool holder 1 4 1 4 3 8 1 4 1 2 3 4 Weight according to EPTA Procedure 01 power tool...
Page 17: ...irst time Release the battery by pressing the battery unlocking button and pull the battery out of the handle Do not exert any force when doing this Connect the battery charger to a socket out let sli...
Page 18: ...ion The real percentage of the battery charge condition is only indicated when the power tool motor is stopped The electronics automatically switch off the motor prior to the battery being deep dis ch...
Page 19: ...n both with the screw To mount the bit garage fit the spacer as well as the bit garage to the tool and fasten both with the screw To mount the belt hook together with the bit garage fit the spacer the...
Page 20: ...measure rules out the danger of injuries through accidental starting of the power tool Mounting application tools figure 8 ASCD12 100W4 ASCD12 150W4 ASCD18 200W4 Slide the sleeve frontwards Afterward...
Page 21: ...en Mounting application tools figure 9 ASCD12 150W8 ASCD18 300W2 ASCD18 1000W34 Mount the socket completely on the square drive Fig 9 OBJ_DOKU 0000010782 001 fm Page 21 Friday January 10 2020 10 03 A...
Page 22: ...tion tool released and intended for the respective application Setting the torque figure 10 ASCD12 150W4 ASCD12 150W8 ASCD18 200W4 ASCD18 300W2 ASCD18 100034W Adjust the torque only when the machine i...
Page 23: ...tool changing In case of overload the machine switches off Thermal overload of the power tool is indi cated through flashing of the LED in the han dle Apply the power tool to the nut or screw only whe...
Page 24: ...ity The radiation produced by the lamp can be harmful for the eye When pressing the On Off switch the light is switched on After releasing the On Off switch the light briefly stays on and then switche...
Page 25: ...n are shown in the diagram Recommendation for adjustment of the impact wrench ASCD18 1000W34 When using a 3 4 in to 1 2 in drive adapter operate the drive impact wrench maximal at level 3 600 Nm ASCD1...
Page 26: ...rior of the power tool Therefore regularly blow out the interior of the power tool from outside via the ventilation openings with dry oil free compressed air always wear eye protection when doing this...
Page 27: ...ped consulting an expert for hazardous material is required Dispatch batteries only when the housing is undamaged and no liquid is escaping from the bat tery Make sure that the battery contacts are no...
Page 28: ...Provided accessories figure 16 ASCD 18 Fig 16 ASCD18 200W4 ASCD18 300W2 Battery Battery charger Spacer Belt hook Bit garage Screw Battery OBJ_BUCH 0000000394 001 book Page 28 Friday January 10 2020 9...
Page 29: ...ir la zone de travail propre et bien clair e Les zones en d sordre ou sombres sont propices aux accidents b Ne pas faire fonctionner les outils lec triques en atmosph re explosive par exemple en pr se...
Page 30: ...eveux longs peuvent tre pris dans des parties en mouvement g Si des dispositifs sont fournis pour le raccordement d quipements pour l extraction et la r cup ration des pous si res s assurer qu ils son...
Page 31: ...exion d une borne une autre Le court circuitage des bornes d une batte rie entre elles peut causer des br lures ou un feu d Dans de mauvaises conditions du liquide peut tre ject de la batterie viter t...
Page 32: ...ne protection contre une lectrocution Utiliser des autocollants N utilisez pas des accessoires qui n ont pas t sp cialement con us ou autoris s par le fabricant de l outil lectrique Le seul fait qu un...
Page 33: ...trique est l arr t Ne retirez la batterie que lorsque l outil lec trique est l arr t Maintenez les batteries hors de la port e des enfants Tenez toujours la batterie propre et prot gez la de l humidi...
Page 34: ...minimiser la r sorption ind sirable de ces mat riaux Utiliser une aspiration adapt e la poussi re g n r e Utiliser des quipements personnels de protection tels que par exemple un mas que anti poussi...
Page 35: ...estimation pr cise de la sollicitation vibratoire il est recommand de prendre aussi en consid ration les espaces de temps pendant lesquels l appareil est teint ou en marche mais pas vraiment utilis Ce...
Page 36: ...1 29 8 12 9 42 3 16 1 52 8 12 9 42 3 Incertitude K en m s2 ft s2 1 5 4 9 1 5 4 9 1 5 4 9 1 5 4 9 1 5 4 9 1 5 4 9 REMARQUE La somme de la valeur d mission mesur e et de l incertitude constitue la limit...
Page 37: ...osition directe au soleil Suivre les indications donn es dans le texte ci contre Mise en marche Arr t Ce symbole confirme la certification de ce produit aux tats Unis et au Canada Confirme la conformi...
Page 38: ...es ou des lettres partiellement fourni avec Ax Zx Marquage interne Symbole signe Explication Signe Unit nationale Explication n0 rpm min min 1 r min Vitesse vide pour batterie compl tement charg e P W...
Page 39: ...de l outil lectrique Il se peut que seule une partie des accessoires d crits ou repr sent s dans cette notice d utili sation soit fournie avec l outil lectrique AVERTISSEMENT Surface de prise Accu Af...
Page 40: ...se Accu Affichage LED de l accu Commutateur du sens de rotation Accu Touche de d verrouillage Lampe Porte outil Interrupteur Marche Arr t Porte ceinture Logement d embouts OBJ_BUCH 0000000394 001 book...
Page 41: ...de prise Accu Affichage LED de l accu Commutateur du sens de rotation Accu Touche de d verrouillage Lampe Porte outil Interrupteur Marche Arr t Porte ceinture Logement d embouts OBJ_BUCH 0000000394 00...
Page 42: ...D de l accu Commutateur du sens de rotation Accu Touche de d verrouillage Lampe Porte outil Interrupteur Marche Arr t ASCD18 1000W34 Fig 4 Surface de prise OBJ_BUCH 0000000394 001 book Page 42 Friday...
Page 43: ...t lbs 135 Nm 155 ft lbs 210 Nm 214 ft lbs 290 Nm 780 ft lbs 1050 Nm Porte outil six pans creux Porte outil carr m le 1 4 1 4 3 8 1 4 1 2 3 4 Poids suivant EPTA Procedure 01 Outil lectrique sans batter...
Page 44: ...r gez l accumulateur compl tement D verrouillez l accumulateur en appuyant sur la touche de d verrouillage et retirez le de la poign e Ne forcez pas Branchez le chargeur sur la prise de courant enfonc...
Page 45: ...de charge actuel en pourcentage de la batterie n est indiqu que lorsque le moteur de l outil lectroportatif est l arr t L lectronique stoppe automatiquement le moteur pour viter toute d charge avanc e...
Page 46: ...Pour monter le logement d embouts posi tionner la pi ce d cartement ainsi que le logement d embouts et les fixez l aide de la vis Pour monter le porte ceinture avec le loge ment d embouts positionner...
Page 47: ...de s curit pr ventive exclut un danger de blessure caus par un d marrage non intentionn de l outil lectrique Montage de l outil de travail figure 8 ASCD12 100W4 ASCD12 150W4 ASCD18 200W4 Tirez la doui...
Page 48: ...ntage de l outil de travail figure 9 ASCD12 150W8 ASCD18 300W2 ASCD18 1000W34 Montez l embout compl tement sur le carr d entra nement Fig 9 OBJ_BUCH 0000000394 001 book Page 48 Friday January 10 2020...
Page 49: ...tils de travail FEIN con us et autoris s pour l utilisation correspondante R glage du couple figure 10 ASCD12 150W4 ASCD12 150W8 ASCD18 200W4 ASCD18 300W2 ASCD18 100034W Ne changez le couple qu l arr...
Page 50: ...outil lectrique s arr te Une surcharge thermique de l outil lectrique est indiqu e par un clignotement de la LED dans la poign e Posez l outil lectrique sur la vis sur l crou seulement lorsque l appa...
Page 51: ...ayons g n r s par la lampe peuvent tre dangereux pour les yeux Appuyer sur l interrupteur Marche Arr t allume la lampe Si l on rel che l interrupteur Marche Arr t la lampe reste allum e pendant une co...
Page 52: ...dans le diagramme Recommandation pour le r glage de la vis seuse percussion ASCD18 1000W34 Si vous utilisez un adaptateur 3 4 in 1 2 in faites fonctionner la visseuse percussion maximum en position 3...
Page 53: ...ieur de l outil lectrique Soufflez alors r guli rement de l ext rieur de l air comprim sec exempt d huile dans l int rieur de l outil lectrique travers les ou es de ventilation utilisez toujours une p...
Page 54: ...de faire appel un expert en transport des mati res dangereuses N exp diez les batteries que si le carter ne pr sente pas de dommages et aucun liquide ne s coule Veillez ce que les contacts de la batte...
Page 55: ...res fournis figure 16 ASCD 18 Fig 16 Accu Accu ASCD18 200W4 ASCD18 300W2 Chargeur d accus Pi ce d cartement Porte ceinture Logement d embouts Vis OBJ_BUCH 0000000394 001 book Page 55 Friday January 10...
Page 56: ...eden provocar accidentes b No utilice la herramienta el ctrica en un entorno con peligro de explosi n en el que se encuentren combustibles l qui dos gases o material en polvo Las herramientas el ctric...
Page 57: ...r controlar mejor la herramienta el ctrica en caso de presentarse una situaci n inesperada f Lleve puesta una vestimenta de trabajo adecuada No utilice vestimenta amplia ni joyas Mantenga su pelo y ve...
Page 58: ...rovocar da os e incluso un incendio c Si no utiliza el acumulador gu rdelo separado de clips monedas llaves cla vos tornillos o dem s objetos met licos que pudieran puentear sus contactos El cortocirc...
Page 59: ...as No use accesorios que no hayan sido espe cialmente desarrollados u homologados por el fabricante de la herramienta el ctrica El mero hecho de que sea montable un acceso rio en su herramienta el ctr...
Page 60: ...nta el ctrica Solamente desmonte el acumulador estando desconectada la herramienta el ctrica Mantenga los acumuladores fuera del alcance de los ni os Mantenga limpio el acumulador y prot jalo de la hu...
Page 61: ...exposici n a estos materiales sea m nima Utilice un equipo de aspiraci n apropiado para el polvo producido Use equipos de protecci n personal como por ejemplo una mascarilla guardapolvo con un filtro...
Page 62: ...por vibraciones durante el tiempo total de trabajo Para determinar con exactitud la solicitaci n experimentada por las vibraciones es necesa rio considerar tambi n aquellos tiempos en los que el apar...
Page 63: ...1 8 9 1 29 8 12 9 42 3 16 1 52 8 12 9 42 3 Inseguridad K en m s2 ft s2 1 5 4 9 1 5 4 9 1 5 4 9 1 5 4 9 1 5 4 9 1 5 4 9 OBSERVACI N la suma de los valores emitidos medidos considerando la inseguridad r...
Page 64: ...del calor p ej de una exposici n prolongada al sol Seguir las instrucciones indicadas al margen Conexi n Desconexi n Este s mbolo confirma que este producto ha sido certificado en USA y Canad Atestigu...
Page 65: ...ipamiento suministrado en parte Ax Zx Identificaci n para fines internos S mbolo Definici n S mbolo Unidad nacional Definici n n0 rpm min min 1 r min Velocidad en vac o con bater a plenamente cargada...
Page 66: ...erie suministrado con su herramienta el ctrica puede que no corresponda en su totalidad al material descrito o mostrado en estas instrucciones de servicio ADVERTENCIA rea de agarre Bater a Indicador d...
Page 67: ...er a Indicador del estado de carga de la bater a Selector de sentido de giro Bot n de extracci n de bater a L mpara Porta tiles Switch Enganche para cintur n Almac n de bits OBJ_BUCH 0000000394 001 bo...
Page 68: ...rre Bater a Indicador del estado de carga de la bater a Selector de sentido de giro Bot n de extracci n de bater a L mpara Porta tiles Switch Enganche para cintur n Almac n de bits OBJ_BUCH 0000000394...
Page 69: ...del estado de carga de la bater a Selector de sentido de giro Bot n de extracci n de bater a L mpara Porta tiles Switch ASCD18 1000W34 Fig 4 rea de agarre OBJ_BUCH 0000000394 001 book Page 69 Friday...
Page 70: ...lbs 135 Nm 100 ft lbs 135 Nm 155 ft lbs 210 Nm 214 ft lbs 290 Nm 780 ft lbs 1050 Nm Porta tiles con hex gono interior Porta tiles con cua dradillo externo 1 4 1 4 3 8 1 4 1 2 3 4 Peso seg n EPTA Proc...
Page 71: ...argue completamente la bater a Libere la bater a presionando el bot n de extracci n y s quela hacia delante de la aga rradera No proceda con brusquedad Conecte el cargador al enchufe inserte en ste la...
Page 72: ...ador solamente se indica estando dete nido el motor de la herramienta el ctrica Antes de que el acumulador llegue a descar garse excesivamente el sistema electr nico desconecta el motor de forma autom...
Page 73: ...l tornillo Para montar el almac n de bits coloque ste y el distanciador en el orden y posici n correc tos y sujete ambos con el tornillo Para montar el enganche para cintur n junto con el almac n de b...
Page 74: ...iva evita los accidentes que pudieran presen tarse en caso de una puesta en marcha involuntaria Montaje del til Figura 8 ASCD12 100W4 ASCD12 150W4 ASCD18 200W4 Jale hacia delante el casquillo A contin...
Page 75: ...es Montaje del til Figura 9 ASCD12 150W8 ASCD18 300W2 ASCD18 1000W34 Inserte la llave de vaso hasta el tope en el cua dradillo Fig 9 OBJ_BUCH 0000000394 001 book Page 75 Friday January 10 2020 9 27 A...
Page 76: ...s tiles que FEIN haya previsto y autorizado para el trabajo que vaya a realizar Ajuste del torque Figura 10 ASCD12 150W4 ASCD12 150W8 ASCD18 200W4 ASCD18 300W2 ASCD18 100034W Solamente ajuste el par c...
Page 77: ...caso de sobrecarga se desconecta la herra mienta el ctrica Si la herramienta el ctrica se ha sobrecalen tado ello se se aliza mediante el parpadeo del LED de la agarradera Solamente aplique la herram...
Page 78: ...erca La radiaci n que emite la l mpara puede ser da ina para la vista Al accionar el switch se enciende la l mpara Al soltar el switch la l mpara se mantiene todav a encendida brevemente y se desco ne...
Page 79: ...ati vos para el tiempo de impacto Ajuste recomendado en la llave de impacto ASCD18 1000W34 Si usa un adaptador de reducci n de 3 4 in a 1 2 in solo use la llave de impacto como m ximo hasta la etapa 3...
Page 80: ...laridad desde afuera aire comprimido seco por las rejillas de refrigeraci n para limpiar el interior de la herramienta el ctrica utilice siempre unos lentes de protecci n No intente limpiar las rejill...
Page 81: ...servicios de un experto en mercanc as peligrosas al preparar la pieza para su env o Solo env e bater as cuya carcasa no est da ada y que no pierdan l quido Aseg rese que los contactos de la bater a no...
Page 82: ...el suministro figura 16 ASCD 18 Fig 16 ASCD18 200W4 ASCD18 300W2 Bater a Cargador de bater a Distanciador Enganche para cintur n Almac n de bits Tornillo Bater a OBJ_BUCH 0000000394 001 book Page 82 F...