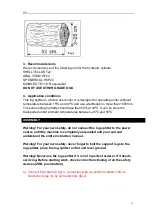
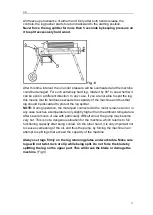
background image

GB 

20 


fig.12 


Periodically check oil level to ensure it is between 2 grooves around the 
dipstick. Upon lower oil level, oil refilling is required. 
Warning: Never mix oil with general waste! 
Used oil must be disposed of according to current regulations in the 
country where the machine is used. 


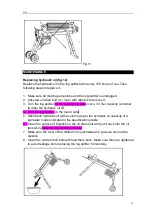
Sharpening the wedge 

After using the log splitter for some time, sharpen the wedge of the log splitter 
using a fine-toothed file and smooth any burrs or crushed area along the cutting 
edge
 

STORAGE 

When you have finish working with your log splitter: 
1. 

Disconnect the log splitter from the mains supply. 

2. 

Tighten

 the oil yank cover / air bleeder, 

3. 

Clean the unit down 

using

 a dry cloth. 

4. 

Store in a dry and well-ventilated area. 


TROUBLESHOOTING 


PROBLEM 

PROBABLE CAUSE 

REMEDY SUGGESTED 

Motor stops 
starting 

Overload protection device 
disengaged to protect the log 
splitter from being damaged 

Let motor cool down, and 
push the button of the 
overload protection device to 
re-start the motor 

Fails to split 

logs 

Log is improperly positioned 

Refer to “Log splitter 
operation” section for perfect 
log loading 

The  sizes  or  hardness  of  the 
log exceeds the capacity of the 
machine 

Reduce  the  log  size  before 
splitting it on the log splitter 

Wedge cutting edge is blunt 

Refer to “Sharpening wedge 
“section to sharpen the 
cutting edge. 

Oil leaks 

Locate leak(s) and contact 
the dealer 

Unauthorized adjustment was 
made on Max. Pressure 
Limiting Screw. Lower max 
pressure rating was set. 

Contact the dealer 

Summary of Contents for FFBE5TS-UK

Page 1: ...GB 1 ORIGINAL INSTRUCTIONS ELECTRIC LOGSPLITTER FFBE5TS UK READ THIS INSTRUCTIONS MANUAL BEFORE USING THE TOOL FEIDER 32 rue Aristide Berg s ZI 31270 Cugnaux France Made in PRC 2019...

Page 2: ...ION Do not operate the log splitter while under the influence of drugs alcohol or any medication that could affect your ability to use it properly AVOID DANGEROUS CONDITIONS Put the log splitter on a...

Page 3: ...rd operating position that the operator has to bring his face close to the machine and thus risks being struck by wood chips or debris EXTENSION CORDS Improper use of extension cords may cause ineffic...

Page 4: ...og pusher Do not attempt to load the log on until the log pusher has stopped Keep hands out of the way of all moving parts PROTECT YOUR HANDS Keep you hands away from splits and cracks which open in t...

Page 5: ...el obstacle Warning Risk of slipping No smoking in the working area The log splitter must be always operated by one person only Never use another people to help you with freeing jammed log 1 The log s...

Page 6: ...nds keeping the cylinder under pressure in the attempt to split excessively hard wood After this time interval the oil under pressure is overheated and the machine could be damaged It is thus better t...

Page 7: ...damage the tool and cause accidents and injuries 29 The splitting operation of the machine is designed to be activated by one person While there is the possibility that additional operators could be w...

Page 8: ...essively long cables or inadequate section can cause voltage drops that prevent motor from developing its full power 2 Only connect your machine and or extension cable to earthed electricity mains Gro...

Page 9: ...ist of loose parts WARNING If any parts are missing do not operate this machine until the missing parts are replaced Failure to do so could result in serious personal injury Do not discard the packing...

Page 10: ...f the logs to be split The figure 1 shows the maximum log sizes that can be split The diameter of the log is indicative a small log can be difficult to split if it has knots or a particularly tough fi...

Page 11: ...er ambient temperatures between 250C and 550C ASSEMBLY Warning For your own safety do not connect the log splitter to the power source until the machine is completely assembled and you read and unders...

Page 12: ...a to front stand 10a 10b with screws then assemble horizontal leg 8 and fix it to front stand 10a 10b by bolts fig 3 fig 3 c Connect back stand 13c to connection pipe c and connect back stand 13d to c...

Page 13: ...d with bolts assemble the wheel shaft 11 and wheels with four spring washers the last fit wheel covers fig 5 fig 5 Remove the accessories as shown in the figure from the carton and check the number of...

Page 14: ...s fig 1 Fig 1 2 Push the three M8 16 screws through the three washer8 and the mounting hole then tighten the screw holes corresponding to the bent legs Push the four M8 16 bolts through the mounting h...

Page 15: ...ine has been assembled OPERATION Warning Before operating the log splitter the Bleed Screw 15 Fig 6 should be loosened by some rotations until air can go in and out of the oil tank smoothly Air flow t...

Page 16: ...instruments Unauthorized resetting will cause the hydraulic pump fail to output enough splitting pressure or RESULT IN SERIOUS INJURY AS WELL AS DAMAGE TO THE MACHINE Fig 7 Make sure that the screws...

Page 17: ...ded to protect the log splitter NOTE During operation the metal part connected to the motor remains cold or in any case reaches a temperature only slightly higher than the ambient temperature After se...

Page 18: ...ng a jammed log fig 10 1 Release both controls 2 After the log pusher moves back and completely stops at its starting position insert a wedge wood under the jammed log 3 Start the log splitter to push...

Page 19: ...tainer to drain the hydraulic oil off 4 Turn the log splitter on the motor side 5 Refill fresh hydraulic oil at the volume as per the hydraulic oil capacity of a particular model indicated in the spec...

Page 20: ...ean the unit down using a dry cloth 4 Store in a dry and well ventilated area TROUBLESHOOTING PROBLEM PROBABLE CAUSE REMEDY SUGGESTED Motor stops starting Overload protection device disengaged to prot...

Page 21: ...ew up before moving the log splitter Oil drain bolt with dipstick is not tight Tighten the oil drain bolt with dipstick Hydraulic control valve assembly and or seal s worn Contact the dealer DISPOSAL...

Page 22: ...ormity with the Directive 2006 42 EC and the regulations transposing it Also in conformity with the following Directives RoHS Directive 2011 65 UE EMC Directive 2014 30 UE Also in conformity with the...

Reviews: